Being able to turn your lights on and off with your voice is one of the best things about having a smart home. If you don’t have an Amazon Echo or Google Home, though—or just prefer keyboard shortcuts—you can use an AutoHotkey script to control your Philips Hue lights from your computer.
For this guide, we’re going to be using AutoHotkey, an amazing little program that lets you write custom automation scripts and even remap keys on your keyboard.
What You’ll Need
We’re going to show you a basic script that you can use to turn a set of lights on and off (which you can customize later). Before we do that, you’ll need a few things.
* A Windows machine with AutoHotkey installed: If you haven’t already, you can download AutoHotkey here. It’s only available for Windows machines, unfortunately. The application will run in the background and interpret the scripts you create (usually in a program like Notepad).
* Your Philips Hue Bridge IP address: You’ll need to enter your Bridge’s IP address into the script in order for it to work. We’ll walk you through how to find this information below.
* A Philips Hue Developer API username: The script we’re using also uses the developer API. In order to make use of it, you’ll need to have an account and know your developer API username. Once again, we’ll show you how to get an account and find your ID below.
* The AutoHotkey script: In the next large section below, we’ll have the script we’re basing this guide off of. Reddit user tarrosion created a template that we’ll be basing ours off of here if you want to dive a little deeper. However, we’ve tweaked this script to simplify it. Copy the script from the section below, paste it in a blank Notepad document, and then save it with a name like hueshortcut.ahk .
If you already know your bridge IP address and API username, then you can skip ahead.
How to Find your Bridge IP Address
Your bridge IP address is relatively simple to find. Head to this link and sign into your Philips Hue account.
Along the top of the page, click Bridge.
Click the “Show more bridge details” button.
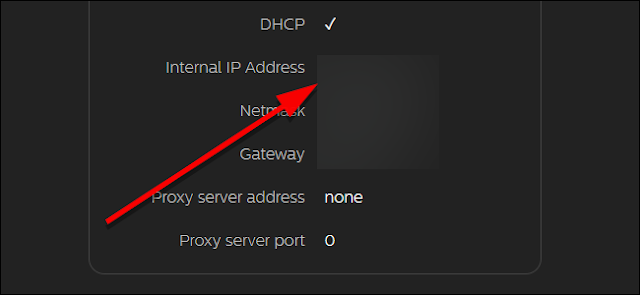
Make a note of your Internal IP Address. You’ll need it later.
Hang on to this for the next section.
How to Get a Hue Developer API Account
If you don’t already have a Hue Developer account, or if you’ve forgotten your API username, you’ll need to get one now. This part is a little more complicated, but if you’re comfortable using a few text commands it should be straightforward. Start by heading here and creating a new developer account with Hue.
You’ll get an email asking you to confirm your account and create a password. Once that’s done, head to the following URL, replacing <bridge ip address> with the IP address you grabbed from the previous section.
http://<bridge ip address>/debug/clip.html
Here, you’ll see a tool that lets you manually send commands to your Hue bridge. If you don’t understand everything on this page, that’s alright. You only need to use this tool to get your API username. To do that, enter /api/ in the URL box. Under Message Body, enter {"devicetype":"my_hue_app#iphone peter"} replacing iphone peter with whatever descriptor you want, preferably one that describes the device you’re using it on.
When you’ve entered all the info, tap the link button on your Hue bridge. This is a security step to make sure that only you or someone inside your home can create applications to control your lights. Once you’ve pressed the link button on your bridge, click POST.
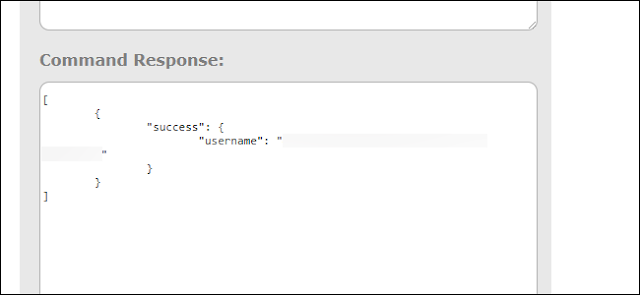
In the Command Response box, you should see a result that looks like the one below (minus the censor blur, naturally). You’ll be given a long, randomized username. Copy this down somewhere and save it. You’ll need it for the script later on.
Now that you have those two pieces of information, you’re ready to set up your script!
How to Set Up the AutoHotkey Script
As I mentioned earlier, for this guide, we’re using a modified version of this script from redditor tarrosion. We’ve tweaked it to add shortcuts so you can turn a group of lights on and off at once instead of every light in your house. Here are the following hotkeys you’ll be able to use with this script:
* Ctrl+Alt+L: Toggle all of your lights on or off.
* Ctrl+Alt+I: Turn all lights off.
* Ctrl+Alt+O: Turn the current group of lights on.
* Ctrl+Alt+I: Turn the current group of lights off.
* Ctrl+Alt+1: Switch to Group 1.
* Ctrl+Alt+2: Switch to Group 2.
* Ctrl+Alt+Up: Increase warmth of current group of lights (requires Color or Ambiance bulbs).
* Ctrl+Alt+Down: Decrease warmth of current group of lights (requires Color or Ambiance bulbs).
* Ctrl+Alt+Left: Increase brightness of current group of lights.
* Ctrl+Alt+Right: Decrease brightness of current group of lights.
You can create or modify as many groups of lights as you need. For this example, I’ve created two groups of two lights each: one for an office and one for the living room. You can change the names of these as you see fit. You also may need to change the values of each group depending on how many lights you have.
First, copy the script below into a Notepad document and save it as something like “huelights.ahk” making sure to replace the .txt extension with .ahk. Without that, Notepad will save it as a .txt file and AutoHotkey won’t be able to run it.
WinHTTP := ComObjCreate("WinHTTP.WinHttpRequest.5.1")
lightsOn := 1
office := [1,2]
livingroom := [3,4]
curgroup := office lightoff(light, ByRef WinHTTP) { WinHTTP.Open("PUT", "http://<your-bridge-IP-address>/api/<your-api-username>/lights/" . light . "/state", 0) bodytext = {"on" : false} WinHTTP.Send(bodytext) return } lighton(light, ByRef WinHTTP) { WinHTTP.Open("PUT", "http://<your-bridge-IP-address>/api/<your-api-username>/lights/" . light . "/state", 0) bodytext = {"on" : true} WinHTTP.Send(bodytext) return } setlightct(light, newct, ByRef WinHTTP) { WinHTTP.Open("PUT", "http://<your-bridge-IP-address>/api/<your-api-username>/lights/" . light . "/state", 0) bodytext = {"ct" : %newct%} WinHTTP.Send(bodytext) } modifylightct(light, amount, ByRef WinHTTP) { WinHTTP.Open("PUT", "http://<your-bridge-IP-address>/api/<your-api-username>/lights/" . light . "/state", 0) bodytext = {"ct_inc" : %amount%, "transitiontime" : 2} WinHTTP.Send(bodytext) } modifylightbrightness(light, amount, ByRef WinHTTP) { WinHTTP.Open("PUT", "http://<your-bridge-IP-address>/api/<your-api-username>/lights/" . light . "/state", 0) bodytext = {"bri_inc" : %amount%, "transitiontime" : 2} WinHTTP.Send(bodytext) } ;ctrl-alt-1: change to group 1 ^!1:: curgroup := office return ;ctrl-alt-2: change to group 2 ^!2:: curgroup := livingroom return ;ctrl-alt-o: turn group lights on ^!o:: for _, light in curgroup lighton(light, WinHTTP) return ;ctrl-alt-i: turn group lights off ^!i:: for _, light in curgroup lightoff(light, WinHTTP) return ;ctrl-alt-l: toggle all lights ^!l:: WinHTTP.Open("PUT", "http://<your-bridge-IP-address>/api/<your-api-username>/groups/0/action", 0) if lightsOn > 0 bodytext = {"on" : false} else bodytext = {"on" : true} WinHTTP.Send(bodytext) lightsOn := 1 - lightsOn return ; ctrl-alt-k : all lights off ^!k:: WinHTTP.Open("PUT", "http://<your-bridge-IP-address>/api/<your-api-username>/groups/0/action", 0) bodytext = {"on" : false} WinHTTP.Send(bodytext) lightsOn := 0 return ;ctrl-alt-Up: increase warmth of current light group ^!Up:: for _, light in curgroup modifylightct(light, 43, WinHTTP) return ;ctrl-alt-Down: decrease warmth of current light group ^!Down:: for _, light in curgroup modifylightct(light, -43, WinHTTP) return ;ctrl-alt-Left: increase brightness of light group ^!Left:: for _, light in curgroup modifylightbrightness(light, -32, WinHTTP) return ;ctrl-alt-Right: decrease brightness of light group ^!Right:: for _, light in curgroup modifylightbrightness(light, 32, WinHTTP) return
Now, you’ll need to make a couple of adjustments. First, in the script, change every instance of <your-bridge-ip-address> to the IP address you got from your bridge earlier. Next, replace <your-api-username> with your Hue API username. There should be seven instances of each in the script above.
Next, you’ll see a section at the top that defines the groups you can control. That section looks like this:
office := [1,2]
livingroom := [3,4]
The first two lines define your groups of lights. Each bulb is assigned a number, though it’s not always obvious what number each of your lights corresponds to. The easiest way to check is to open up your Hue app and tap Settings, then tap Light Setup.
Here, you’ll see a list of all your lights. Count each one down in order to figure out which number your lights are. For example, the two lights in my office are at the top, so they would be 1 and 2. Below that are my living room lights, so those should be 3 and 4. If you’ve removed and added new lights from your setup, these numbers may shift a bit, so test your scripts and use a little trial and error to make sure you’re using the right lights.
Once you’ve found the numbers that correspond to your lights, change them in the two lines above. You can also change the name of each of the groups if you want to. Just make sure to change every instance of that group name in the script. If you want to add a third group (or more), create a new line below the first two using the following format, replacing X, Y with the numbers of the lights you want to add to that group:
roomname := [X, Y]
You’ll also need to add another shortcut to be able to change to the third group. Select the following block of text in the script above and make a copy of it below this text block, changing all the 2s to 3s and change “livingroom” (or whatever name you gave your second group) to the name of the third group:
;ctrl-alt-2: change to group 2
 ^!2::
 curgroup := livingroom
 return
If you’re familiar with AutoHotkey, you can tweak this script even more to add new shortcuts or control your lights in different ways. Check out the AutoHotkey documentation if you need help. You can also check out the Philips Hue API here for more commands you can integrate into your script.


 04:20
04:20
 Unknown


0 comments:
Post a Comment