Showing posts with label Audio. Show all posts

Sunday, 23 July 2017

Why Is the Dialogue So Quiet on My HDTV?

Why Is the Dialogue So Quiet on My HDTV?


We’ve all been there: the characters on screen are talking and it’s way too quiet so you crank up the volume only to be blasted by a loud explosion two seconds later. Why is the dialogue so quiet and what can you do to fix it?

Why Is There Such Variation In Volume?

It’s a situation nearly everyone can relate to. You’re sitting there watching TV and suddenly the characters are talking in hushed tones about something important. You can’t hear what they’re saying very clearly so you turn the volume up until you can. Everything is perfect and you can hear their conversation clearly and then BOOM—a car crash, explosion, or sudden shift in action blows your eardrums out as the volume level skyrockets relative to the quiet conversation to which you were just listening.

Why does it seem like so many TV shows and movies—especially action films—swing so wildly in volume levels? Unfortunately, it’s unlikely you can narrow down a common source of variable volume in different content to a single issue. Many can combine to create an annoying TV viewing experience. Let’s first take a look at of the issues that can cause this volume variability before we jump into what you can do about it.

The Sound Might Have Been Mixed That Way

Audio and speaker configurations are labeled by the number of different channels of audio present in the source. Headphones, regular TV sets, and systems with a pair of speakers (and no subwoofer) are referred to as 2.0 channel audio. The number before the decimal represents the number of full frequency range channels—so, regular front speakers, rear speakers, and so on. The number after the decimal represents the number of specialized, low frequency channels—output to subwoofers.

So, if you add a single subwoofer to 2.0 channel audio, it becomes 2.1 channel audio. Add in rear surround speakers and a center channel front speaker, and it becomes 5.1. Add in two additional side surround speakers and you get 7.1 channel audio. Some systems feature an additional pair of directional surround speakers, resulting in 9.1 channel audio. And if you’re using an advanced system like Dolby Atmos, you might even see an additional decimal point followed by a digit representing the number of in-ceiling or upward-firing speakers—something like 9.1.2.


In a 5.x, 7.x, and 9.x configuration, the sound effects (everything from the big booms to the faint creak of a door in the distance) are pumped through the front and rear L/R channels (depending on where in the “soundspace” the engineers want the sound to appear to the listener).

Why Is the Dialogue So Quiet on My HDTV?

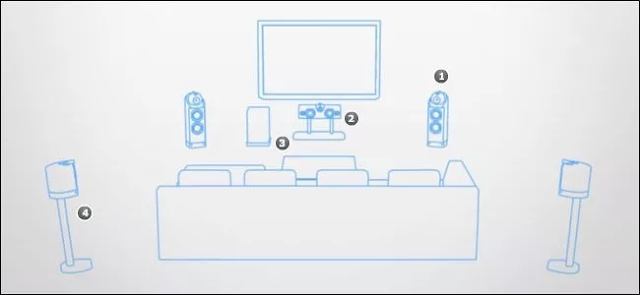
Dialogue is pumped through the center channel, labeled with a (2) in the above diagram. (As a fun aside, you can unplug the wire to your center channel speaker while watching a movie or sporting event and the voices of the actors or announcer will vanish.)

Even if your home media center is set up perfectly and adjusted for balanced surround sound, it’s distinctly possible that you’ll still experience the super loud special effects and explosions and super quiet dialogue simply because it was originally mixed that way. The audio engineers expect you to turn it up to hear the dialogue and then get rocked right out of your seat when that unexpected car bomb goes off. This is called dynamic range, and it’s what makes those films so immersive. (That doesn’t mean you can’t fix it though—keep reading.)

You’ll note that we’ve made a lot of references so far to action movies. The phenomenon is radically more pronounced in action films and practically nonexistent in sources like sitcoms (aside from annoyingly loud commercials). In 2009, for example, audio engineers released a paper highlighting how movies such as The Matrix had a range of 25 units from the loudest to the quietest moments where as sitcoms like Friends had a range of only six units.

Your TV Isn’t Downmixing Correctly

Although we can point the finger at maniacal audio engineers in many cases, sometimes we can blame your television itself. Most people are not watching TV with extensive home surround systems. They’re watching TV with the simple 2.0 channel speakers built into the TV and maybe a 2.0 channel soundbar with a subwoofer added in for good measure to boost it up to 2.1.

Why Is the Dialogue So Quiet on My HDTV?

When you watch media encoded with 5.1 or greater channel audio (which is pretty much any DVD, Bluray, streamed source from Netflix, Amazon Prime Video, etc.) on a 2.x setup, it falls on the TV to perform a task known as “downmixing” to blend the channels together and re-balance sounds so that the 5.1 configuration sounds normal coming from a 2.0 system.

Organizations like Dolby publish ratios that provide the ideal downmixing configuration with proper balance, but that doesn’t mean the people who designed your TV set followed the guidelines, or that your TV even has proper downmixing algorithms in the first place. Many cheaper TV sets just smash the channels together and push them out the speakers with little to no adjustment. That’s a perfect recipe for way-too-loud action and way-too-soft dialogue.

Your Media Center Isn’t Configured Properly

Sometimes you can blame overzealous audio engineers, and sometimes you can blame cost-cutting television engineers. Other times, you have nobody to blame but yourself. If you have a multi-speaker system hooked up to a receiver, it’s on you to set it up correctly. If you’re using the wrong audio settings on your receiver and your channels are unbalanced or the settings intended to help equalize your listening experience are not active, then there’s a good chance you’ll be stuck with the same kind of experience you’d get with the cheap TV and no sound system.

What Can I Do?

Now that we’ve got an idea how the dialogue and the action end up so far apart in volume, let’s look at ways we can remedy the problem. Although we’d love to walk you through the specific steps to fix your exact TV set or audio receiver, that’s a bit beyond the scope of the article. Instead we’re going to highlight common settings and solutions. We recommend you use the terms and concepts here to explore the settings menu on your device, or as a search term paired with the model number of your device to learn more.

Check Your Speaker Configuration

Many devices and services allow you to specify what your audio configuration is so that the device or service can either provide you with the right audio channel track or properly downmix it for you.

Why Is the Dialogue So Quiet on My HDTV?

If your Blu-ray player, for example, thinks that it’s hooked up to a 5.1 channel audio system, then it’s going to put out all 5.1 channels and you’ll be at the mercy of whatever your TV does with that output—maybe your TV will downmix it beautifully, maybe it won’t. If your player has the option to specify that the audio output is 2.0, then the downmix can be handled by the player and not the TV.

In the screenshot above (of a Samsung BD H6500 Blu-ray player), you can see the option labeled “Downmixing Mode” where you can specify how you want the Blu-ray player to downmix the audio channels for your speaker configuration.

In short, you need to pore over the settings of the device and/or service providing the signal to your television (e.g. your receive, Blu-ray player, cable box, TiVo, etc.) and ensure that if there is an option to select the speaker configuration of the receiving device that it matches what your actual speaker configuration is (e.g. if you’re just using your TV then it should be set to “2.0” or “Normal Stereo” or the like).

Enable Dynamic Range Compression

Normally, compressing audio is bad thing if you enjoy a rich and dynamic range. But sometimes, dynamic range has to come second to not waking up your neighbors—so dynamic range compression is a necessary evil.

Labeled as “Dynamic Range Compression”, “Dynamic Range Control”, “DRC”, “Night Mode”—or (much less commonly) as “Dialogue Enhancement”, “Volume Amplification”, “Night Mode”, “Boost Downsample” or the like—this option instructs the device to compress the range of volume in the audio track of the displayed video such that the highest and lowest points are closer together. This makes the booms less boomy and the whispers less hushed.

Why Is the Dialogue So Quiet on My HDTV?

Using the same Samsung Blu-ray player menu, you can see the option above for “Dynamic Range Control”. Typical options are On, Off, and Auto.

You do sacrifice fidelity to the original recording (loud noises meant to startle you during a spooky movie won’t be as loud, for example, nor will tiny noises be as tiny) but it allows you to watch an action movie once the kids are in bed without shaking the walls of the house.

You can find dynamic range options on TV sets, on audio receivers, and within media center software (Like Kodi Media Center or Plex).

Adjust the Center Channel

If have a real multi-channel setup, you likely won’t want to turn on compression or enable stereo output just to fix the volume issue. Instead, you probably can just adjust the center channel volume directly on your receiver. Nearly every surround receiver on the market allows for channel-by-channel adjustments.

Typically, you have to turn off any sort of special audio mode—like “Movie” or “Concert Hall”—and then manually adjust your channels. The instructions for your device should show you how.

One way to approach it is to adjust the general volume up to the level that is comfortable for you in regard to the loud sounds in the movie or TV show (the explosions, the gunfights, etc.) and then individually adjust the center channel upwards until the dialogue is also at a comfortable level.

Another method—known as negative equalization—is to leave the center channel set at its default, zero level, and then to adjust all the other speakers down. You can then turn the volume up to whatever you like. While the overall effect of making the center channel volume louder relative to the other channels is the same, this method can help alleviate the problem of getting too much hiss or other effects when boosting your center channel higher all by itself.

The only downside of this method is that you might find yourself needing to adjust the center volume on a case-by-case basis. If you adjust it up for a particularly annoying action movie, you may find that the center channel—and thus, the voices—are too loud when you watch other types of movies.

Armed with the knowledge of why the dialogue is so quiet and strategies for fixing it, you’ll never have to sit through another startling round of whisper-whisper-car-bomb-BOOM again.

Saturday, 8 July 2017

How to Embed YouTube as an Audio Player

How do you embed the audio portion of any YouTube video into your website? An easy option would be that you convert the YouTube video into an MP3 file and upload it to an audio hosting site like Soundcloud. This will work but YouTube is very likely to have a problem with your approach due to copyright issues.

There’s a simpler approach as well that uses the official YouTube API and requires no file conversion.

How to Embed YouTube as an Audio Player


You can embed any YouTube video in your web pages and visitors on your site will be able to play and pause the video audio with a simple click. With this technique, you can also use a YouTube video as background audio that runs in a loop.

How to Embed YouTube Audio


It takes just one step to embed a YouTube audio. Open any YouTube video and make a note of the YouTube Video ID (a string of 11 characters).

Next copy-paste the code below anywhere on your website and replace VIDEO_ID with actual ID of your YouTube video.

 <div data-video="VIDEO_ID" 
         data-autoplay="0"        
         data-loop="1"            
         id="youtube-audio">
  </div>
  <script src="https://www.youtube.com/iframe_api"></script>
  <script src="https://cdn.rawgit.com/labnol/files/master/yt.js"></script>

There are few other configuration parameters that you can change depending on requirements. For instance, if you set data-autoplay to 1, the audio will begin playing immediately on page load. Likewise, set data-loop to 1 and the audio will play continuously in a never-ending loop until manually stopped.

This internally renders the YouTube video using the IFRAME player and would thus work on both desktop and mobile browsers.

The JavaScript files are hosted on Github while the images are hosted on Imgur. It is recommended that you copy the assets to your own server before deploying on a heavy-traffic website.


YouTube Audio – The Technical Details


We are using the YouTube JavaScript API that renders a regular YouTube player but with the width and height set to 0 pixels. When the user clicks the audio button, it toggles the existing YouTube player state and the video begins to play or pauses.

Here’s the annotated version of the source code. It can be extended to embed YouTube playlists, the default playback volume can be changed or you even embed a part of the video.

YouTube Audio Embed

Source- labnol.org

Saturday, 10 June 2017

How to extract audio from DVD

Good Evening Friends., Today Way2trick is going to discuss about a intresting how to process that how we can extract audio from any DVDSometimes, we will find some sweet music in DVD movies and want to extract the audio from DVD to enjoy it on iPhone, iPod etc. 

How can we do it? I recommend Xilisoft DVD to Audio Converter. It can convert DVD to WMA, AAC, MP3, WAV, M4A, AC3, RA, AU, etc. You can convert any segment, and set output file size/time. This DVD audio converting Guide will show you an easy way to extract audio from DVD with Xilisoft DVD to Audio Converter.

How to extract audio from DVD

Step:-


Step 1: Free download this DVD audio converting software, install and run it. The interface is as follows:

Step 2: Click "OPEN DVD" button to load DVD files.

Step 3: Click "Profile" drop-down list to select an output format.

Note: You can change some parameters such as "Bit Rate", "Sample Rate".

Step 4: Click "Start converting" button to start to extract audio from DVD.

Step 5: After conversion has done, you can click "Open" button to your output audio folder directly.

OK. You successfully complete extract audio from DVD.

How to save YouTube videos | Download YouTube video

Good Evening Friends., Are you searching for a best YouTube video Down-loader? Or a process where you can easily save YouTube video? Today Way2trick tell you that How to Save or download any youtube video.

Step:-

Step-1. Download the FREE Software Download YouTube Video now, install and follow the steps to complete the task.


Step-2. Browse YouTube videos and select by yourself
Visit www.youtube.com , browse YouTube videos and select.

Step-3. Create a new YouTube video downloading task, Click "New Download" button on the toolbar to open the "New Download" dialog, and copy the URL of the YouTube video you want, then paste it into the "URL" textbox.

How to save YouTube videos | Download YouTube video


Tips 1: You can also drag and drop the video URL directly to the main window or to Drop Zone to create a new task.Tips 2: Right click the YouTube video thumbnail or URL, and select "Download with Xilisoft Download YouTube Video" option from the right-click menu, then the "New Download" dialog appears, and the video URL is automatically added into the "URL" textbox.

Step-4 Adjust the task settings according to your needs
Adjust the Destination and Start Task options in the "New Download" dialog above.

Step-5 Start the YouTube video downloading task. Click "OK" button to close the "New Download" dialog, then click "Start" button on the toolbar to start the task. If you set the "Start Type" option as "Start Now", then the selected video will be promptly downloaded and converted to the format you choose and saved to the folder you set in the Step 3.


How to make iPhone Text Tones

Assigning a different Text Tones to each person in your address book is a great way to know who’s calling even before you look at your iPhone’s screen. You may want to know how to make SMS ringtones from your favorite audio or video files. This article will show you how to make ringtones with Xilisoft iPhone Ringtone Maker.

Firstly, Download, install and launch the software.

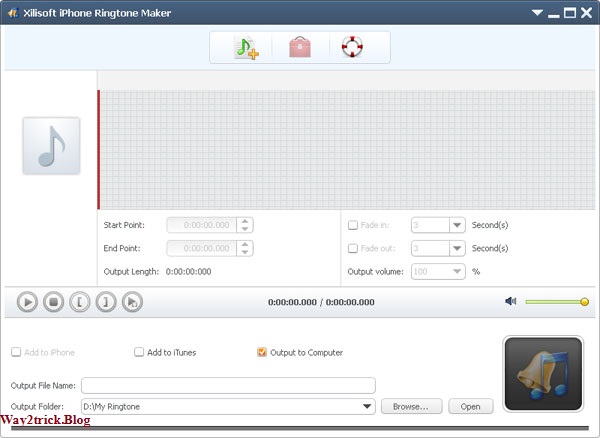
Step 1. Load a video/audio file

Click the "Select file" button on the toolbar to select the file you want to create ringtone in the dialog that pops up, then click "Open" button. You can see the audio waveform in the grid area.

How to make iPhone Text Tones


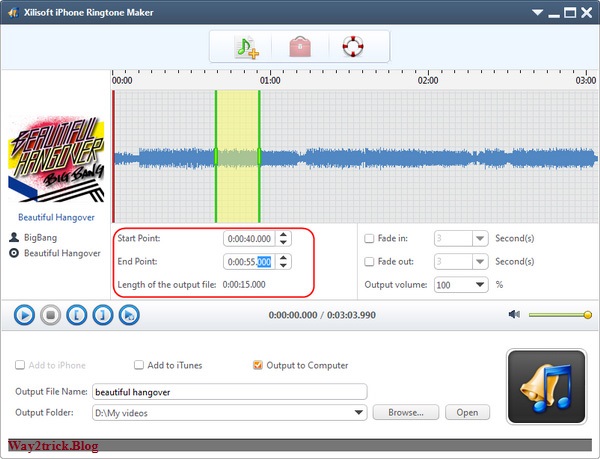
Step 2. Extract a clip

Click "Play" button to listen the music and find the part you want. Drag and drop the start & end line to get a music clip, or click "Set the current time as the start point" and " Set the current time as the end point " buttons to extract a clip, or type the start & end time directly in the corresponding text boxes. It is noteworthy that the clip should be less than 30s.

How to make iPhone Text Tones


Step 3. Adjust the output settings

Enter the name in the "Output File Name" textbox or keep the original name, and click "Browse" button on the right side of the "Output Folder" to choose a folder for saving the outputted ringtones.

Tip: After making ringtone, you can click "Open" button to view the ringtone directly.

Step 4. Adjust the file transfer settings

If you want, check "Add to iTunes" and "Add to iPhone" options to let the program upload the ringtone to iTunes and your iPhone directly after conversion.

How to make iPhone Text Tones


Step 5. Start making ringtone

After all above are finished, click "Start Converting" button to start to make your own iPhone ringtone. You can check the converting process from the progress bar at the bottom. Just in a few minutes, you make your own iPhone SMS ringtone from the loved music.

How to make iPhone Text Tones

How to cut videos easily and quickly in a short time period

Good Evening Friends.,  Do you want to save the exciting segments from your favourite movies? Are you confused about cut videos from movies? Here is the key! It’s so easy to cut videos from movies with Video Converter.

Xilisoft Video Converter is making video editing simple for everyone to create and share amazing movies. With one-click video-cutting software, friendly interface and fast processing capabilities, you can cut any video clips and turn them into polished movies in just minutes.

Download Video Converter (for free) and start the tutorial!

Step 1: Install and run the software

After installation, run the software. You can see the main interface as below.

How to cut videos easily and quickly in a short time period


Step 2: Add File

Click “Add File(s)” button on the toolbar or select “File> Add File(s)” on the main menu to load files.

Step 3: Cut videos

At first, choose the video file you want to clip. Then click " Clip" button on the toolbar to enter "Clip" window. Set the start & end point to get the partial segment and repeat the action to get several segments at will. After clipping, check the "Output segments as a whole one" option and merge the segments in the list into one file. And then click "Move Up" or "Move Down" button to specify the sequence of these segments.

Tip:-


  • Another easy method: Set start time and length manually
  • First of all, please preview the video on the right bottom corner preview window and find your favorite part. Then please click the "Advanced Profile Settings" button on the top right panel and set the "Start Time " and "length",after that click "Enter" on your keyboard. The original video file will become your favorite part quickly.

How to add subtitles to a movie for iPad

You may want to know how to “hard-encode” subtitles into .mp4 and .m4v video files so you can watch them on your iPhone or iPad.

Today Way2trick will show you a pretty quick and simple method. Xilisoft Video Converter Ultimate can help you embed subtitles to videos in a foreign language or with poor sound. You can easily add subtitle stream to videos and convert them to MP4 format for iPhone or iPad with this program. Then you can turn on or off the subtitle anytime as you like. Here is the process to How to add subtitles to a movie for iPad with step by step picture.

Step:-


Firstly, download Xilisoft Video Converter Ultimate and then install and run it.

Step 1. Add File

Click “Add File(s)” button on the toolbar or select “File> Add File(s)” on the main menu to load files.

How to add subtitles to a movie for iPad


Step 2. Add and adjust subtitle to video

Firstly, choose the video you want to edit, and then click "Effects" button on the toolbar to enter "Effects" window. In "Subtitle" tab, click "Add Subtitles" button to load the desired subtitles into the list. Then select a subtitle from the list and adjust its transparency, vertical position, font, color, size, style and line spacing at will.

How to add subtitles to a movie for iPad


Step 3. Select output format or device

Select the files need to be converted and click “Profile” button to select the output format in the drop-down list. Then click “Browse” button to specify destination folder for saving output files, or click “Output to devices” button to output the video to your iPhone/iPad/PSP.

How to add subtitles to a movie for iPad


Step 4. Convert

After selected output profile, you only need to check the files you want to convert in the file list and click “Convert Checked Item” button on the toolbar to complete the task.

How to add subtitles to a movie for iPad


Just a few minutes, the original video will be converted to MP4 video with subtitle stream. When you play the video on your iPhone, you will be able to select On or OFF for subtitle.

Friday, 19 May 2017

Useful FFmpeg Commands


USEFUL FFMPEG COMMANDS

FFmpeg supports all popular audio and video formats. Or you can running the command ./ffmpeg -formats to get a list of every format that is supported by your FFmpeg installation. If you are just getting started, here are some commands that will give you good idea of the capabilities of this tool.


1. CUT VIDEO FILE INTO A SMALLER CLIP

You can use the time offset parameter (-ss) to specify the start time stamp in HH:MM:SS.ms format while the -t parameter is for specifying the actual duration of the clip in seconds.

ffmpeg -i input.mp4 -ss 00:00:50.0 -codec copy -t 20 output.mp4

2. SPLIT A VIDEO INTO MULTIPLE PARTS

If you want to split a large video into multiple smaller clips without re-encoding, ffmpeg can help. This command will split the source video into 2 parts – one ending at 50s from the start and the other beginning at 50s and ending at the end of the input video.

ffmpeg -i video.mp4 -t 00:00:50 -c copy small-1.mp4 -ss 00:00:50 -codec copy small-2.mp4

3. CONVERT VIDEO FROM ONE FORMAT TO ANOTHER

You can use the -vcodec parameter to specify the encoding format to be used for the output video. Encoding a video takes time but you can speed up the process by forcing a preset though it would degrade the quality of the output video.

ffmpeg -i youtube.flv -c:v libx264 filename.mp4
ffmpeg -i video.wmv -c:v libx264 -preset ultrafast video.mp4

4. JOIN (CONCATENATE) VIDEO FILES

If you have multiple audio or video files encoded with the same codecs, you can join them into a single file using FFmpeg. Create a input file with a list of all source files that you wish to concatenate and then run this command.

ffmpeg -f concat -i file-list.txt -c copy output.mp4
5. MUTE A VIDEO (REMOVE THE AUDIO COMPONENT)

Use the -an parameter to disable the audio portion of a video stream.

ffmpeg -i video.mp4 -an mute-video.mp4
6. EXTRACT THE AUDIO FROM VIDEO

The -vn switch extracts the audio portion from a video and we are using the -ab switch to save the audio as a 256kbps MP3 audio file.

ffmpeg -i video.mp4 -vn -ab 256 audio.mp3
7. CONVERT A VIDEO INTO ANIMATED GIF

FFmpeg is an excellent tool for converting videos into animated GIFs and the quality isn’t bad either. Use the scale filter to specify the width of the GIF, the -t parameter specific the duration while -r specifies the frame rate (fps).

ffmpeg -i video.mp4 -vf scale=500:-1 -t 10 -r 10 image.gif
8. EXTRACT IMAGE FRAMES FROM A VIDEO

This command will extract the video frame at the 15s mark and saves it as a 800px wide JPEG image. You can also use the -s switch (like -s 400×300) to specify the exact dimensions of the image file though it will probably create a stretched image if the image size doesn’t follow the aspect ratio of the original video file.

ffmpeg -ss 00:00:15 -i video.mp4 -vf scale=800:-1 -vframes 1 image.jpg
9. CONVERT VIDEO INTO IMAGES

You can use FFmpeg to automatically extract image frames from a video every ‘n’ seconds and the images are saved in a sequence. This command saves image frame after every 4 seconds.

ffmpeg -i movie.mp4 -r 0.25 frames_%04d.png
10. MERGE AN AUDIO AND VIDEO FILE

You can also specify the -shortest switch to finish the encoding when the shortest clip ends.

ffmpeg -i video.mp4 -i audio.mp3 -c:v copy -c:a aac -strict experimental output.mp4
ffmpeg -i video.mp4 -i audio.mp3 -c:v copy -c:a aac -strict experimental -shortest output.mp4
11. RESIZE A VIDEO

Use the size (-s) switch with ffmpeg to resize a video while maintaining the aspect ratio.

ffmpeg -i input.mp4 -s 480x320 -c:a copy output.mp4

12. CREATE VIDEO SLIDESHOW FROM IMAGES

This command creates a video slideshow using a series of images that are named as img001.png, img002.png, etc. Each image will have a duration of 5 seconds (-r 1/5).

ffmpeg -r 1/5 -i img%03d.png -c:v libx264 -r 30 -pix_fmt yuv420p slideshow.mp4

13. ADD A POSTER IMAGE TO AUDIO

You can add a cover image to an audio file and the length of the output video will be the same as that of the input audio stream. This may come handy for uploading MP3s to YouTube.

ffmpeg -loop 1 -i image.jpg -i audio.mp3 -c:v libx264 -c:a aac -strict experimental -b:a 192k -shortest output.mp4

14. CONVERT A SINGLE IMAGE INTO A VIDEO

Use the -t parameter to specify the duration of the video.

ffmpeg -loop 1 -i image.png -c:v libx264 -t 30 -pix_fmt yuv420p video.mp4

15. ADD SUBTITLES TO A MOVIE

This will take the subtitles from the .srt file. FFmpeg can decode most common subtitle formats.

ffmpeg -i movie.mp4 -i subtitles.srt -map 0 -map 1 -c copy -c:v libx264 -crf 23 -preset veryfast output.mkv

16. CROP AN AUDIO FILE

This will create a 30 second audio file starting at 90 seconds from the original audio file without transcoding.

ffmpeg -ss 00:01:30 -t 30 -acodec copy -i inputfile.mp3 outputfile.mp3

17. CHANGE THE AUDIO VOLUME

You can use the volume filter to alter the volume of a media file using FFmpeg. This command will half the volume of the audio file.

ffmpeg -i input.wav -af 'volume=0.5' output.wav

18. ROTATE A VIDEO

This command will rotate a video clip 90° clockwise. You can set transpose to 2 to rotate the video 90° anti-clockwise.

ffmpeg -i input.mp4 -filter:v 'transpose=1' rotated-video.mp4
This will rotate the video 180° counter-clockwise.

ffmpeg -i input.mp4 -filter:v 'transpose=2,transpose=2' rotated-video.mp4
19. SPEED UP OR SLOW DOWN THE VIDEO

You can change the speed of your video using the setpts (set presentation time stamp) filter of FFmpeg. This command will make the video 8x (1/8) faster or use setpts=4*PTS to make the video 4x slower.

ffmpeg -i input.mp4 -filter:v "setpts=0.125*PTS" output.mp4
20. SPEED UP OR SLOW DOWN THE AUDIO

For changing the speed of audio, use the atempo audio filter. This command will double the speed of audio. You can use any value between 0.5 and 2.0 for audio.

ffmpeg -i input.mkv -filter:a "atempo=2.0" -vn output.mkv

Related Posts Plugin for WordPress, Blogger...

Labels

404 AdBlock Add-on Airtel GPRS Trick Airtel SMS Trick Alexa Amazon Amazon Kindle Amazon Prime Android Android 8 Android Oreo antivirus Apple Apple Mac ASCII Audacity Audio Authotkey Backup Balance Transfer in Vodafone Battery Bing Blogger Blogging Bookmarklet Browser Camera Chromebook clock Cloud colors command lines Computer Computer Tricks configuration Contact Creative Commons Credit Card CSS devolop DIY Doodle DOS Download Dropbox E-Mail eBook Email Email Attachment Embed Encryption English Error Evernote Eyes Facebook Facebook Tricks Feedburner Flipkart Font Foursquare Free Internet Free sms trick in Vodafone G Mail Gadget Game Getty Images GIF Gists Github Google Google AdSense Google Analytics Google Apps Google Chrome Google Contacts Google Currents Google DNS Google Docs Google Drive Google Earth Google Font Google Forms Google Images Google Map Google Photos Google Play Store Google Plus Google Print Google Reader Google Script Google Sheets Google Spreadsheet Google Translate GPRS Setting GPS Hacking Health App HelloFax Hindi Hoodie HTML Icons idea Image Editing Images IMEI Indian Railways Infographics Instagram Internet Internet Explorer Internet Tricks iOS iPad iPhone IRCTC iTunes iTV JavaScript JioCinema JioTV Junglee Kindle Language Translation Laptop Laptop. TV Life Time FREE GPRS Life-Style Link Linkedln Linux logo Make Money Online Microdoft Powerpoint Microdoft Word Microsoft Office Microsoft Outlook Mobile Mosaic Music Name Networking nexus Notepad OCR Online Shopping Open DNS OS Outlook Password PDF Petya Phillips Hue Lights Photogtraphy Pixel Play Station Podcasts Pokemon Pokemon Go Polls Print Productivity Proxy Server Pushbullet QR Code Ransomware Reddit Reliance Hack GPRS Reliance Jio RGB Ringtone Router RSS Safe Mode Samsung Galaxy S Scrabble Screen Capture Screen Sharing Screencast Secrets Security Send free sms from PC SEO Sierra Skype Slideshare SMBv1 SMS Snapchat Snapdeal Social Media Solution Sound Device Speech Recognition Sql Steam Sync Synology NAS Tata Docomo GPRS trick Teleprompter Torrent Trick Tricks TV Twitter UltraISO Unicode Unknown Extension Unlimited 2GB Unlimited 3GB Unlimited GPRS USB USB Security Key Video Editing virtual desktop Virus attack VLC Vodafone 110% working trick for GPRS Vodafone 3g Vodafone GPRS VPN wallpapers WannaCry Web Design Web Domain Website Wget Whatsapp WiFi Wikipedia Windows Windows 10 Windows 10 S Windows KN Windows Tricks windows updates Winows N Wolfarm Alpha WordPress XBox YouTube Zip
Twitter Delicious Facebook Digg Stumbleupon Favorites More