Showing posts with label Google. Show all posts

Monday, 13 November 2017

How to Receive Push Notifications for Google Forms on your Mobile Phone

The Form Notifications add-on sends the Google Forms data in an email message each time a respondent submits then form. It can also send automated emails to the form respondents immediately after they complete your Google Form.


The notifications add-on for Google Forms add-on has been updated and it can now send push notifications to your mobile phones as well. That means when respondents complete and submit your online Google Form, you’ll get an instant real-time notification (sample) on your iPhone or Android phone. The notification text can also include answers from the Google Form.

A fast response time is a key to success, especially in areas like customer service and closing sales leads, and mobile notifications will ensure that your important form entries are never lost in the daily deluge of emails.

SETUP MOBILE NOTIFICATIONS FOR GOOGLE FORMS


It takes a few easy steps to get up and running.

1.) Install the Email Notifications for Google Forms from the Google store.

2.) Install the IFTTT mobile app on your Android or iPhone.

3.) Now we need to create a connection between our Google Form and the IFTTT app so that mobile notifications are triggered on the mobile phone immediately after the form is submitted.

1. CONFIGURE IFTTT


Open ifttt.com on your desktop and create a new applet. Choose the Maker Webhooks service for if-this condition and set the Event name as the name of your Google Form. For if-this-then-that action, choose Notifications as the service and set the text as {{Value 1}}. Click Finish to make your IFTTT applet live.

Also Check:-


2. CONFIGURE GOOGLE FORMS


Open any Google Form, go to the Addons menu, choose Email Notifications and then select Mobile Notifications. Enter the Event name, the IFTTT key and the notification text. You can put any {{form field name}} in the text and these will be replaced with actual values filled by the user.

That’s it. Click the Test button to test the connection between the form and your mobile phone. If it works, click Save to enable mobile notifications.

How to Receive Notifications for Google Forms on Your Mobile Phone


If you have multiple Google Forms, you need to create separate IFTTT applets for each form and the event name should be unique for each applet.

Internally, when someone submits your form, the Google Addon triggers and sends a web request to the IFTTT service which in turn pushes the notification to your mobile device.

TROUBLESHOOTING MOBILE NOTIFICATIONS


  • Ensure that your mobile is connected to the Internet.
  • The event name in the applet should match the event name in the form configuration.
  • You are logged into the IFTTT app on your mobile phone.
  • Check the activity log to ensure that notifications are getting sent.

Thanks for landing on this post, If you like my post then give your opinion and feedback in comment box.


TAGS:- #How to Receive Push Notifications for Google Forms on your Mobile Phone, #How to Receive Push Notifications for Google Forms on Mobile, #Receive Push Notifications for Google Forms on your Mobile Phone, #Mobile Notifications for Google Forms, #How to Receive Notifications for Google Forms on Your Mobile Phone, Email Notifications for Google Forms on Mobile, #Push notification to mobile when Google form is submitted, #ifttt google spreadsheet, #google forms email notification for forms, #google add on email notifications for forms, #google forms conditional notifications, #google form email recipients, #the google forms add on needs to be restarted to send email notifications, #email notification addon

How to do Reverse Image Search on your Phone or Tablet

Google Reverse Image Search helps you quickly discover visually similar images from around the web. Upload a photograph from your desktop to Google Images and it will show you related images used on other websites and also different sizes of the same photo almost instantly.


Journalists can use the reverse search option to find the original source of an image or to know the approximate date when a picture was first published on the Internet. Photographers can use ‘search by image’ feature to know about other websites that are using their photographs.

REVERSE IMAGE SEARCH ON MOBILE DEVICES


Google’s ‘search by image’ feature is only available for desktop computers and not on mobile devices and tablets. Thus, if a friend has sent you an image on WhatsApp or Facebook that you’d like to verify, you’ll have to first transfer the photograph to a desktop and then perform a reverse search. Too much work, right?

 CLICK HERE
Not anymore. Meet Reverse Photos, an online tool that lets you perform reverse image searches on mobile phones. Go to reverse.photos on your mobile phone, click the “Upload Image” button and choose an image from the photo gallery of your phone. Next click “Show Matching Images” and it will feed your photo into Google’s image database and show visually similar photos.

Also Check:- 

How to do Reverse Image Search on your Phone or Tablet

You can either upload pics available your Photo Library, or you can take a new picture with your phone’s camera, or upload existing images from your cloud storage services like iCloud, Google Drive, Dropbox or OneDrive. All inside the comfort of your mobile phone or tabletThere’s another workaround as well that will let you use the official Google Image Search website for reverse search on a mobile device. Open the Chrome browser on Android and under settings, choose “Request Desktop Site.” Now open images.google.com and you should see the Camera icon to upload an image for searching.

Thanks for landing on this post, If you like my post then give your opinion and feedback in comment box.


TAGS:- #How to do Reverse Image Search on your Mobile Phone, #Reverse Image Search on your Mobile Phone, #How to Reverse Image Search on your Mobile Phone, #How to do Reverse Image Search on your Mobile, #Reverse Image Search on Mobile, #How Reverse Image Search, #Reverse image search using your phone or tablet, #How to Use Google's Reverse Image Search on Your Android Device, #How to Reverse Image Search on Google, #Use Google reverse image search on your phone, #How To Do Reverse Image Search On Your Mobile Phone, #How to Perform an Image Search or a Reverse Image Search in Mobile

Wednesday, 8 November 2017

How to Purchase a Google Domains


Google Domains, if you are new, is a domain registration service where you can buy new domain names or transfer your existing domains from another registrar into the Google service. There’s no official announcement yet but Google Domains are now available in India without you having to use any hacks or proxy servers.

I own about a dozen-odd domains and they have been mostly purchased through Gandi, GoDaddy, Dreamhost, and BigRock. Last week, I purchased a new domain reverse.photos through Google Domains and, like most other Google products, loved the overall experience.

Everything is tied to your main Google account so there’s one less set of credentials to remember and the account is already secured with 2-factor authentication.

Google Domain includes intelligent and powerful search that will not only suggest domain names based on exact keyword matches but related words too. So a search for “blue widgets” will check the availability of “blue widgets” as well as “color widgets”, “white widgets” and “blueplugins”.
How to Purchase a Google Domains
Google Domains aren’t cheap. The average 1-year domain registration fee is certainly higher than what other companies offer but a big advantage is that they do not charge you extra money for making your postal address and phone number private in the public WHOIS database.

There’s no transfer fee if you decide to move your web domain from another registrar to Google Domains but, as per ICANN rules, you’ll have to extend the registration period of your domain for an additional year. This additional year is added to your domain’s existing registration.

The most convenient feature, however, is shared domain management. Just like you can allow external users to access your shared Google Doc, you can add collaborators to domains registered through Google Domains and they can manage the domain on your behalf. You’ll continue to remain the owner of the domain but others can manage the DNS settings or renew the domain on your behalf.

How to Purchase a Google Domains

Google Domains offer a simplified, hassle-free interface for managing domains, includes privacy by default, the pricing is straight-forward and the domain be easily integrated with G Suite (Google Apps) for email. It might be worth considering when you are out to buy a domain for your next million dollar idea.

Thanks for landing on this post, If you like my post then give your opinion and feedback in comment box.

Thursday, 28 September 2017

Find the Creation Date of your Google Account


If your Google account ever gets hacked or if you are unable to get into your Gmail account because you no longer have access to your mobile phone number or alternate email address, Google will require you to answer a few security questions before restoring your account.

These questions include:

1. What was the last password you used to sign-in to your Google Account?

2. When was the last time you were able to sign in to your Google Account?

3.When did you create your Google Account?

All these questions are required and if you are not sure about the exact dates, Google says that you can provide your “best estimate.”

It is therefore recommended that you make a note of Google account creation date at a safe place but where you do get this information from? One option is that you open your Gmail mailbox, switch to All messages and note the timestamp of the welcome message from Gmail.

Find the Creation Date of your Google Account


WHEN DID I CREATE THE GOOGLE ACCOUNT?

In case you have deleted that email message, here is how you can easily find out the date when you first created you Google / Gmail account.

1. Go to google.com/takeout, sign-in with your existing Google Account and click the Create an Archive button.

2. On the next page, click the Edit link against the Google+ circle option and then click the link that says “Transfer your Google+ connections to another account”

3. Google will once again require your account password. Sign-in and on the next screen you’ll see your Google Account creation as shown in the above screenshot.

This is one important piece of information that will be required for recovering your lost Gmail account.

Find the Creation Date of your Google Account

Thanks for landing on this post, If you like my post "Find the Creation Date of your Google Account" then give your opinion and feedback in comment box.


TAGS:- #How to know my gmail account creation date, #How to know gmail account creation date, #How to check my gmail account creation date, #How to find gmail account creation date, #check the gmail account creation date, #gmail account creation date, #How to know gmail account creation date in a easy way, #How to Find the Creation Date of your Google Account, #How can I find out the date my Gmail account was created?, #How do you find out the date your Gmail account was created, #how to find own gmail account creation date, #how to find out when someone's gmail account was created, #how to know others gmail account creation date, #gmail account creation date finder, #gmail account creation date hack, #email ID creation date lookup, #how to find gmail account creation date without password, #gmail creation date finder

Monday, 28 August 2017

How to know my gmail account creation date

Hello Friends. If your Google account ever gets hacked or if you are unable to get into your Gmail account because you are no longer have access to your mobile phone number or alternate email address, Google will require you to answer a few security questions before restoring your account.
Today we learn that "How to know my gmail account creation date"

How to know my gmail account creation date

It is therefore recommended that you make a note of Google account creation date at a safe place but where you do get this information from? One option is that you open your Gmail mailbox, switch to All messages and note the timestamp of the welcome message from Gmail. By this simple method you can wasily know that the creation date of your Gmail ID.

How to know my gmail account creation date


Steps:-

1.) Open Gmail.com
2.) LOG IN to your Gmail account.
3.) Clicks on setting.
4.) Click on Forwarding and POP/IMAP

Check the
1. Status: POP is enabled for all mail that has arrived since #/#/10


Thanks for landing on this post, If you like my post "How to know my gmail account creation date" then give your opinion and feedback in comment box.


TAGS:- #How to know my gmail account creation date, #How to know gmail account creation date, #How to check my gmail account creation date, #How to find gmail account creation date, #check the gmail account creation date, #gmail account creation date, #How to know gmail account creation date in a easy way, #How to Find the Creation Date of your Google Account, #How can I find out the date my Gmail account was created?, #How do you find out the date your Gmail account was created, #how to find own gmail account creation date, #how to find out when someone's gmail account was created, #how to know others gmail account creation date, #gmail account creation date finder, #gmail account creation date hack, #email ID creation date lookup, #how to find gmail account creation date without password, #gmail creation date finder

Wednesday, 16 August 2017

10 Things You May Not Know You Can Do With Google Photos


Google Photos may seem like a simple image hosting service, but it’s actually quite powerful. Google Photos bridges the gap between cloud storage, image hosting, and image sharing services, giving stiff competition to Flickr, iCloud, Dropbox, and OneDrive.

You probably know that Google Photos can back up photos from your Android or iOS device, and that you can access it from the web to view your library. You probably even know that Google Photos provides free unlimited storage when you opt for their “high quality” setting (which means photos up to an ample 16-megapixel limit and HD videos up to 1080p). Any higher than that, and it’ll count toward your Google Drive storage. Though most of the features and services bundled with this application have been discussed for a while, here are some beyond-the-basics tricks you may not have known about.

Search for People, Places, and Objects

Google Photos will automatically arrange your uploaded pictures by location and by date taken. Using advanced image recognition and Google’s large database of information, it can recognize the subject of your photos quite easily. Search your photos for anything: a wedding you attended last month, pictures you took during holidays, pictures of your pets, food, and much more. At the bottom right, touch the search icon and from the box, type what you want to find–like food, cars, or your pet and touch “Enter” or “Search.”

Things You May Not Have Known Google Photos Can Do

The Google Photos app uses some complex image processing techniques to group photos together. The auto-grouped photos are shown in the main search interface. The categories you’ll see here depends upon what you take pictures of. These groups could be the places you visit, people you know, or objects such as food, cars, bikes, and more. At the top, you’ll see several Faces that Photos app has spotted in your uploaded pics.

Group Similar Faces Together and Label Them

Google Photos creates models of the faces in your photos in order to group similar faces together. That way, you can search your photo library for photos of certain people (like “Mom” or “Jenny”). Face groups and labels are private to your account, and won’t appear to anyone you share the photos with. To create a label for a face group, tap “Who is this?” located at the top of a face group. Enter a name or nickname (or choose from the suggestions). After you label a face group, you can search with that label using the search box.

Things You May Not Have Known Google Photos Can Do

If you wish to change or remove the label name, then tap the “Options” menu and choose “Edit or Remove name label.”

If there’s more than one face group for the same person, you can merge them. Label one of the face groups with a name, then label the other face group with the same name. When you confirm the second name, Google Photos will ask you if you want to merge the face groups. Face grouping is on by default, but you can stop grouping similar faces together in “Settings.” At the top left, tap or click the hamburger menu. Next to “Group similar faces,” turn the switch off. When you turn off this setting, it will delete all the face groups in your account, the face models you created for those groups, and any labels you created.

Delete Photos After Uploading Them

If you’re going to upload your photos to the cloud, why keep them on your phone? Google Photos can automatically remove images and videos from your phone once it uploads them, eliminating redundant copies of the photo. Previously, this feature was activated only if you’ve set the app to back up “Full original resolution” images, which costs you storage on Google Drive. But now it’s available “High quality (free unlimited storage)” too. Google Photos’ “Assistant” feature will prompt you to delete images from your phone when the storage space gets low. If you accept the prompt, it will give information on how much space you can free up if you delete images and videos on the device.

Things You May Not Have Known Google Photos Can Do

If back up and sync is always turned on, then you can manually delete local copies of your photos and videos too. At the top left, touch the hamburger menu and choose “Settings.” Touch “Free up device storage” to remove original photos and videos from your device that are already backed up.

Back Up Photos From Other Apps

Google Photos’ auto-backup is handy, but by default, it only backs up photos taken with the default Camera app. If you want to also back up photos you took in Instagram, WhatsApp, Viber, and other similar Android apps, you can do so. You just need to know where those apps store the photos they take.

Open the Google Photos app on your Android phone, and tap on the hamburger menu icon in the top left corner. Select “Device Folders” from the menu that appears. You’ll notice different folders holding images from various apps like Facebook, Instagram, messaging apps, and Screenshots. Chose which folders to include or exclude from the backup process. If you don’t want to clutter your Google Photos storage with screenshots, for example, you can leave that folder turned off. And if you want all those cute filtered Instagram images, tap the cloud icon and it’ll scan that folder in the future.

Things You May Not Have Known Google Photos Can Do

Alternatively, go to “Settings > Back up and sync,” touch “Choose folders to back up…” and select the folders you want to back up. Note that this setting is available only on Android devices.

Pinch to Change View

You probably know you can pinch to zoom in and out of a picture, but there’s more to it with Google Photos. By default, the app shows your images in a daily view with thumbnails arranged chronologically, but there are a number of other options such as monthly view and “comfortable” view, which makes the photos full-width on the screen. You can move between the views simply by pinching in or out on your device’s screen. You can even pinch in on an image in a view to open it in as an individual image, and pinch out on a full-screen image to go back to the image list. Swiping up or down on the full screen image will have the same effect.

Things You May Not Have Known Google Photos Can Do


Select Multiple Photos With a Single Tap

Imagine having to select a hundred photos from your gallery and tapping on your screen a hundred times. Talk about tedious! Thankfully, Google Photos allows you to select multiple photos at a time. While viewing images in the Google Photos app, long-press on any photo to start selecting the photos. Then without lifting your finger, drag upward, downward, or sideways. This process will allow you to quickly select a series of photos without having to lift your finger. On the web, you can do the same thing by holding down the Shift key.

Undelete Photos

Let’s say you got a little trigger happy with the above gestures and accidentally deleted the wrong photos. Or perhaps you just changed your mind after hitting the Delete button. Google Photos will hold on to those images for at least 60 days in the trash. All you have to do is navigate to the trash folder, touch and hold the photo you want to undelete, and tap the restore arrow in the top right-hand corner. You can also delete those images permanently from the trash: just mark those images you want to get rid of and select the delete icon again.

Note: If you delete a photo or video and it appears to come back (without restoring it), try using your device’s Gallery app to delete it. The photo or video you tried to delete might be on a removable memory card in your device.
Things You May Not Have Known Google Photos Can Do

Upload Faster with the Desktop Client

Google Photos automatically uploads photos from your phone, but it also has desktop uploaders for Windows and Mac OS X. You can also drag-and-drop folders from your desktop to photos.google.com, and they’ll be uploaded instantly. This is useful if you’re uploading a large number of photos, and want a faster upload speed than your cellular carrier offers. The desktop uploaders can also automatically upload photos from digital cameras and SD cards when you plug them in, which is great if you take photos on something other than your phone.

Show Photos on a TV with a Chromecast

If you have a Chromecast, then you can display your photos and videos on a big screen. Install the Chromecast app for Android or iOS and make sure that your devices are on the same Wi-Fi network as your Chromecast. At the top right, touch the “cast icon,” and select your Chromecast. Open a photo or video on your device, and click the “cast icon” to display it on your TV. Swipe the photos, and you’ll see the change happening on your TV as well. If you’re on a PC or Mac, you can cast photos and videos from the Chrome browser to your TV, too. Just install Google Cast extension and follow the on-screen instructions.

Things You May Not Have Known Google Photos Can Do

Download All Your Photos at Once

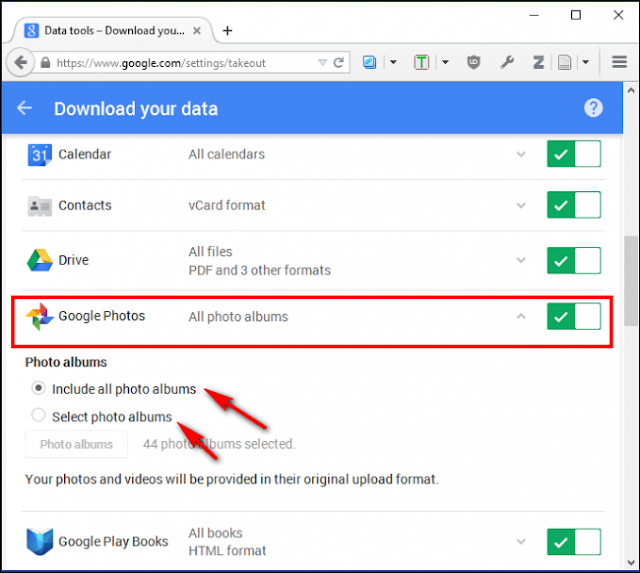
Unlike Dropbox, Google Photos’ desktop uploader is a one-way client. You can’t directly download all your photos from it. If you want to download all your media from Google’s servers in eone fell swoop, then you can do so with Google Takeout. Log in to your Google account and head over to the Google Takeout page. Select “Google Photos” and select the albums you’d like to download. Now you can download all the media as a ZIP file without having to tediously select each individual image in the Google Photos gallery.

Things You May Not Have Known Google Photos Can Do

Monday, 14 August 2017

How to Change User Agent String in Google Chrome

You can do lot of interesting things on the web if you know how to modify the user-agent string of your web browser.


How to Change User Agent String in Google Chrome

For instance, change the Chrome’s user-agent string to that of iPhone Safari and you’ll be to read popular magazines for free. Or change the user-agent to Googlebot and you can read Wall Street Journal stories without a subscription. Similarly, if you use the user agent of iPad on your desktop, Google will render the tablet version of Gmail which is more beautiful than the original desktop version.

While it is relatively easy to edit the User-Agent string of Firefox, IE, Flock or Apple Safari through add-ons and registry hacks but you don’t have that luxury in Chrome since Google’s browser doesn’t support external add-ons yet.


HOW TO SWITCH USER AGENT OF GOOGLE CHROME

It is however possible to change the user-agent of Google Chrome via the following hack – open Chrome.dll file inside a Hex viewer, search for the Chrome User Agent string and overwrite (not insert) that with the user-agent of another browser.  Here are the full steps involved:

0. Make a backup of chrome.dll file – the file is available in the 0.2.xx folder of your Chrome installation folder (refer to #2).

1. Open chrome.dll inside Xvi32 and search for a patten that matches the default user agent string for Google Chrome :

Mozilla/5.0 (Windows; U; Windows NT 5.1; en-US) AppleWebKit/525.13 (KHTML, like Gecko) Chrome/0.X.Y.Z Safari/525.13.


2. Point the cursor to the letter M and choose Edit -> Overwrite String. Paste the user-agent of any other browser here. For instance, the strings for iPhone and Google spiders are:

Mozilla/5.0 (iPhone; U; CPU like Mac OS X; en) AppleWebKit/420+ (KHTML, like Gecko) Version/3.0 Mobile/1A543 Safari/419.3

Mozilla/5.0 (compatible; Googlebot/2.1; +http://www.google.com/bot.html)

3. Close Google Chrome (if running) and then save the chrome.dll file inside the hex editor. Restart chrome.exe and type about: in the address bar to confirm if the user agent has changed. If you have trouble opening chrome after making the above changes, just delete the modified chrome.dll file and replace it with the old backup.

If you plan to use this trick more frequently, a better option is that you create multiple copies of chrome.dll – one per user agent. Now if you want Chrome to emulate IE or Firefox, just make rename the chrome-firefox.dll or chrome-iphone.dll to chrome.dll.

Thanks for landing on this post, If you like my post then give your opinion and feedback in comment box.


Tags:- #Chrome user agent string, #chrome user agent string windows, #chrome user agent string list, #chrome user agent string android, #chrome user agent string iPhone, #chrome user agent string safari, #user agent string, #User-Agent Switcher for Chrome, #Computer tricks and tips, #computer problems solution, #way2trick

Sunday, 23 July 2017

What to Do If Clicks Don’t Register in Android Apps on a Chromebook


Android apps on Chromebooks have some great benefits: they expand the device’s capabilities, have an overall small footprint, and they work very well on limited hardware. That said, they’re still in beta, and sometimes things don’t work as they should.

The biggest issue I’ve had with Android apps in Chrome OS is touch elements not responding correctly—or even at all—with touch or mouse. That is an incredibly frustrating issue to have, especially when the app in question is a tool that can be utilized for productivity.

For example, when I first started using PicSay Pro to resize images and add borders, the “Solid Border” option was almost unusable. It would load, but the option to change the color of the border didn’t react to click or touch—the color palate would briefly load, then disappear again. Since white is the default selection and I need to add a one pixel black border to all images, that didn’t work for me.


Then, while trying to troubleshoot the issue (even going as for as discussing the issue with the developer), I accidentally stumbled on a fix: putting the app in full screen mode. Not just fully maximized, mind you, but by actually hitting the full screen button on my Chromebook’s keyboard (shown above).

I’m not sure what causes the issue with certain touch elements—the title bar, the shelf, or something else altogether—but going full screen has been the solution in basically every scenario I’ve encountered where Android apps were acting weird.

So there you go, just a quick tip to make your Android app experience a little better on your Chromebook: if things aren’t working, try full screening it!

Saturday, 22 July 2017

How to Use Someone Else’s Music Subscription On a Shared Google Home

How to Use Someone Else’s Music Subscription On a Shared Google Home

Google Home lets you listen to music from Spotify, Pandora, Play Music, and even YouTube Red. You can also share your Google Home with other members of your household. If you don’t have a music subscription, but someone else in your house does, you can set Google Home to use their account for your music needs. Here’s how.

Google Home recognizes multiple users. you can share music services with other members of your family. Some services like Spotify require a premium subscription to stream to Google Home. If you’re the primary account holder on your Google Home device, but someone else in your family has a Spotify Premium subscription, you’ll need to change a setting so Google knows to use their account for streaming music.

We’ll assume you’ve already added another user to your Google Home before you get started. Open the Google Home app and tap the menu button in the top left corner. Scroll down and choose “More settings.”


How to Use Someone Else’s Music Subscription On a Shared Google Home

Scroll down in the list and tap Music.

How to Use Someone Else’s Music Subscription On a Shared Google Home

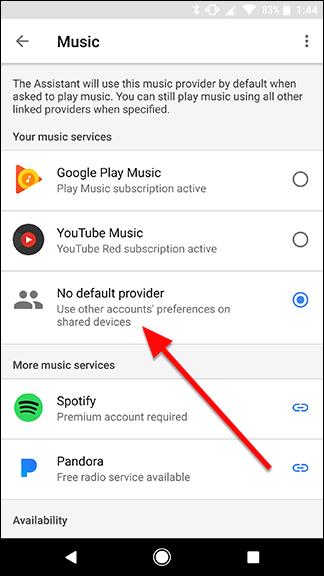
Here, you’ll see a list of music providers. Select “No default provider.” Now, when you ask Google Home to play music, it will use whatever music subscription that other users on your device have chosen.

How to Use Someone Else’s Music Subscription On a Shared Google Home

Repeat this same process for the other user on your device. This time, have them choose the music account they want to share. Now, whenever you ask Google to play music, it will use your family members’ account instead.

An Easier Way to Implement Google Authorship

Google now routinely highlights author information in search results. For instance, if you are looking for gadget reviews on Google and one of the search results is pointing to a column by David Pogue, you might also see a thumbnail image of Pogue – picked from Google Profile – next to the snippet. Google may also display the circle authority in case that author has a presence on Google Plus.

Here’s an illustrated tutorial on how you may display your own profile picture in Google search results next to articles that you may have written on your website or on someone else’s website. You need to create a Google+ profile and then link it your website using the rel=”author” markup.

It takes some effort to implement the authorship markup and the other big hurdle is that it requires you to edit the HTML code of your website. Some authors may find it too technical while others, think guest contributors, may not have access to the site template at all. Fortunately, there’s now a simpler option as well.


SETUP GOOGLE AUTHORSHIP USING WORK EMAIL

Instead of modifying HTML templates, you can just include your name and email address on a web page (using the mailto syntax) and Google will automatically connect it to your Google Profile. Here’s how:

Step 1: Go to your Google Profile, page, click the Edit Profile button and then add a Work email. Make sure that the visibility of this email address is set to “Anyone on the web.”

Step 2: Click Verify to verify your email address. You’ll then see a little “tick mark” next to your email address in Google Plus.

Step 3: Next open any of your web articles that you would like to “claim” in Google Search and add either of these two lines in your article:

Option 1: Use both email address and name together
&lt;a href=&quot;mailto:david.pogue@nyt.com&quot;&gt;David Pogue&lt;/a&gt;<br /><br />
Option 2: Link the author's name to his Google+ page 
Send &lt;a href=&quot;http://plus.google.com/1158131688984505&quot;&gt;David Pogue&lt;/a&gt;
an email at &lt;a href=&quot;mailto:david.pogue@nyt.com&quot;&gt;david.pogue@nyt.com&lt;/a&gt;

The important point is that all web pages, that you have authored, should include your name and your “work” email address that you previously verified in Google Plus. That is the only signal Google can use to verify your content ownership.

Friday, 21 July 2017

Subscribe to Earthquake Alerts for your Area

The U.S. Geological Survey agency monitors earthquake activity around the world. It reports the geographic location and intensity of an earthquake and anyone can subscribe to this data through Twitter, RSS feeds and KML files for Google Earth.

Then there are desktop software like Quake Alert that poll the USGS website and will pop-up an alert as soon as a new “big” earthquake is reported anywhere in the world.

Get Earthquake Alerts for your Surrounding Areas

The Twitter and RSS feeds will report earthquake activity worldwide but if you are only interested in receiving email alerts for your own geographic region, you should use the Earthquake Notification Service.

Here you have a Google Map and all you have to do is draw a custom polygon over regions that you would like to monitor for earthquake activity. You can mark one or more regions on the map, set the notification magnitude threshold (like only send me alerts for earthquakes with magnitude of 5 and above) and save your profile.


The USGS website says that information for U.S. earthquakes is generally available within 2-8 minutes but for earthquakes outside the U.S., it may take up to 20 minutes to report the activity. Twitter may thus be a faster medium to get earthquake news but as USGS says – “it cannot provide quantitative data such as location and magnitude.”

Send HTML Emails with Gmail and Google Docs


All popular email programs – from web-based Gmail and Yahoo! Mail to desktop-based Microsoft Outlook to the mail app on your mobile phone – are now HTML (or rich-text) capable. Thus, your email messages can have custom fonts, inline images, lists, tables and other formatting similar to a web page.

But there’s one little problem – how do you write an HTML email?

The built-in WYSIWYG editors, like the one shown above, offer basic functions for formatting text but there are things you cannot do. For instance, how do you insert a 3×5 table inside a Gmail message? Can you right-align an image and wrap text around it similar to Word?

All this is easily possible in HTML but since your email program won’t let your compose a message directly in HTML, you’re stuck.

There’s an alternative that uses Google Docs to send HTML mails from your Gmail account itself. It works for both Google Apps and regular Google Accounts.

First make a copy of this Google Docs sheet and then choose Gmail – > HTML Mail to authorize the sheet to send mails from your email account. Once authorized, choose GMail – > HTML Mail again and now you should see a form for sending mails. Fill in the various fields, write any HTML code in the Message field and hit send.

The Google Docs option internally uses Google App scripts (class GmailApp) and you can find the full source code under Tools – > Script Editor. So the next time you want to create a more professional-looking email newsletter that has tables and other complex formatting, you know where to go.

How to Add Websites as Apps in Google Chrome

The default start page of Google Chrome, that you see when you create a new tab, has two sections.  The “most visited” section contains thumbnails of websites that you visit more often while the other section has shortcuts to web apps that you have installed from the Chrome Web Store.

The “most visited” list is auto-generated based on your browsing history but you can quickly add any of your favorite website to the “apps” section even if that site is not officially available as an installable app in the Chrome Store.

There are two ways of doing this. You can either drag a website thumbnails from the “Most Visited” section to the “Apps” section of Chrome and make that site available as an app. Or you may open a site in a separate tab and drag the site’s favicon to the Apps section.


OR Click on Chrome's menu button, go to the Tools menu and click on “Create app for this website.” That's it! Now you should see that website in the Chrome App Launcher. If you're using Chrome OS, this can be a really convenient way to access all of your favorite and/or frequently visited websites.

Once the website is available as an app inside Chrome, you can quickly launch the site from the Apps section itself without installing any extensions. The only limitation is that Chrome won’t generate any thumbnail images for these self-created apps.

Publish your Blog as a Magazine with Google Currents


Google Currents is a Flipboard like app that lets you read blogs, news websites and other online publications in a magazine format on your mobile phone and tablet devices. The app is available for both Android and iOS platforms.

One big advantage with Google Currents is that you can read your subscriptions offline and it will even download the embedded images for offline access.

You can get Google Currents now from the Android Market and the iTunes Store. This is currently available only for US users but there’s at least an easy workaround for iPhone /iPad users.

PUBLISHING TO GOOGLE CURRENTS


As a web publisher, you can package one or more RSS feeds, image slideshows, tweets, videos, social network updates and any other HTML content into an “edition” and publish it to Google Currents which others can then subscribe to on their tablet or mobile phone.


There’s no programming required as Google Currents provides an web editor for publishers to create these bundles. You can also pull content from Google Docs and ePUB ebooks into Currents. The default layouts are beautiful but advanced users may apply their own CSS styles to further customize the appearance of their magazine.

READ RSS FEED WITH GOOGLE CURRENTS

Google Currents can also be used as a RSS reader to follow feeds that are not available as standalone editions. Simply subscribe to any RSS feed inside Google Reader and then pull it directly into Google Currents using Add More – > Library – > Google Reader. The plain feed will automatically be served in a magazine layout similar to other editions.

GOOGLE CURRENTS VS FLIPBOARD, ETC.

There are quite a few reading apps – like Flipboard, Yahoo LiveStand, Pulse, Zite and AOL Editions – that let you publish (and consume) online content in a magazine format. However, Google Currents is probably the only app that will share advertising revenue with publishers which is obviously a big incentive.

When Amazon introduced blog publishing for Kindle, there was a concern that people would publish someone else’s RSS feed as their own and monetize it through the Kindle Store. That is however unlikely to happen with Google Currents as it only lets you include content from domains that you have verified through Google Webmaster Tools.

How to Completely Remove Chat from your Gmail


If you are like me who uses Gmail for emails but not for chatting, there’s a simple setting that will help you completely remove (and not just hide) the chat box from your Gmail mailbox.

Go to your Gmail Settings page, switch to the Chat tab, choose “Chat Off” and click the “Save Changes” button. Alternatively, you may use this link to directly access your Gmail Chat settings page. You can re-enable chat in your Gmail by using the “Chat On” option.

This setting to disable chat may have been available in regular Gmail accounts for some time (am not too sure) but it was only recently added to Gmail for Google Apps accounts.

Thursday, 20 July 2017

Do Check the Google Homepage on your Birthday!


Google uses special logos (or doodles) to honor famous personalities, especially artists and scientists, on their birthdays. And they do something similar on your birthday as well.

{Spoiler Alert} If you visit the Google homepage on your birthday, you’ll find a special logo and when you hover the mouse over that logo, it will greet you with some personalized text.

It probably picks the date from your Google Profile and you’ll also need to be logged in to your Google Account to see that birthday logo. 

How to Identify the Language of any Text


If you ever come across words or sentences that are written in an “unknown” language, here are some tools that will help you quickly identify the name of that foreign language.

1. Google Language Detection – Paste a couple of words in the search box and the service will try detecting the language of the text using the Google Language API. The accuracy of the automatic language detection increases with the amount of text entered.


2. What Language is This – If Google is unable to determine the language of your text, try an alternate – What Language Is This. This is again a web-based tool for identifying the language of any text but unlike Google API, here the analyzing of text takes place in the web browser itself and no information is sent across the Internet.


What Language can recognize most languages (including Indic) but it can have trouble identifying characters of Japanese rÃ…maji or Chinese pÄ«nyÄ«n. 

3. Google Translate – If you need to determine the language of an entire web page or an online document, paste the URL of that page in the Google Translate box and choose “Detect Language” as the source language.

Google Translate supports a very limited number of language pairs but if you use translation with the “auto detect language” feature, it will at least let you determine the name of the source language. See screenshot:


4. Polyglot 3000 – Unlike the previously discussed language detection services, Polyglot is a desktop based language recognizer application for Windows that doesn’t require web access for language detection.

Polyglot can recognize many more languages than Google API and also supports some rarely used languages such as Sanskrit.


Related Posts Plugin for WordPress, Blogger...

Labels

404 AdBlock Add-on Airtel GPRS Trick Airtel SMS Trick Alexa Amazon Amazon Kindle Amazon Prime Android Android 8 Android Oreo antivirus Apple Apple Mac ASCII Audacity Audio Authotkey Backup Balance Transfer in Vodafone Battery Bing Blogger Blogging Bookmarklet Browser Camera Chromebook clock Cloud colors command lines Computer Computer Tricks configuration Contact Creative Commons Credit Card CSS devolop DIY Doodle DOS Download Dropbox E-Mail eBook Email Email Attachment Embed Encryption English Error Evernote Eyes Facebook Facebook Tricks Feedburner Flipkart Font Foursquare Free Internet Free sms trick in Vodafone G Mail Gadget Game Getty Images GIF Gists Github Google Google AdSense Google Analytics Google Apps Google Chrome Google Contacts Google Currents Google DNS Google Docs Google Drive Google Earth Google Font Google Forms Google Images Google Map Google Photos Google Play Store Google Plus Google Print Google Reader Google Script Google Sheets Google Spreadsheet Google Translate GPRS Setting GPS Hacking Health App HelloFax Hindi Hoodie HTML Icons idea Image Editing Images IMEI Indian Railways Infographics Instagram Internet Internet Explorer Internet Tricks iOS iPad iPhone IRCTC iTunes iTV JavaScript JioCinema JioTV Junglee Kindle Language Translation Laptop Laptop. TV Life Time FREE GPRS Life-Style Link Linkedln Linux logo Make Money Online Microdoft Powerpoint Microdoft Word Microsoft Office Microsoft Outlook Mobile Mosaic Music Name Networking nexus Notepad OCR Online Shopping Open DNS OS Outlook Password PDF Petya Phillips Hue Lights Photogtraphy Pixel Play Station Podcasts Pokemon Pokemon Go Polls Print Productivity Proxy Server Pushbullet QR Code Ransomware Reddit Reliance Hack GPRS Reliance Jio RGB Ringtone Router RSS Safe Mode Samsung Galaxy S Scrabble Screen Capture Screen Sharing Screencast Secrets Security Send free sms from PC SEO Sierra Skype Slideshare SMBv1 SMS Snapchat Snapdeal Social Media Solution Sound Device Speech Recognition Sql Steam Sync Synology NAS Tata Docomo GPRS trick Teleprompter Torrent Trick Tricks TV Twitter UltraISO Unicode Unknown Extension Unlimited 2GB Unlimited 3GB Unlimited GPRS USB USB Security Key Video Editing virtual desktop Virus attack VLC Vodafone 110% working trick for GPRS Vodafone 3g Vodafone GPRS VPN wallpapers WannaCry Web Design Web Domain Website Wget Whatsapp WiFi Wikipedia Windows Windows 10 Windows 10 S Windows KN Windows Tricks windows updates Winows N Wolfarm Alpha WordPress XBox YouTube Zip
Twitter Delicious Facebook Digg Stumbleupon Favorites More