Showing posts with label Windows 10 S. Show all posts

Monday, 20 November 2017

How to Create A Virtual Hard Disk On Windows 10

We all have the partitioned physical hard disk drives on our system. But then, how does a VHD    ( Virtual hard disk ) differ from the physical hard disk?

Here you go. VHDs are mainly used as hard disks for virtual machines. They completely mimic what the hard disks in our computers have.VHDs too have the same directory structure which is composed of files and folders and the disk partitions. If it has the same structure, you might wonder why would you ever require a separate VHD then! If Microsoft has launched such a feature, then there must be something special about it.

VHDs can easily be backed up and they allow you to create dynamic volumes, because of which you need not allocate the disk spaces altogether. You need not actually partition your hard drive for this purpose and they can be easily accessed by means of local networks. Also once you create a dynamic VHD and install an operating system, there are options to dual boot it. As they are dynamic, no much space is needed to be allocated for them and also, the whole space can be regained back once you delete the VHD container file.

Steps: How to Create A Virtual Hard Disk On Windows 10


STEP (1) Open up the Administrative tools  app in yours Windows 10 by typing its name in the search bar.

How to Create A Virtual Hard Disk On Windows 10


STEP (2) Once it gets opened up in the Control Panel, towards the right pane you will find an option titled Computer Management shortcut. Double click on it.

How to Create A Virtual Hard Disk On Windows 10


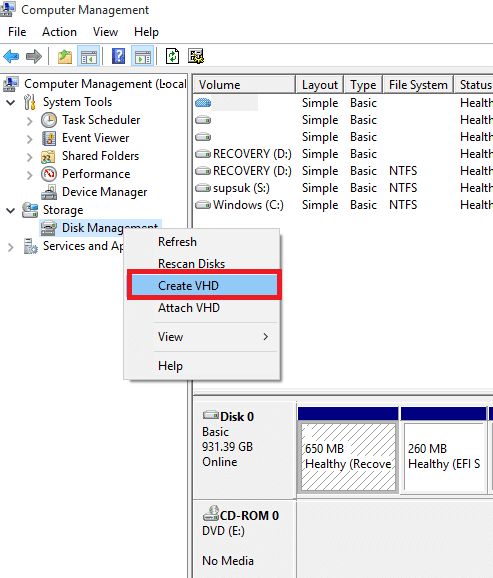
STEP (3) Expand the option named Storage found in the left pane of the window that gets launched.You will find an option named Disk Management. Right click on it and choose the option Create VHD.

How to Create A Virtual Hard Disk On Windows 10


STEP (4) Once you do that, you will find that a window named Create and Attach VHD pops up. You will find a text box below the option Location.

Click the Browse button and choose the location where you want to store the VHD file.

How to Create A Virtual Hard Disk On Windows 10

Now, Choose a folder where you want to store the VHD file.

How to Create A Virtual Hard Disk On Windows 10


Also you can choose the size of the VHD by changing the number next to Virtual Hard disk size. The size by default,will be set in GB. You can change it to MB(megabytes) or TB(terabytes), if required.


Note: – You must have 1 GB space free on the drive in which you have stored the VHD folder if you choose 1 GB as the size of the Virtual hard disk.

Also, you have two options for creating virtual hard disk: –

  • Fixed Size (It allocates a fixed size of virtual hard drive which you chose)
  • Dynamically expanding (It does not allocate instantly the size chosen, but keep growing in size till the allocated size, as it grows in size.)
How to Create A Virtual Hard Disk On Windows 10


In my case, I have chosen the path ” S:\syslab\vhd.vhd” to store the corresponding VHD file and I have set its  size to 1 GB.


STEP (5) Choose on the option Dynamically expanding or Fixed size as the virtual hard disk type and click on the OK button.
STEP (6) Once you do the above steps, you will find the Virtual hard disk created, towards the right of the window. Right click on it and choose the option Initialize.This helps you to create new volumes on the disk.

How to Create A Virtual Hard Disk On Windows 10


Note: – Its recommended that you choose MBR (Master boot record).

STEP (7) Click OK on the alert message that pops up. Go back to the disk created, right click and choose the option  New  Simple Volume.

How to Create A Virtual Hard Disk On Windows 10

The Simple Volume wizard opens up and you will have to click on the Next button to modify the Settings.

How to Create A Virtual Hard Disk On Windows 10


STEP (8) Select the size of the volume you want to have and click again on the Next button.I have chosen the option that was set by default.

How to Create A Virtual Hard Disk On Windows 10


STEP (9) In the next window that appears, choose the drive letter with which you can name the volume. Once you are done with that, choose the Next button.

How to Create A Virtual Hard Disk On Windows 10


I have opted to name the drive as P.

STEP (10) In all the rest of the windows,keep clicking on the Next button in order to go with their default options .

Choose to format the new partition.

Finally, Click on the Finish button in the last window of the Simple Volume wizard.

How to Create A Virtual Hard Disk On Windows 10


STEP (11) You will find the new VHD creates in the Disk Management utility and the same will be apparent in the File Explorer too. Now, you are completely done with all the process of its creation.

How to Create A Virtual Hard Disk On Windows 10


STEP (12) Whenever you want to unmount the drive and retrieve back the space in the system’s memory, just right click on the VHD just created in the file Explorer.Click on the option Eject.The VHD will now be deleted.

How to Create A Virtual Hard Disk On Windows 10


Thanks for landing on this post, If you like my post then give your opinion and feedback in comment box.


TAGS:- #How to Create A Virtual Hard Disk On Windows 10, #Create A Virtual Hard Disk On Windows 10, #how to create a virtual hard disk in windows 7, #how to create a virtual hard disk in virtualbox, #how to create a virtual hard disk in vmware, #how to create a virtual hard disk in windows xp, #how to create a virtual hard disk drive, #Virtual Hard Disk On Windows 10, #How to make a Virtual Hard Disk On Windows 10, #create a virtual hard disk windows 7, #create a virtual hard disk using advanced options, #How to Create A Virtual Hard Disk On Windows

Saturday, 26 August 2017

How to Install and Test Windows 10 S

How to Install and Test Windows 10 S

Microsoft’s stripped-down Windows 10 S is now shipping on PCs like the Surface Laptop. If you want to try it before you buy, you can install it yourself in a virtual machine or a PC you have lying around.

MSDN Subscribers: Install Windows 10 S From an ISO

Microsoft has released ISO files of Windows 10 S, but only through MSDN (because Windows 10 S is meant for “education”, even though Microsoft is inexplicably shipping it on a flagship laptop). If you have an MSDN subscription, you can download Windows 10 S from Microsoft. The ISO files can be used to install Windows 10 S in a virtual machine or on actual PC hardware, just like you’d install any other version of Windows.

Most people don’t have MSDN subscriptions, though, so hopefully Microsoft will make Windows 10 S ISO files more broadly available in the future. However, there is an alternative for Windows 10 users—see the last section of this article.

Surface Laptop Users: Reinstall Windows 10 S from a Recovery Image

How to Install and Test Windows 10 S

If you have a Surface Laptop that shipped with Windows 10 S and you want to reinstall its Windows 10 S operating system, you can download a recovery image for your Surface device from Microsoft’s Surface website. Just sign in with the Microsoft account your Surface Laptop is registered to or enter its serial number. You’ll get a recovery image you can use to reinstall Windows 10 S on this device.

Follow the instructions in Step 3 on the Surface recovery page. You’ll be asked to use the Create a recovery drive tool on an existing Windows PC and then copy the files from the recovery image .zip file to the USB recovery drive you created.

Everyone Else: Convert a Windows 10 PC to Windows 10 S

Microsoft has released a Windows 10 S installer implemented as an .exe file. You can run this on Windows 10 Professional, Education, or Enterprise to convert your existing Windows 10 installation to Windows 10 S.

This won’t work on Windows 10 Home, which makes some sense. Windows 10 S is actually based on Windows 10 Professional, according to Microsoft.

You could use this to install Windows 10 S in a roundabout way. First, install Windows 10 Professional in a virtual machine or on a PC. Second, run the tool to convert your Windows 10 installation into a Windows 10 S one. (And you don’t need a product key to install Windows 10, so anyone can do this to set up a quick and dirty virtual machine to test Windows 10 S.)

If you’re installing Windows 10 S on a PC, be aware that you won’t be able to run non-Store applications afterwards, some features may not work, and that some of your personal files will be deleted during the installation process. We recommend not installing Windows 10 S on your primary PC. If you are installing Windows 10 S on an important PC, be sure to back up your files and create a system recovery drive ahead of time, just in case.


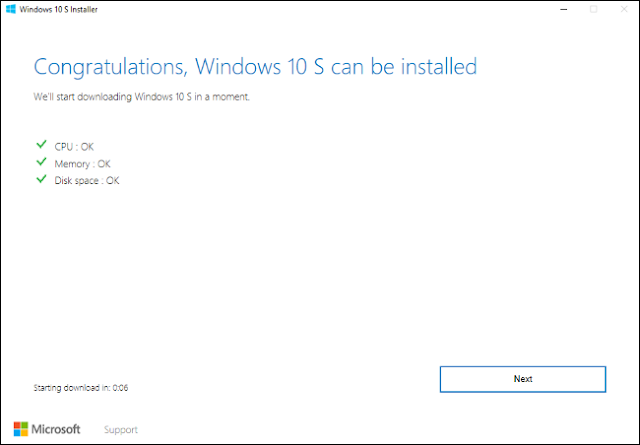
When you’re ready, visit Microsoft’s website and download the Windows 10 S installer. Launch it and click through the wizard. It will download and install Windows 10 S on your PC for you. When the download is complete, the tool will restart your PC and finish the process.

How to Install and Test Windows 10 S

You’ll be able to use Windows 10 S with all its limitations after the installation completes. All your desktop applications will be removed. You’ll only be able to install applications from the Store, and some hardware devices won’t work if they require drivers that aren’t available through Microsoft.

You can test whether your peripherals work on Windows 10 S, whether Project Centennial desktop apps from the Windows Store work properly, or just see how you can live with Windows 10 S’s limitations.

How to Install and Test Windows 10 S

If you decide you want to ditch Windows 10 S and roll back to your previous version of Windows 10, you can do so. This only works within the first 10 days, and only if you haven’t deleted your windows.old and $windows.~bt folders.

To do so, head to Settings > Update & security > Recovery. Click the “Get started” button under Go back to the previous version of Windows 10. If you don’t see that option here, it’s either been over ten days or you deleted the windows.old or $windows.~bt folders.

If this option isn’t available, you may need to use the Settings > Update & security > Recovery > Reset this PC > Get Started > Restore factory settings option, or reinstall Windows 10 from installation media.

Related Posts Plugin for WordPress, Blogger...

Labels

404 AdBlock Add-on Airtel GPRS Trick Airtel SMS Trick Alexa Amazon Amazon Kindle Amazon Prime Android Android 8 Android Oreo antivirus Apple Apple Mac ASCII Audacity Audio Authotkey Backup Balance Transfer in Vodafone Battery Bing Blogger Blogging Bookmarklet Browser Camera Chromebook clock Cloud colors command lines Computer Computer Tricks configuration Contact Creative Commons Credit Card CSS devolop DIY Doodle DOS Download Dropbox E-Mail eBook Email Email Attachment Embed Encryption English Error Evernote Eyes Facebook Facebook Tricks Feedburner Flipkart Font Foursquare Free Internet Free sms trick in Vodafone G Mail Gadget Game Getty Images GIF Gists Github Google Google AdSense Google Analytics Google Apps Google Chrome Google Contacts Google Currents Google DNS Google Docs Google Drive Google Earth Google Font Google Forms Google Images Google Map Google Photos Google Play Store Google Plus Google Print Google Reader Google Script Google Sheets Google Spreadsheet Google Translate GPRS Setting GPS Hacking Health App HelloFax Hindi Hoodie HTML Icons idea Image Editing Images IMEI Indian Railways Infographics Instagram Internet Internet Explorer Internet Tricks iOS iPad iPhone IRCTC iTunes iTV JavaScript JioCinema JioTV Junglee Kindle Language Translation Laptop Laptop. TV Life Time FREE GPRS Life-Style Link Linkedln Linux logo Make Money Online Microdoft Powerpoint Microdoft Word Microsoft Office Microsoft Outlook Mobile Mosaic Music Name Networking nexus Notepad OCR Online Shopping Open DNS OS Outlook Password PDF Petya Phillips Hue Lights Photogtraphy Pixel Play Station Podcasts Pokemon Pokemon Go Polls Print Productivity Proxy Server Pushbullet QR Code Ransomware Reddit Reliance Hack GPRS Reliance Jio RGB Ringtone Router RSS Safe Mode Samsung Galaxy S Scrabble Screen Capture Screen Sharing Screencast Secrets Security Send free sms from PC SEO Sierra Skype Slideshare SMBv1 SMS Snapchat Snapdeal Social Media Solution Sound Device Speech Recognition Sql Steam Sync Synology NAS Tata Docomo GPRS trick Teleprompter Torrent Trick Tricks TV Twitter UltraISO Unicode Unknown Extension Unlimited 2GB Unlimited 3GB Unlimited GPRS USB USB Security Key Video Editing virtual desktop Virus attack VLC Vodafone 110% working trick for GPRS Vodafone 3g Vodafone GPRS VPN wallpapers WannaCry Web Design Web Domain Website Wget Whatsapp WiFi Wikipedia Windows Windows 10 Windows 10 S Windows KN Windows Tricks windows updates Winows N Wolfarm Alpha WordPress XBox YouTube Zip
Twitter Delicious Facebook Digg Stumbleupon Favorites More