Showing posts with label iPhone. Show all posts

Friday, 29 September 2017

How to move data from Android Device to iPhone for free

Transferring files from iOS to Android has still not become an easy task. The two systems use different platforms to operate and connecting the two has been a problem ever since the inception. AnyTrans has already scored as an iPhone manager, that too at a professional level and now with its data transfer mechanism; it is here to make its presence felt. It has now introduced a new feature that is free to download and easy to use.


How to move data from Android Device to iPhone for free


AnyTrans review


AnyTrans allows you move your data from Android to iPhone and manage iPhone, iPad, iPod, iTunes and iCloud content. While AnyTrans has already proved itself to be a professional manager for iPhones, it has something new to offer to its customers. With its new feature, iOS mover, you can transfer files from Android devices to your iOS devices. This was not easy before as iTunes and Android don’t really gel well and it becomes difficult to transfer files. The best part is that this iOS mover feature is free to use in the latest version. All you need is two devices one being android and another being iOS. Connect them to your PC, run the software and you are good to go.

Move your data from Android to iPhone

nce you download the app on your Android device, you will get several options. You have to download your iTunes driver in order to complete the task of transferring the data. It should not be difficult to understand the process. This comes with a free and a paid version and for full version you will get all the required features. Now there are different heads in the window namely iTunes library for songs, backup manager, device manager, iOS mover, iCloud manager, and media downloader. However, the iOS Mover is absolutely free for all the versions. If you have still not downloaded the software, you can do it just for the sake of it.

How to use iOS Mover

Firstly you need to download AnyTrans for your Windows computer or Mac from imobie.com. Then connect both the Android device and your new iPhone via USB cables. Once successfully connected, you will see three buttons – Content to iCloud, Content to iOS, and Content to iTunes, which respectively enables you to transfer data from Android device to iCloud, transfer data from Android device to iOS device, transfer data from Android device to iTunes.


Some Important Features

We will now go into the details of AnyTrans that will come in handy. You may have heard a lot about it already but this will just sum it up to let you know why you shall use the software. This will also give you reasons to give it a try over some other same kind of software available in the market.

Transfer Any File Types

AnyTrans, as its name suggests, can transfer anything. It can transfer music, playlists, videos, and much more from your iDevice to your Mac, PC and iTunes. This seems cool but it is actually cooler than that due to the details it provides. You can check the app anytime to see which file was transferred, from where and at what point in time.

Keep Only Important Files

Apart from providing the users an option to transfer files it also gives the option to transfer files back to the iDevice in question. In many cases, you have tons of pictures and videos on your iPhone or iPad but you don’t see them all the time. At the same time, you don’t want to delete them either as they are memories you want to keep. Scrolling to find the important picture every time can be a gruesome job and that is the reason why you need to make the transfer. Just keep what you actually need and transfer the rest to your Mac or PC. That sounds really cool, isn’t it?

Contact Backup

Apart from the transferring part, backing up contact is one more feature that it offers. So you can back up all your iPhone contacts and never worry about losing any of them. You can also backup the SMS/MMS or iMessages in your PC. One more thing is you can change the theme of the software as per your liking.


Thanks for landing on this post, If you like my post " How to move data from Android Device to iPhone for free " then give your opinion and feedback in comment box.


Tags: #how to use move to ios app, #how to transfer data from android to iphone after setup, #move to ios code, #how to transfer data from android to iphone 6, #move from android, #how to transfer photos from android to iphone via bluetooth, #move to ios download, #move to ios apk, #How to move data from Android Device to iPhone for free, #How to move data from Android Device to iPhone for free, #move data from Android Device to iPhone for free, #How to move data from Android Device to iPhone, #move data from Android Device to iPhone, #Learn How to move data from Android Device to iPhone for free, #How to move data from mobile to iPhone for free, #move data from Mobile to iPhone, #Transfer files from Mobile to iPhone, #Transfer files from Android Device to iPhone

Thursday, 28 September 2017

How to Make an iPhone App | Create a Application


Five Parts:  Setting Up Your Development Environment   Planning the App    Creating the App    Testing the App    Releasing Your Project 

The app market is changing and shifting constantly, and the success stories are big enough to catch anyone's eye. Do you think you have the Next Big Idea for an iPhone app? It may be easier to make than you think. Although you'll need to learn some coding, much of the interface work can be done graphically. Creating an app will take time, learning, and patience but maybe you can make the next Flappy Bird! See Step 1 below to get started.


Part 1 of 5: Setting Up Your Development Environment

1.) Download and install Xcode.


Xcode is the development environment that all iPhone apps are created in. Xcode is available for free from Apple, but requires OS X 10.8 or later to be installed. There is no official way to run Xcode on a Windows or Linux PC. This means that if you want to develop an iPhone app but don't have a Mac, you'll need to invest in one first.
  • To develop iOS 8 apps, you will need Xcode 6.0.1 and the iOS 8 SDK, both of which are available from Apple. The iOS 8 SDK contains a significant number of new APIs that allow you to create all kinds of new app experiences, including iCloud integration and Touch ID.
How to Make an iPhone App | Create a Application


2.) Install a good text editor.

While you can code completely within Xcode, you'll find working with large chunks of code much easier if you have a dedicated text editor that specializes in programming syntax. TextMate and JEdit are two very popular choices.

How to Make an iPhone App | Create a Application

3.) Install a vector graphics program.

If you plan on creating custom art and designs for your app, you will want a program that can create vector graphics. Vector graphics scale without losing clarity, and are essential for a good-looking app. Popular vector programs include CorelDraw, Adobe Illustrator, Xara Designer and Inkscape. A nice, free, vector graphics drawing program is DrawBerry. It is not as powerful as the professional programs, but it is good for a first-time user, or if you just don't want to pay for something just for one use.

How to Make an iPhone App | Create a Application

4.) Familiarize yourself with Objective-C.

Objective-C is the programming language used to create functionality within iPhone apps. It handles data and object manipulation. Objective-C is a derivative of the C family of languages, and is an object-oriented language. If you already have a basic understanding of C or Java, Objective-C should be, for the most part, pretty easy to grasp.
  • While it's possible to build a basic app without knowing Objective-C, you cannot perform any sort of advanced function without coding it yourself. Without Objective-C, all you can do is move back and forth between screens.
  • There are a variety of tutorials available online, as well as a wealth of information to be found in various books about Objective-C. If iPhone app development is something you want to take seriously, you'll be well-served by having some resources handy.
  • Some of the more popular online Objective-C communities include the Apple Developer Forums, the iPhoneSDK Google Group, and StackOverflow.


5.) Consider outsourcing development.

If you simply don't have any interest in learning Objective-C, or don't have an artistic bone in your body, there are a large number of freelancers and development teams out there that may be able to take on various aspects of your project for you. Outsourcing your development is a complicated process, but can save you lots of headaches if you're not the programming type. Make sure that everyone involved signs a Non-Disclosure Agreement, and that pay structures are in place before any work begins.
  • ODesk and Elance are two of the most popular freelancing services on the Internet, and both have hundreds of developers and artists of all skill levels.
How to Make an iPhone App | Create a Application


6.) Create a development account.

In order to distribute your app on the App Store or give it to others to test, you will need to sign up for an Apple Developer account. The account costs $99 per year, and will require you to enter in tax and bank account information.
  • You can create your account at the iOS Dev Center website.
How to Make an iPhone App | Create a Application


7.) Download some test apps.

Once you've signed up for a Developer account, you will have access to Apple's development resources. These resources include a variety of sample projects which can give you a tremendous amount of insight into how app development works. Find an example that is related to the kind of app you want to create and mess around with it in Xcode.

How to Make an iPhone App | Create a Application

Part 2 of 5: Planning the App

How to Make an iPhone App | Create a Application


1.) Define your concept.

Before you even open Xcode for the first time, you should have a well-thought-out plan for your app and its features. This could include a design document which outlines all of the functionality of the app, sketches of the user interface and flow between screens, and a basic idea of the types of systems that will need to be implemented.
  • Try to stick to your design document as much as possible while you are developing your app. This will help keep you focused on the features you want.
  • Try to draw at least one thumbnail sketch for each screen in your app.
How to Make an iPhone App | Create a Application


2.) Determine your audience.

The audience of your app will have a lot to do with the way it looks and the functionality of the application. For example, a to-do list app will have a much different audience than a gory shooting game. This will help you

3.) Address a need with the app.

If your app is a utility of some kind, it should offer a solution to a problem that hasn't been done before, or one that does it better than previous attempts. If your app is a game, it should have a unique feature or features that help set it apart and attract specific gamers.


How to Make an iPhone App | Create a Application


4.) Consider the content.

Your user interface will be determined by the type of content you are showing the user of your app. For example, if the app deals with photos, you will want a user interface that makes looking at photos and navigating through them as easy as possible.


How to Make an iPhone App | Create a Application


5.) Practice good UI design processes.
The user interface should never get in the way of the user. This means that options should be clearly visible, and the user should never have to question what button does what. If you are using icons, they should accurately represent their function. Navigation through the app should be fluid and natural.
  • UI design is as much an art form as it is a science. You will likely be revising your design constantly as your project evolves.


Part 3 of 5: Creating the App

How to Make an iPhone App | Create a Application


1.) Create a new project in Xcode.
Open up Xcode, and start a new Project from the File menu. Select "Application" under the "iOS" heading on the left side of the window. In the template section, choose "Empty Application".
  • There are a variety of templates available, all designed for different tasks. Start with a blank template until you get more comfortable with the development process. You can try one of the more complicated templates once you're familiar with how everything works.
  • You will need to provide a Product Name, your company identifier, and the class prefix. If you don't have a company identifier from Apple yet, enter com.example. For the class prefix, enter XYZ.
  • Select "iPhone" from the Devices menu.
How to Make an iPhone App | Create a Application

2.) Create a Storyboard.
The Storyboard is the visual representation of all of your app's screens. It shows the contents of each screen as well as the transitions between them. The Storyboard tool will help you develop the flow of your app.
  • Click File → New → File.
  • Under the iOS heading, click "User Interface".
  • Select Storyboard, and click Next.
  • Select iPhone from the Devices menu, and then name the file "Main". Make sure that it is saved in the same location as your project.

How to Make an iPhone App | Create a Application

3.) Assign your Storyboard to your project.
Once you create the Storyboard, you will need to assign it as the main interface of your app. This will load the Storyboard when the app is launched. If you don't assign the storyboard, nothing will happen when you start the app up.
  • Click your project name in the left navigation tree.
  • Find the Targets heading in the main frame. Select your project from the Targets list.
  • Find the Deployment Info section in the General tab.
  • Enter Main.storyboard into the "Main Interface" text field.
How to Make an iPhone App | Create a Application

 
4.) Add your first screen by using a view controller.

View controllers dictate how content is viewed by the user. There are a variety of preset view controllers available, including standard views and tables. You will add view controllers to your storyboard, which tells the app how to display the content to the user.
  • Select your "Main.storyboard" file in the project navigation menu. You will see a blank canvas appear in the Interface Builder window.
  • Find the Object Library. This is located at the bottom of the right frame, and can be selected by clicking the little cube button. This will load a list of objects that can be added to your canvas.
  • Click and drag the "View Controller" object onto the canvas. Your first screen will appear on the canvas.
  • Your first "Scene" is complete. When the app is started, the view controller will load your first screen.
How to Make an iPhone App | Create a Application


5.) Add interface objects to your first screen. 

Once you have the view controller set, you can start populating the screen with the interface objects you need, such as labels, text input fields, and buttons. Interface objects can all be found in the Objects Library list that you found the View Controller object in.
  • Click and drag objects from the list to add them to your screen.
  • Most objects can be resized by clicking and dragging the boxes on the edge of the object. When resizing, guidelines will appear on the screen so that you can ensure everything lines up correctly.
How to Make an iPhone App | Create a Application


6.) Customize the objects you add. 

You can adjust the properties for each object, allowing you to create a custom and intuitive interface. For example, you can add placeholder text to a text input field that will help guide the user on what they should input.
  • Select the object you want to customize and click the "Attributes Inspector" button at the top of the right frame. The button looks kind of like a shield.
  • Customize the object to your liking. You can change font style, font size, text color, alignment, background images, placeholder text, border style, and much more.
  • The available options will change depending on the object you are customizing.
How to Make an iPhone App | Create a Application


7.) Add more screens. 

As your project grows, you will probably need to add more screen to display all the content necessary for the app to be useful. For example, if you are making a to-do list app, you will need at least two screens: one for inputting a to-do list item, and one for viewing the entire list.
  • More screens are added by dragging and dropping view controller objects onto blanks parts of your canvas. If you can't find a blank spot to drop it, click the "zoom out" button until you find empty areas. Make sure to drop the view controller onto the canvas and not onto an existing screen.
  • You can change the initial screen by selecting the view controller you want to lead with from the project outline. Click the Attribute Inspector button and check the "Is Initial View Controller" box. For example, if you are making a to-do list, you'll want the actual list to be the first thing the user sees when the app is launched.
How to Make an iPhone App | Create a Application


8.) Add a navigation bar.

 Now that you have two screens in your app, it's time to make it so that the user can move back and forth between them. You can do this through the use of a Navigation Controller, which is a specialized View Controller. This controller adds a navigation bar to the top of your app that allows user to move back and forth between screens.
  • Your navigation controller should be added to your initial view so that it can control all subsequent screens.
  • Select your initial view in the project outline.
  • Click Editor → Embed In → Navigation Controller.
  • You should see a gray navigation bar appear at the top of the screen you added the controller to.
9.) Add functionality to the navigation bar.

Now that you have inserted the navigation bar, you can start adding navigation tools to it. This will allow your user to move back and forth between screens.
  • Add a title to the navigation bar. Click the Navigation Item underneath the view controller you assigned it to. Open the Attribute Inspector and type the title of the current screen in the Title field.
  • Add a navigation button. Open the Objects library if its not already open and find the Bar Button Item. Click and drag it to the navigation bar. Typically, buttons that move you "forward" in the app are placed to the right, and buttons that move you "back" are placed to the left.
  • Give the button a property. Buttons can be configured to have specific properties that make them easy to adapt to the circumstance. For example, if you are creating a to-do list, you'll want an "Add" button to create a new entry. Select the button, and open the Attribute Inspector. Find the Identifier menu and choose "Add". The button will change to a "+" logo.
10.) Link your new button to an existing screen.

In order for your button to function, you will need to connect it to another screen. In our to-do list example, the button is located on the overall list, and needs to be linked to the entry screen. To link the button, hold the ^ Control and drag the button onto the second screen.
  • When you release the mouse button, the Action Segue menu will appear with a list of options. Choose "Push" to use the push transition when moving between screens. You can also choose "Modal", which will open the screen as a self-contained action as opposed to a sequence.
  • If you use Push, a navigation bar will be added automatically to your second screen and a "back" button will be automatically created. If you choose modal, you will need to manually insert a second navigation bar as well as add a "Cancel" and "Done" button (for a to-do list; the labels of your buttons will change depending on the needs of your app).
  • "Cancel" and "Done" buttons can be created the same way that you created the "Add" button. Simply select "Cancel" or "Done" from the Identifier menu in the Attribute Inspector.
11.) Add data handling capabilities. 

Up to this point, you've been able to create a basic navigable interface without the need for any coding. If you want to add any deeper functionality, such as data storage and handling user input, you'll need to get your hands dirty in the code. Coding is outside of the scope of this guide, but there are a large number of Objective-C tutorials available online.
  • You can use your navigable interface prototype to help you hire a developer. Having a working interface will make it much easier to explain what you need on the coding side of things.


Part 4 of 5: Testing the App

1.) Start the iOS Simulator.

Xcode comes with a built-in iOS simulator that lets you test your app on a variety of simulated iOS devices. To start the Simulator, choose "Simulator and Debug" from the dropdown menu at the top of the Xcode window, and then choose the device you want to test on.

How to Make an iPhone App | Create a Application


2.) Build the app.

Click the Build button, which looks like a traditional Play button, to compile the app and run it. Building the app may take a few minutes. you can watch the progress in the toolbar. Once the build process is complete, the iOS Simulator will open and you can begin testing your app.


3.) Test the app on your own iPhone.

Before distributing your app for testing, you can test it on your own device (if you have one). First, plug your device into your computer via USB. Close iTunes if it opens. Select "Device and Debug" from the dropdown menu, and then click the Build button. After a few seconds the app should launch on the iPhone. test all of the functionality before closing the app.

4.) Debug your app.

If your app crashed, you need to start figuring out what happened and why. This is a vast subject and there are countless reasons why your app may have crashed. Open the debug console and read the error messages. Most of the time they are rather cryptic. If you do not understand the error, try Googling the error message. Chances are, you will find a post on the Apple development forum where a friendly seasoned developer has answered their plea.
  • Debugging can be a very time consuming and tedious time for you. If you don't give up and persevere, in time you will get better at it. You will start to recognize the errors, track them down quickly, and even expect them on occasions. One common mistake is releasing an object from memory more than once. Another is forgetting to allocate memory and initialize an object before trying to add or assign to it. With each app your errors will become fewer and fewer.
How to Make an iPhone App | Create a Application

5.) Check memory usage.

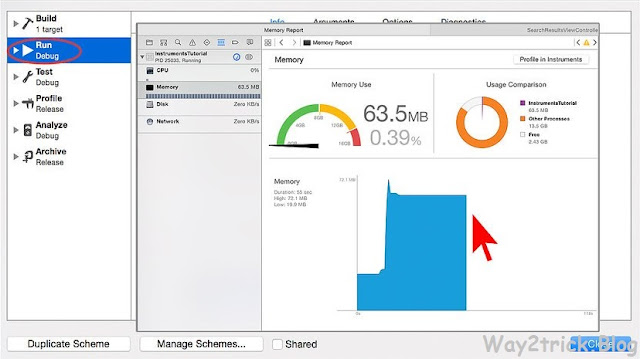
The iPhone has a very limited amount of memory. Each time you allocate an object some memory, you have to release it when you are done with it and give back the memory. Instruments is the iPhone SDK tool for viewing and analyzing your memory usage amongst other things.
  • With Device and Debug selected as before, choose Run → Run with Performance Tool → Leaks. This will launch Instruments and start the app on your device. Go ahead and use the app as normal. It will seem to freeze periodically as Instruments records and analyzes your memory usage. Any leaks will result in a red spike in the Leaks timeline. The source of the leaks will be displayed in the lower half of the screen.
  • Double clicking on the leaked objects will attempt to take you to the responsible code or clicking on the little arrow in the address column will show you the leak history. Sometimes where the leak is detected is not necessarily where it originated from.
  • If you get really stumped, try by process of elimination. Comment out and/or carefully bypass areas of your code and run it. Sometimes you can narrow down the general area and then eventually hone in on the responsible line. When you know where it is, you can fix or rewrite it. Remember, using Google can often provide you with the quickest direct links to internal Apple forums or documentation that deal with your issue.
Also Read:- How to Back Up a Folder With a Flash Memory Drive

How to Make an iPhone App | Create a Application


6.) Distribute your app to be tested by others. 

While testing your app in a simulated setting is a good way to ensure that your app works and that the interface looks good, nothing beats testing from users other than yourself. Just make sure you've ironed out the most egregious bugs before sending it out for external testing. In order to distribute your app to your testers, you will need to create an Ad-Hoc certificate on the iOS Dev Center site.
  • External testers can provide a lot of feedback that you wouldn't expect. This can be especially useful if you have a complex app.
  • In order to authorize tester's devices, you will need each device's UDID number.
  • Choose Device from the drop down list and press the "Build" icon. In the Finder, navigate to your project's folder and look for the "Ad-Hoc-iphoneos" folder. Inside there will be an app. Copy your "AdHoc.mobileprovision" certificate you got from the iOS Dev Center into the same folder. Select the app and the certificate and zip them up. This archive can be given to your external tester. You will need to create a separate archive for each Ad-Hoc certificate.


Part 5 of 5: Releasing Your Project


1.) Create your Distribution build.
Select Device and Release from the drop-down menu. Press the "Build" icon. In the Finder, navigate to your project's build folder and look for the "Release-iphoneos" folder. Inside there will be an app. Zip it up into an archive.
  • In order for new apps to pass Apple certification, they will need to be optimized for iOS 8 and the Retina display.
How to Make an iPhone App | Create a Application

2.) Open the iTunes Connect dashboard.

You can access this from the iOS Dev Center. If you have any unfinished steps to complete for setup, they will be listed at the top of the page. Make sure that all of your banking and tax information has been entered correctly.

How to Make an iPhone App | Create a Application

3.) Enter all of your app's information.

Click "Manage Your Applications" and then select "Add new Application". Fill out the App name, SKU number and select the bundle ID. Select your app bundle from the drop down menu.
  • Fill out the forms providing your app description, keywords, support site, category, contact email, copyright etc.
  • Fill out the Rights and Pricing forms.
  • Have your iTunes artwork ready. You will need a large 512x512 vector icon, as well as some screenshots of your app. Screenshots can be grabbed from the iPhone simulator using Command+ Shift+4 and dragging the cross-hair over the area. Make sure they are 320x480 for iPhone. Screenshots are a very important part of marketing your app, so make sure that they show the most important parts.
How to Make an iPhone App | Create a Application


4.) Upload your app.

Click "Ready to Upload Binary" and you will be taken to a screen that directs you to download the Application Uploader tool. Download it and press Done.
  • Install the Application Uploader tool and launch it. The first time you run the program, it will ask for your iTunes login information.
  • The Application Uploader tool will check your iTunes Connect account and find any apps you are ready to upload binaries for. They will be displayed in the drop-down menu. Select the one you want, choose the Distribution zip you created earlier and upload it. The uploader will check some internal stuff within the bundle and will return an error if it finds anything incorrect, such as an incorrect version number, missing icon etc. If everything is fine, it will upload the zip and finish.
5.) Wait for the review.

There is nothing to do now except wait for the review process. Apple will notify you in a few days or weeks via email if your application state changes to "In review". When it goes into review, the process is very quick. If it fails the initial barrage of tests, you will get a rejection email telling you why, and Apple will offer suggestions for fixing it. If your app passes inspection, Apple will send you an email informing you that your app is ready for sale. Your app will now appear on the iTunes app store.


How to Make an iPhone App | Create a Application


6.) Promote your app.
Now that your brand-new app is available for purchase, it's time to start spreading the word. Utilize social media, send out press releases to App-focused sites, make some YouTube videos, and do everything you can to get people talking about your app.
  • You can send free copies to reviewers, who will then write about your app on their website or review it on their YouTube channel. If you are able to get it in the hands of popular reviewers, this can lead to a lot of sales.
7.) Watch your sales.

Download the free iTunes Connect Mobile app for your iPhone. Login each day and check your sales, markets, and countries of sale. This is the fun part! Apple will periodically send you emails with links to your latest sales data. You can download them for your records. Good luck!

Read Also:- Make Screencast Movies of your iPhone or iPad with QuickTime


Tips

  • Try to be original and not duplicate apps that already exist on the App Store. Do a thorough search of the App Store to find out what's available. Of course, if your idea is flat out better, then go for it.
  • Always look for ways to improve your app.
  • If you like printed reference, hit Amazon.com to find some iPhone development books.
  • Try to test on as many different iDevices you can get your hands on. Even better if they have varying iOS versions installed.
  • If you hire an iOS developer and want to guarantee the iOS app looks like you've specified, you could design the interface for the app in Photoshop and use a tool to convert it into a functional Xcode/iOS application!


Warnings

  • The iPhone SDK is constantly changing and the devices evolving. If an SDK upgrade is made available during a project, make sure you read the what's new and changes before you jump on it. Unless stated by Apple that all new submissions must be compiled with the new SDK version, it may not be necessary for you at this point. If you do upgrade, some of the methods you have used may have become obsolete and although not likely to produce more than a warning at compile time, be safe.
  • You are not guaranteed lots of downloads or sales, don't get discouraged.
  • When you succeed and get an app on the App Store, don't be intimidated by mean people who write nasty reviews. Some give helpful feedback and some just like to be rude.
  • It's addictive; you might not be able to stop.

Thanks for landing on this post, If you like my post then give your opinion and feedback in comment box.


TAGS:- #How to Make an iPhone App, #How to Create a Application, #Create a Application, #How to Create a Application for iPhone, #Create a Application for iPhon, #how to make an iphone app on mac, #how to make an iphone app for beginners, #how to make an iphone app on windows 10, #how to make an ios app on windows, #how to make an app for free, #ios app development tutorial, #ios app development software, #how to code an app for iPhone, #how to code an app for beginners, #how to develop an iPhone app for beginners, #how to make an ios app on mac, #Make an iPhone App, #Learn Make an iPhone App, #How can i Make an iPhone App, #Making an iPhone App, #Making an iPhone App issue

Saturday, 26 August 2017

How to Use a Physical Keyboard With Your iPad or iPhone

How to Use a Physical Keyboard With Your iPad or iPhone

Your iPad and iPhone come with on-screen touch keyboards, but there’s nothing stopping you from connecting a good old fashioned physical keyboard and typing on that. Here’s how to get started.

What You’ll Need

Fortunately, you don’t need a whole lot to make this happen—just a Bluetooth keyboard. Pretty much any Bluetooth keyboard will work. Personally, I’m a big fan of Anker’s various compact keyboards, including this one ($18), which works with any computer and mobile device, but also has keys that are designed to work for iOS devices. The Logitech K380 ($30) is similar as well, but it also has easy-switch buttons that let you switch on the fly between devices that are all paired to the keyboard.

Of course, you can also buy Bluetooth keyboards that are designed specifically for iPads, often as part of “cases” that attempt to turn the iPad into a sort of ersatz laptop. However, they’re usually way more expensive than just regular Bluetooth keyboards. Apple’s own Smart Keyboard is $169, but it’s probably the closest you’ll get to native keyboard support if you have an iPad Pro.

If you don’t have an iPad Pro, or you just want something a little cheaper, you can get some keyboard cases for a decent price, like Zagg’s Slim Book ($55) and Anker’s Folio ($33), to name a couple.

If you want to use your MacBook’s keyboard, you can download software, like Type2Phone or 1Keyboard for $10, but for this guide we’ll be focusing on using a standard Bluetooth keyboard.

Pairing a Bluetooth Keyboard

The pairing process is the same as it is for other Bluetooth peripherals. Start by opening the Settings app on your iPad or iPhone and select “Bluetooth”.

Enable Bluetooth if it’s turned off.

Next, turn on your Bluetooth keyboard and make it discoverable. There’s often a dedicated button on the keyboard for this—usually it’s the Bluetooth symbol. (Some keyboards may require you to press the Fn key if the Bluetooth symbol is on a regular key.)

Once your keyboard is in pairing mode, it will appear in the list of connectable Bluetooth devices on your iPad or iPhone under “Other Devices”. Tap on it to connect it.

How to Use a Physical Keyboard With Your iPad or iPhone


Next, enter in the sequence of numbers followed by the “Enter” key on your keyboard.

That’s all there is to it! Your Bluetooth keyboard will now be connected to your iPad or iPhone and you can begin to type away without having to use the on-screen virtual keyboard. Both your keyboard and your iPad or iPhone will remember that they’re paired. So the next time you want to use your keyboard, just power it on—you won’t have to go through the pairing process again.

Basic Typing

How to Use a Physical Keyboard With Your iPad or iPhone

When you open up a document or note on your iOS device, just tap on a text field with your finger to put the cursor there and start typing. Since there’s no mouse support, you’ll still have to mostly navigate the interface with your finger like you normally would.


While you type, the on-screen keyboard won’t appear as long the Bluetooth keyboard is paired, so this gives you more screen real estate while working. As soon as you power off your Bluetooth keyboard and tap in another text field, the on-screen keyboard will come right back.

Saturday, 5 August 2017

How to Catch Legendary Pokémon in Pokémon Go

How to Catch Legendary Pokémon in Pokémon Go

Since the game went online over a year ago, players of Niantic’s massively popular (and often frustrating) AR monster-catcher have wondered where all the legendary creatures are hiding in Pokémon Go. The original Game Boy title had massively powerful, interesting, and unique legendary Pokémon way back in the 90s, but the smartphone game launched without access to Articuno, Zapdos, Moltres, and Mewtwo, despite a heavy feature in the original trailer.

Now, at least some of these critters are catchable in the game: the first two legendary Pokémon to appear are the flying-ice type bird Articuno and the flying-psychic type Lugia, with more monsters slated to hit the game later on. But be warned: catching them isn’t going to be a walk in the park. Unless you catch them by walking to the park. Like I did.

An Introduction to Raid Bosses

If you’ve played any massively multiplayer online RPGs, like World of Warcraft, you’ll be familiar with the concept of a raid boss. It’s a massively powerful enemy that’s more or less impossible for a single player to take down, requiring a coordinated team or a huge group of dozens or more players to defeat.

How to Catch Legendary Pokémon in Pokémon Go

In Pokémon Go, the raid bosses introduced in the latest update are regular Pokémon. But instead of simply trying to capture them by throwing balls and lures, you’re first tasked with defeating them in a gym battle: the monster spawns at a gym for a set amount of time, during which groups of up to twenty Pokémon Go players can team up in groups to take it down. Once the boss Pokémon is dispatched, you’ll have a chance to catch a weaker version of the rare monster with a conventional ball throw, using the special Premier Balls you earned as a reward for battle.

While all the raid bosses in Pokémon Go will be powerful monsters, the legendary Pokémon will be even rarer, appearing exclusively in these community-focused battles. The mechanics for the bosses as outlined below won’t change, but in order to get a chance at catching one, you’ll want to go to a popular area or gather a team.

Step One: Find a Raid Pass

You can’t just walk up to a raid boss and pile in—you’ll need a Raid Pass. These tokens are granted once a day by walking within range of a Pokémon Gym and spinning the circle, just like on a PokéStop. You can only get one Raid Pass per day, no matter how many gyms you go to, and you can’t hold on to more than one at a time—that means free players are limited to one raid boss battle per day, and they’ll have to spin the circle at a gym before going to a new raid battle the next day.

How to Catch Legendary Pokémon in Pokémon Go

There’s an alternative if you want to attack multiple raid bosses in a single day: the Premium Raid Pass. This is an item bought in the Shop for 100 coins, and you can buy as many as you can afford in a day. But just like the regular Raid Pass, you’re limited to only a single Premium Raid Pass at a time. And of course, buying them with coins will quickly drain your supply, unless you have Pokémon at multiple gyms or you top it up with real money.

How to Catch Legendary Pokémon in Pokémon Go

Step Two: Find a Legendary Raid Boss

Raid bosses appear exclusively at Pokémon Gyms. While the Raid Boss is active, the normal gym battles with Pokémon from other trainers won’t be available. The game will give you smartphone alerts for upcoming raid bosses, or you can find them in the new tab in the radar screen, or of course you can just look around the overworld until you find one.

How to Catch Legendary Pokémon in Pokémon Go

Raids that are about to become active will appear above their corresponding Pokémon Gyms as an egg symbol: a pink striped egg for “Normal” monsters (difficulty level one and two), a white and yellow egg for “Rare” monsters (level three and four), and a blue and purple striped egg for “Legendary” monsters (exclusively level five). This is the one you want—if you’re limiting yourself to a single free Raid Pass per day, save it for the Legendary eggs. If you see a legendary Pokémon (Articuno, Zapdos, Moltres, or Lugia in the initial batch) you can be sure it’s an active raid boss, since those Pokémon can’t be left in a normal gym.

How to Catch Legendary Pokémon in Pokémon Go


Eggs timers last around 30 minutes, after which the raid boss will stay available at its gym for a couple of hours. You have that long to gather a team, or team up with players who are already there, and defeat the boss.

Step Three: Team Up and Choose Your Pokémon

Once the egg timer reaches zero, you’ll be able to offer up your Raid Pass and join the raid boss battle. Whether you join a private group of your friends or the default raid group that forms up as players join the gym battle, you can use your Raid Pass over and over until you beat the boss, or until the boss time limit goes out. If you’re in a less populated area or you don’t have a group with you, wait a while at the raid boss location—more people might show up soon.


You might just be able to defeat a level one or two raid boss on your own, but for legendary Pokémon, you’ll want as many people as possible. Ten high-level players (30+) might be able to defeat the super-strong Pokémon, but twenty mid-level players will have an easier time of it. Twenty is the maximum party limit, either public or private, after which larger groups will be split up.

As you form up with other players, you’ll be given the opportunity to select up to six of your strongest Pokémon for the fight. Pure strength (CP) is important here, but type advantage is even more critical for getting those big hits. You’ll also want big, beefy Pokémon that have a lot of hit points, because the raid boss hits hard and can often take out even high-level smaller Pokémon with a single attack. Make your selections wisely.

Step Four: Take Down the Boss

When the countdown reaches zero, you’ll enter into a battle with your first Pokémon. The battle interface is just like a gym battle, with fast and strong attacks and swiping to dodge. But instead of a one-on-one fight with a trainer’s Pokémon, all of the people in your team will attack simultaneously, whittling down the boss’s hit points until it reaches zero. This is why it’s so important to have a large group: the boss can only attack one Pokémon/trainer combo at a time, while everyone can attack it during the entire battle.

How to Catch Legendary Pokémon in Pokémon Go

You can swap out and heal Pokémon if necessary, but keep an eye on the timer: if the boss still has hit points when it reaches zero, the entire group loses the fight. If you do manage to beat the raid boss, you’ll be showered with experience and rare items like Rare Candies and Golden Razz Berries. You’ll also receive a number of Premier PokéBalls: the better you, your local team, and game team (Mystic/Instinct/Valor) do, the more Premier Balls you’ll receive.

Step Four: Catch the Legendary Pokémon

Here’s what it’s all come down to: can you catch a legendary Pokémon? Immediately after the raid boss is defeated, you’ll be given a chance to catch a randomized version of that Pokémon in the standard Pokémon Go ball-throwing interface. The Pokémon won’t be able to run away from you, but you can only use the Premier balls you received from the raid boss to catch it! That means you’ll be extremely limited in your number of throws, since this is a high-level Pokémon with major evasive powers and a smaller area to throw at.

How to Catch Legendary Pokémon in Pokémon Go

It’s possible—perhaps even likely—that you won’t catch a legendary Pokémon on your first raid boss victory. Be patient, wait for an ideal shot, and use any berries you have available with every throw. Good luck!

Related Posts Plugin for WordPress, Blogger...

Labels

404 AdBlock Add-on Airtel GPRS Trick Airtel SMS Trick Alexa Amazon Amazon Kindle Amazon Prime Android Android 8 Android Oreo antivirus Apple Apple Mac ASCII Audacity Audio Authotkey Backup Balance Transfer in Vodafone Battery Bing Blogger Blogging Bookmarklet Browser Camera Chromebook clock Cloud colors command lines Computer Computer Tricks configuration Contact Creative Commons Credit Card CSS devolop DIY Doodle DOS Download Dropbox E-Mail eBook Email Email Attachment Embed Encryption English Error Evernote Eyes Facebook Facebook Tricks Feedburner Flipkart Font Foursquare Free Internet Free sms trick in Vodafone G Mail Gadget Game Getty Images GIF Gists Github Google Google AdSense Google Analytics Google Apps Google Chrome Google Contacts Google Currents Google DNS Google Docs Google Drive Google Earth Google Font Google Forms Google Images Google Map Google Photos Google Play Store Google Plus Google Print Google Reader Google Script Google Sheets Google Spreadsheet Google Translate GPRS Setting GPS Hacking Health App HelloFax Hindi Hoodie HTML Icons idea Image Editing Images IMEI Indian Railways Infographics Instagram Internet Internet Explorer Internet Tricks iOS iPad iPhone IRCTC iTunes iTV JavaScript JioCinema JioTV Junglee Kindle Language Translation Laptop Laptop. TV Life Time FREE GPRS Life-Style Link Linkedln Linux logo Make Money Online Microdoft Powerpoint Microdoft Word Microsoft Office Microsoft Outlook Mobile Mosaic Music Name Networking nexus Notepad OCR Online Shopping Open DNS OS Outlook Password PDF Petya Phillips Hue Lights Photogtraphy Pixel Play Station Podcasts Pokemon Pokemon Go Polls Print Productivity Proxy Server Pushbullet QR Code Ransomware Reddit Reliance Hack GPRS Reliance Jio RGB Ringtone Router RSS Safe Mode Samsung Galaxy S Scrabble Screen Capture Screen Sharing Screencast Secrets Security Send free sms from PC SEO Sierra Skype Slideshare SMBv1 SMS Snapchat Snapdeal Social Media Solution Sound Device Speech Recognition Sql Steam Sync Synology NAS Tata Docomo GPRS trick Teleprompter Torrent Trick Tricks TV Twitter UltraISO Unicode Unknown Extension Unlimited 2GB Unlimited 3GB Unlimited GPRS USB USB Security Key Video Editing virtual desktop Virus attack VLC Vodafone 110% working trick for GPRS Vodafone 3g Vodafone GPRS VPN wallpapers WannaCry Web Design Web Domain Website Wget Whatsapp WiFi Wikipedia Windows Windows 10 Windows 10 S Windows KN Windows Tricks windows updates Winows N Wolfarm Alpha WordPress XBox YouTube Zip
Twitter Delicious Facebook Digg Stumbleupon Favorites More