Thursday, 13 August 2015

Convert any word document or webpage to pdf

Many times when we are randomly opening pages of some websites or going through different sites , we see some topics which seems really interesting. Often when we are looking for some particular topic , we reach to some other post which is interesting too but we have to continue to our search and leave that page half heartedly. Many of you might be aware of the default option provided by browsers for saving web pages to your computer and read them later while you are offline . You can do it by using option “ Save Webpage As…”

But these web pages saved by this method are not that good quality files. When reading , it seems that we are still looking at the website and not in our computer. So today I am going to tell you a trick to Convert Webpage to PDF and saving it to your computer simultaneously.

How to Convert any webpage to pdf

There are two very simple and automated methods to Convert Webpage to PDF format.

Method 1 : PdfMyURL.com

Pdfmyurl.com is a website that provides service of converting any webpage to pdf format and make it available to save on your system free of cost with the blink of your eye. It is very fast .

All you have to do is Simply open PdfmyURL website and paste the desired URL or website address which you want to convert to pdf and click on button placed at right side of text box. It will convert that URL into pdf format and ask for saving to your system.

Method 2 : Using Nova PDF

You can convert webpage to pdf from popular browsers like Internet Explorer, Firefox, Opera and Chrome by installing a Nova PDF creator that works as a virtual PDF printer. Once the printer is installed, you can simply print to it and a PDF file will be generated.

Just Download this software from their official site here : DOWNLOAD

Install it to your computer and then it will automatically add a new option to your browser’s print button i.e. Nova print server . Select it and click on print. It will save that url as pdf. You can also set margins of page using page setup before downloading the pdf to set the size of pdf file you want.

So this was all about saving a web page as pdf document now I would also like to tell you about How to convert word document to pdf file.

It is a simple task to convert any word file to pdf file. It can be done online or by some software. The best way to do it is using wordtopdf.com

This site will do your work in three simple steps. Browse your file , Enter your email address , click on convert it and within a few minutes the converted pdf file will reach to your inbox. There are many other sites as similar to wordtopdf.com so if this site doesn’t work for you , simply google it.

    Above methods guides you to Convert any webpage or word documents to pdf format easily.

Collection of Cool Google tricks – #3 is the Best

Google is the Proclaimed king among all search engines present on the internet. Among all the web based search engines, Google stands out because of its high speed and simplicity.

 
Everyone is familiar with the web applications provided by Google. Some of these are the Gmail, Google Drive, Google app store and a lot more. But little do people know about some very handy Google tricks that come along with this impeccable search engine.

Top 10 Cool Google tricks of all times:

Below are Some Cool Google Tricks that i have Collected. Do not Forget to Check Bonus at the End of the Post. Enjoy !!!

1. Definition:

There is no longer the need to type a word and then visit dictionaries online to find its meaning. Using this trick, all you need to do is simply write “define” followed by the word whose meaning you want to know, This Cool Google tricks Come very handy if you use it Effectively.

You will be amazed to see that the meaning of the word, along with its synonym and antonym will be displayed on the search engine. For instance, type “define reach” and then press enter. The meaning of the word will get displayed on your screen.

2. Phone number lookup:

It is now possible to trace mobile number by simply typing the full number along with the area code. This will display the address as well as the name of the person under whose name the number is registered.(Doesn’t Work anymore)

This was the Most helpful thing i have seen from all the Google Tricks. Unfortunately its not working anymore. Check the below list.

3. Atari Breakout:

Only Few Know about this trick and so I think this is the Best Trick amongst all the Google Tricks. All you have to do is Type Images.google.com in the address bar of your browser to open up google images. Now type “Atari Breakout”  and Press Enter.

You will Definately Be amazed to see what happens next. It is Only Fair to Add this Trick in my list of Cool Google Tricks.

Note: I am not Responsible if you waste over an hour in playing this game. J/K

4.Translate:

The “Google language tool” comes very handy while translating text, words, a fully fledged web page or document on the internet.

5.Find movies and weather:

All you need to do is type “movies” or “weather” in the search box followed by the area code or name of the state in order to display corresponding information regarding it. For instance, if you type “weather 12345”, weather conditions of the corresponding location will be displayed.

Also, on typing “movies 12345”, the details of all the movies currently running at that place along with number of shows will get displayed. this is another Cool Google trick then i like and use.

6.Paged linked to you:

You can now find the web pages and links that are connected with your blog or website. Simply type “link” followed by the URL of your website and you will get a list of all the pages connected with your website.

7.Tracking airline flights and packages:

This is another handy Google trick. You can now find the arrival time and status of a flight by simply entering the name of the airline and corresponding flight number.

8.Calculator:

You can use the Google search engine as a real time calculator as well. For instance, if you will type 25+25 in the search box, 50 will get displayed.

9.Stocks:

All you need to do is type the stock symbol on Google and you will get information about stock rates, links as well as charts. For instance, to know about the stock details of “Microsoft”, you have to write “msft” on Google.

10.Finding PDF results only:

To get results matching only a certain file type, simply type “fileType:” after your search. Online manuals can be found using this trick from Google.

11.Local search:(Bonus 1)

You can now find local restaurants and other landmarks with this trick. One of the best Google tricks according to me. Simply go to “Google visit” and type the name of the area and the place which you want to find. It is capable of displaying all local landmarks and places.

12. Use Google as Timer (Bonus 2)

You Can use Google Search to Set Timers too. If you want to Complete Certain Task in so and so minutes or hours then You can simply start Timer. This is one of the Most amazing Google Tricks that very few people are aware of. All you have to do is Open a new tab in your favourite Browser and Enter the Term “Set timer 10 minutes” and click enter.

As soon as you Hit enter you will see google timer is already started.  In this Example i have used 10 minutes but you can always change it to anything.

For Eg
: if you wish to set a Timer for 1 and half hour then you will enter thie term “Set Timer 90 Minutes” and Hit Enter.

    With this it ends my list of Cool Google tricks, If i am Missing out on any Usefull Trick then please feel free to Comment.

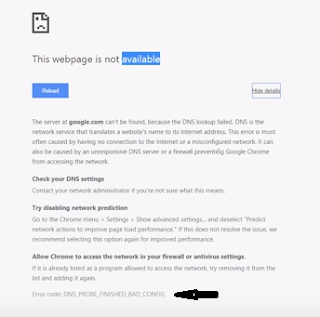
Fix “DNS_PROBE_FINISHED_BAD_CONFIG” in 3 ways

You can Come across DNS_PROBE_FINISHED_BAD_CONFIG error in Google Chrome, Firefox or any other Browser. The error Stops you from accessing Web Pages like Facebook, Gmail or Google.com itself. This Error in your Browser Points out that DNS lookup Failed while loading the webpage for you.

 
It doesn’t matter which Windows Version you are using, This is a Internet Connection Error and is displayed in Browser. This Bad_Config Error is gaining Popularity in recent times as more and more people are getting it. But Today We will Show you 3 Ways to Fix DNS_PROBE_FINISHED_BAD_CONFIG error.

Fixing DNS_PROBE_FINISHED_BAD_CONFIG Error


So in this post i will be Sharing 3 different ways to Solve this issue. After Which you will be able to Surf Internet and Open Sites easily just like before. Below Methods are sorted by Basic To Advance.

Method 1: Release/Renew Ip Address.


In this Method, you will be releasing your ip address and then renewing it again. If the Problem is with your IP address then this method should work for you. Just Follow the Below Simple Steps.

Step 1: Open Command Prompt(cmd) By Pressing Combination of Windows key + R to open run. Now type in “cmd” and Hit Enter.

Alternatively, you can Press Windows Key + X , then Click on Command Prompt (Admin).

Step 2: Now that your Command Prompt is ready, Type in ipconfig /release then hit enter.

Step 3: Now again type in ipconfig /renew and hit enter. This will Renew your IP address.

Step 4: Close the Command Prompt and open your Favorite Browser to Check if the Problem is solved.

Method 2: Flushing DNS.

In This Method We will Be Flushing DNS to Solve Error Code: DNS_PROBE_FINISHED_BAD_CONFIG. This will Most Probably Solve the issue if the Problem is in your DNS Cache. Follow below Steps.
  •     First of all Open Command prompt.
  •     No type in “ipconfig /flushdns” without Quotes and hit Enter.
  •     You can see your dns is succuessfully Flushed.
  •     Open your Browser and see if the issue is still there or you have now fixed it.

 
Alternatively instead of ipconfig /flushdns you can also type “netsh winsock reset catalog” and see if that works. Move on to the Next and Final Method if this doesn’t help.

Method 3: Tweaking DNS Settings.

  1. If both of the above method didn’t helped you to fix DNS_PROBE_FINISHED_BAD_CONFIG error then Use this method. It Requires you to do minor Tweaking in your DNS Settings But In most cases this fixes the issue if done correctly. Follow the below Explained Steps.
     
  2. Right Click on Network icon in taskbar then click on Open Network and Sharing Center.
  3. Now from the Left pane, find and Click Change Adapter Settings. This will Open up Network Connections.
  4. You will be presented with a new window with all Network Connections, Right Click on Active Connection and select Properties.
  5. Now look for Internet Protocol Version 4 (TCP/IPv4), Double Click on it to open its Properties.
  6. In the Properties Window, Click on Use the Following DNS Server Addresses and Type in 8.8.8.8 in Preferred DNS Server and 8.8.4.4  in Alternate DNS Server Just like shown in Below Picture. Then Click on OK.

Now Open your Browser and you will see that you have successfully Fixed Error Code DNS_PROBE_FINISHED_BAD_CONFIG now.

If any of the above method helped you, then take a second to let us know int he Comments below.

Friday, 7 August 2015

What is Trojan horse virus and how to Remove it

Are you facing virus threats on your computer? Is your computer behaving abruptly or are you the victim of a disk crash?  Is your computer hacked by a Trojan horse virus attack? A Trojan horse virus attack is one of the most dangerous threats to your computer and needs to be fixed immediately. If it is not protected on time, then the virus can lead to failures in connecting to the IRC network or even worse can lead to your computer hacking and then your computer might be used by some anti social elements in shaping some criminal attacks.

About Trojan Horse Virus

Before knowing how to remove this evil threat first one should know what actually a trojan horse is? It is a security breaking program, also malicious to your computer and is disguised in some benign object. It can be downloaded unknowingly through any document, executable, zip, movie or music file and unleashes a dangerous malware into your drive on executing the files.


This malware can completely wipe your disk or can even send your credit card details and passwords to any stranger on the web. It is not at all operating system specific. It can affect any operating system but affects windows more promptly due to its popularity and weaknesses. This is a silent attacker and many people come to know about its attack after it has infected other connections.
 

How to Remove Trojon Horse Virus

  •     There are many ways one can avoid itself from being a victim of this malicious virus but the best is to be attentive in downloading and executing files form an unknown source or person and also doing a background check of it, if downloading from a known source. But if you have already been a victim of it then you need to take immediate steps to remove it from your drive before it creates some major problem. You need to repair and then reformat your system completely to remove all malwares which may take from several hours to several days of time.
  • It is quite possible that the removal has not been done properly and may lead to coming back of the virus again and again in such cases you must take stronger measures to curb this problem.
  •     Firstly you need to have anti-virus software installed in your system and that too an updated one or else they will miss the latest species of Trojan horse. Anti-virus software helps prevent the system from many Trojan viruses. Then make sure you have updated your operating system as well with all new security patches.
  •     One may also have to install Anti-trojan programs like The Cleaner which specialize in Trojans. Once it is installed reboot your computer in safe mode and use the cleaner to clean all registries and drives for any Trojan suspected. Make sure the internet is unplugged while cleaning. Once cleaning is complete reboot the system again.

    After using the cleaner make sure that you have updated your operating system and have changed all the passwords. Once the system is repaired make sure to take a backup of every data and reformat the system completely.

How to Schedule emails to send in future

You never know if you will have time in nearby future. There are two instances, once when you are having enough time and no work to do and the other when you are not having time and you are having huge workload. During the times of heavy workload, there can be instances when you forget to do important things which you should have done.

 
Let’s say you didn’t mailed your friend for his birthday. So, what to do then? To keep yourself on a safer side you can schedule your mails when you are free.

How to Schedule emails for sending them in future.

Boomerang for Gmail

There is a plugin, names Boomerang for Gmail which is available both for Firefox and Chrome which will help you to Schedule emails. This plugin is compatible with Gmail and using this you can take control of sending and receiving emails at desired time in your Gmail account.
  •     Open your Google chrome or Firefox Browser and visit the Boomerang website by clicking Here.
  •     Once you have visited the website, click on the Install Boomerang button which is present on the website and the installation will be started.
  •     You will come across a couple of steps, follow those steps and your installation will be done.
  •     Once the installation has been completed, the next time you will open Gmail, Boomerang will be automatically enabled.

How to use Boomerang

  •     Using Boomerang is very easy as the interface of this plugin is very user friendly. Read the guide below on how you can use Boomerang on your Gmail account to Schedule emails.
  •     Compose email like you normally do.
  •     On the Compose page right next to the Send button you will see a new button named Send Later. This is the button which will help you to send email later.
  •     Choose the date and time as per your schedule, whenever you want to send the email.

Additional Features


Schedule Recurring Message :There is one great feature which comes with Boomerang and that feature is that you can schedule recurring messages to anyone on periodic basis. Let’s say you are working in a project and you are the project leader and each week you need to ask your team member about the progress report of the project. Using Boomerang you can schedule that message using the Schedule Recurring Message feature. You will see the option to schedule recurring messages once you click on the Send later Button.

Deal with emails later: Sometimes we don’t want to read the emails we received at that time. Boomerang will remind you to read the received mail at the time you have set. If you have sent an email to your entire team and you want that the person who is max qualified in your team should reply to It but he fails to reply it then you will be get notified.

How to send large files through email – Explained

A lot of internet users send files via emails. However there is one problem and that is that you can only send files with limited sizes. Let’s take example of Gmail. Gmail allows its users to send maximum data attachments of 25 MB.

This is definitely not enough if you are sending your birthday pictures or a video to your friends or family members. So, what to do? No worries, Yes you can send large files through email Easily

You can use websites like dropbox, where you can upload files and share the link of those uploaded files to your friends but unfortunately websites like dropbox comes with some restrictions with first being not free, advertisements and less security.

 
Google Drive by Google is the best option to upload your files and send them to your family members, friends. It acts as a Cloud drive. Most of us are having a Gmail account, you can use the same Gmail account if you are willing to use Google Drive and with that Gmail account you will get 5GB of free space.
 

How to send large files through email


Follow this step by step tutorial for sending large files via email.

Step 1:
First of all you need to visit Google Drive and sign in with your Google account Credentials.

Step 2: Once you are logged in you can start uploading your data. Click in the upload button which is present right next to create.
While uploading any file you can view the status of the upload by looking at the status window which is present at the bottom right corner of your computer screen. You can even place more than one file for uploading at a time.

Step 3
: Once the upload has been completed you can easily share them with your friends, family members or even office colleagues. Click on the Share link to set the sharing settings of the file which you want to share. You can decide if you want to make that file private or public. Click on Who Can Access under Change menu to change the file status.

Step 4: You can send the files directly by emailing them from Google Drive. In the Sharing settings menu of a particular file you will see options which will include sending file via email and via social networking websites like Twitter, Facebook.

Google Drive also comes with one great feature and using this feature you can also limit the people to only view the files and not comment or you can give them permissions to comment or edit the files.

If you want to share files of your project with your team, upload the files and grab the link and share them with your entire team. You can even use Google Drive on smartphones as it is available both for Apple and Android operating systems.

There are other websites which are similar to Google Drive but provide a little less features:-
  •     Dropbox :- Click here to access Dropbox
  •     Sky Drive Live :- Click here to access Sky Drive Live


So now you know how to send large files through email Easily and quickly, then take advantage of it.

Thursday, 6 August 2015

Websites to Download eBooks Free

It would be nice if we can Download eBooks Free and take it with us on our devices, as it is not possible to take a book to any place as it may be fat and also includes the weight and we can`t get the frequent updates for it. There are many sites where eBooks can be obtained for free, downloaded and can be enjoyed from any Android device.

 
For popular and “new release” reading materials or magazine, an online eStore like Amazon or Barnes & Noble is essential but this sites are not free of cost. So here are some of the websites that gives you free downloadable eBook Specially for Tech Students.

5 Best Websites to Download eBooks Free

1.Free-eBooks:-

It is an online store for free ebook authors, ebook resources, ebook downloads. Besides of it you can also download free magazines from it. Each ebook has its own short review in the description. You can also submit your own ebook, you just need to become a member of the Free-EBooks.Net to access their library. You can Register it for free.

Goto: www.free-ebooks.net

2.Many Books:-

It provides you with free ebooks for your eBook Reader, iPod or PDA. You can browse for any ebook through the most recommendations or recent reviews from visitors or you can even search and download free books in categories like scientific, engineering, programming, which you may feel interesting. There are 23,568sss eBooks available in it and they’re all free.

Goto : www.Manybooks.com

 3.Globusz:-

It is a unique ebook Publishing house, specialized in free eBook downloads. It also provides an excellent Star rating Showcase for new and evolving authors to come front with their thoughts or ideas.  It is very well categorized by topics which is friendly to use, and it also consists of 10 top level categories, and over 125 sub-categories.

4.KnowFree:-

It is a free website for ebook where users are able to exchange e-books for free and it also gives video training and other materials for educational purposes and also includes self-practice. It consists of thousands of documents like literature, lists, maps, databases, technical references, etc.

Goto www.knowfree.net

 5.Online Free ebook:-

It provides various links to various ebooks (pdf format) spanning in 9 categories which are used fors daily purposes, they are: Business Ebooks, Gadget Ebooks, Engineering Ebooks, Automotive Ebooks, Health & Medical Ebooks , Hobbies Ebooks, Hardware Ebooks, Sport & Martial Art Ebooks, Programming & Technology Ebooks. It is especially designed to add all this stuffs in your Pocket PC, EPOC, Windows CE, Symbian or other handheld device.

Goto www.onlinefreeebooks.net

 Some more Free Websites to Download E-books :

I hope this article will help you to Get Your Desired E-Book that you need, If you know any other Best Website to Download eBooks Free, Than please add a Comment.

Find lost Smartphone using Google’s Android Device Manager

If you are unable to Find lost Smartphone and you haven’t loaded any app into your smartphone then you need not to worry as there is one method using which we can find your lost Android smartphone and that is by using Google’s Android Device Manager. If your phone is stolen or you have misplaced it anywhere in your home you can use Google’s Android Device Manger to find it.

All the Android smartphones come with Google Play installed in it. When you use Google Play for the first time on your Android smartphone or even on your tablet, Google installs Android device manager in your smartphone or tablet without your knowledge.

How to Activate Android Device Manager

Follow the steps below to activate Android device manager on your smartphone or tablet.
  •      Go to Settings
  •      Then move to Security
  •      Then move to Device Administrators
  •     You will see some apps there and the first one would be Android Device Manager
  •      Tap on it and Activate it

Once you have activated Android device manager on your smartphone, you need to go to your web browser and follow the steps to find your lost Android device.
  • Visit the Google Play home by clicking on this link
  • You will see a Gear icon on the top right corner
  • Click on it and you will see Android device managerClick on Android device manager
  • Once Android device manager is opened in your web browser it will automatically contact your device. The map of your country will be displayed on your web browser.
  • Once Android Device Manager has located your smartphone you will see its location on Google Maps and the distance it is away from you right now.

Now you will have  three options there.

1Ring the Device:

This feature will ring your smartphone at fill volume for 5 minutes even if it is silent. Unfortunately the device won’t ring if it is switched off.

 2.Lock the Device:

This feature will lock your Android smartphone and will be provided a new password to access it. You can set your desired password on your lost smartphone.

3.Erase all Data :

Using this feature all the data which is present in your Android smartphone will be deleted which will include images, music or other files. However it won’t delete the contents of your SD card and Android device manager won’t work once you have erased all the data. It will Factory reset your smartphone.

 Apps to Find lost Smartphone


If you are looking for an app which can find lost Smartphone then we suggest you to check Android Lost, a great app which will remotely control your lost Android smartphone.

Alternatively to Find lost Smartphone you can always have Find my Phone as a Secondary Option.

Resize Image without loosing Quality

People hate to visit websites which require more time for loading. So one should always seek to improve the webpage load time, so to do so you have to look at many things like loading sources, page cache, media files etc. One among such media file is images, adding beauty to your page, but at the same time, it is regarded as the most bulky resources which takes much time to load on the page, thereby causing inconvenience to the visitors.

But one can improve the page load time by cutting the size of an image to a significant amount. But even resizing the image without any proper knowledge may be troublesome as you may lose the quality it had. Though photoshop provides a nice feature to save the original quality of the pic, it is not preferred much as it’s too expensive to purchase the photoshop application for desktop or web version. So here I’m going to provide you with free online tools to Resize Image without loosing Quality

Web Based Tools to Resize Image without loosing Quality

1.Kraken.io :-

JPEG, PNG, GIF, SIV are some of the image formats that can be compressed with this online application. This reduces the image to a quite considerable point without losing the image size.

2.Imageoptimizer.net:-

After uploading the image from your computer, give the size of the image and quality you wish to have after processing. This provides only some control of the output and compression ratio But Greatly Helps to Resize Image without loosing Quality.
 

3.Smush.it:-

Smush.it is the best and popular online application you can have to compress images. It is present with an up-loader as well as URL box to have the image. In this you will not be provided with the ‘enter’ option to enter the image quality as that of previous one because it automatically optimizes the image by compressing it to a limit.
 

4.Compressjpg.com & Compresspng.com :-

I would suggest you to have these application, for more control of the image quality. A slider appears as soon as you upload an image to auto control the quality of the last image. A preview panel is provided for showcasing the changes according to the quality slider change. So before downloading the image you can have the review of your final image. This application is available on different domains for JPG and PNG images.

 5.Punypng.com :-

This application is available to compress the PNG files. Upload an image and you can get a compressed size of the image. Besides this, tinypng.com , a quick tool to compress the PNG images to the best level without affecting the image quality.

Desktop tool to Resize Image without loosing Quality


If you need a Desktop tool to do this task then i would suggest you to have PNG Gauntlet as your first choice, You will need .Microsoft Net Framework 4.0 to run this tool on your Windows.

 
You won’t Face any difficulty in Using this tool as it is very User Friendly. While Optimizing the images PNG Gauntlet will show you older size and Optimized size of the image. this Program is not that Fastest at it work but Usefull.

Coolest Youtube Tricks You Must Know

No wonder all of us are very familiar with this name YouTube . It is the biggest video streaming channel all over the world. Whenever you want to watch any new music release video , your favorite show that you missed on tv , live sports , funny videos , coolest tricks , tech videos and much much more are available anytime there on youtube.

 
All these gives us reason to depend on Youtube for many purposes but apart from its usability there are many tricks which may give you a better and more efficient way to use YouTube. So here I am going to share some exciting and very useful Youtube Tricks with you.

5 Coolest Youtube Tricks that you must Know.

1.Set a Specific Start Time:

Many times you wish to share some video on Youtube with your friends but you want them to focus on some specific part of video and then you inform them the exact time duration from where they should start watching it. But it is possible to share video with customized or specific start time easily. All you need to do is adding some simple code in URL.

Lets say you are watching video on following URL :

http ://www.youtube.com/watch?v=U8STgCviLe0

Now you may simply add ” #t=01m02s ” at the end of this URL while sharing this video and it will start playing video from 1 Minute and 02 Seconds instead of it’s initial position.

2.Set Auto Replay For Video:

Just like a Windows Media Player where you can loop and replay your favorite audio/video song infinite times , you can do the same with Youtube. All you need to do is replace Youtube with infinitelooper in the URL bar and hit enter.

Original URL : http://www.youtube.com/watch?v=U8STgCviLe0
Modified URL : http://www.infinitelooper.com/watch?v=U8STgCviLe0

It will redirect you to a new website where you can replay your video as many times as you want. It also allows a special feature , you can set a selected area for looping which means only some special part of video can be set for looping. This is simply great isn’t it ?
 

3.Watching Video With Slow Internet Speed:

Youtube is taking care of their all type of visitors from many different countries as well as of many different kinds of internet connections including very slow speed video streaming. Youtube provides a great feature called Feather Beta which allows users to enjoy videos on Youtube even if they have very slow internet connection.

Feather beta feature removes the bytes which restricts the browser speed of streaming video hence unleashes full capacity of browser to allow streaming at rapid rate. To Use This Awesome Feature you may Click here And click on Join the Feather Beta feature.

4.Search Accurate Keyword:

Youtube is biggest video channel on internet and it gives birth to complexity that whenever you search for any video title , as a result you get thousands of results for same keyword. This makes it really challenging to find that video which you really want to watch. But there is a simple trick by using which you will be provided with videos having exactly same keywords as you have entered in search bar and no inappropriate stuff.

 
Simply add allintitle: in the beginning of the keyword you want to search and it will show results having exactly same keywords as you searched.
 

5.Always Play Videos In HD:

If you have a high speed internet connection and you love watching videos in HD then this trick is for you. Most of the time videos on youtube channels have default settings and when you play them , they start with low quality in order to stream at faster rate but if you want all videos to be played in HD by default when you click them you can simply install an Add-on in your browser named Magic Actions For Youtube . This Add-on is available for Mozilla Firefox as well as google chrome . Once you installed this Add-on in your browser enable the Auto HD option.

With this it ends my list of 5 Cool Youtube Tricks , you you know more and want to share  with us, Don’t Hasitate to add it in Comments.


Wednesday, 5 August 2015

5 Things to Do while Internet Downtime

First of all A Very Happy New Year to all Smarttricks Readers, Many a times We Panic when our Internet is down, So better you Plan about Things to Do while Internet Downtime. You are an Internet addict ? Then you might have a Hard time during Internet Downtime, So today i will list some Basic Tips On things to do when you are unable to access Internet.

5 Things to Do while Internet Downtime

1) Play Games and Listen to Music:-

People Normally tend to Play games while Thier Internet is down, but if you play games online, then Thats  an issue for you. Listening to your Favourite Music is not a bad idea as well. Gaming and music are the best option according to me to cut the internet downtime. 

2) Repair Your Computer :-

Most of us Dont bother to Repair our Computer While we are on internet, The best time to Clean your PC is when your Internet is down. Do bother to Defrag your Hard disk, Check your Hard disk for Errors , Repair if found any, Manage your Files systematically, Uninstall unwanted Softwares, Delete Unnecessary Files and Folders, Use Registry Softwares to Analyze and Repair your System Registry. This will tuneup your PC. Now Check your Internet if its up.

3) Clean Computer Peripherals:-

Remember When your Mom Use to say ” If you use Computer, even learn to Clean it Regularly” And you just ignore it, Yes my Friend this is the Right time to Clean Your Keyboard, Mouse, CPU Case and other Peripherals you see Dirty. One of the Best Things to do while Internet Downtime.
 
4) Spend time with your Family Members:-

If you have already done above 3 things and still your internet is down then Spend Some Quality time With your Family Members, Most of the time We are on Internet and We Don’t Spend Value time with Parents and Siblings, This Doesn’t Mean you Ignore them when internet is up, after all They pay for your Internet J/K .

5) Go for a Walk :-

This is the Best Thing to Do if your Internet is down, Internet Users Don’t tend to Take a Walk out, Just Disconnect from your Online Life and Enjoy the Fresh Air Outside.

Bonus Tip: While going for a Walk, Don’t Forget to Take your laptop along , You may Stumble on an open WIFI network :p .
So these are the Basic but Usefull Tips on Things to Do while Internet Downtime, I hope this will help and You Enjoyed the article.

Watch Youtube Videos in VLC Media Player

VLC Media Player Have the Capability to Play Videos with all most all Video Formats , Probably this is the One reason Why VLC media player is the most Prefered Media player,  But Do you know that We Can even Watch Youtube Videos in VLC ? Yes we can, We do not require Browser to Watch Youtube Videos, VLC will do that job for you very Well. I already Shared 5 Cool Youtube Tricks that You Must Know

 
You can not only Watch single Video in VLC  but also Watch Youtube Playlists in VLC to watch them in Sequence,Some More Advantages of Watching Youtube Videos In VLC Media player are:

    Watch Youtube Videos without Ads, Means no Disturbance While Watching your Favourite Video.
    Use Loop Button To Watch a Video Again and again Many times.
    Increase or Decrease the Speed of the Video
    Take Snapshots of any particular Screen of a Song or Movie.

How to Watch Youtube Videos in VLC Media Player


Now let us Get Started With Steps to Watch Youtube Videos In VLC, Follow the Below Simple Steps.

Step 1: Open VLC media player, Click on File > Open Network Or Simply Use CTRL+N Keys to Open up Network URL Dialog box.

Step 2: Open Youtube, Navigate to Whatever Video you want to Play in VLC, Copy the Url of that video and Paste it in the Dialogue Box. and Click on Play.

Step 3: Enjoy Your Video.

Simple Enough hah, Now Let us see How to Watch Youtube Playlist In VLC Media Player.

Step 1: To Watch Youtube Playlists in VLC we will be Using an addon, So Click here to Goto the Downloading Page of the VLC addon Called VLC Playlist Parser. Make sure you have Latest Version of VLC Running on your system.

Step 2: Download the addon, Copy it and Paste it in Videos Installation folder which in most cases would be C:\Program Files\VideoLAN\VLC\lua\playlist.

Step 3: Everything is done, Now Open VLC, Press CTRL+N Paste Video Playlist URL Which need to be Public. Click on Play and Enjoy all the Videos.

I Just Hope this tutorial on How to Watch Youtube Videos in VLC Media Player Helps all you Youtube Lovers.

Computer Security Tips to Protect your System information

We hear a lots and lots of concerning cases of hacking, softwares, malwares, viruses, etc, Here are some Computer Security tips to safeguard your PC/laptop against hacker intrusions, malware and different viruses that exploits your PC or Laptops.

6 Computer Security Tips :-

1) Use a firewall :-

A firewall is a software system that will handle outgoing and incoming Internet connections of your computer. You’ll be able to clearly use the one engineered into Windows by default, however this can be by no means the foremost Efficient. i will like to recommend Comodo Firewall which is free and straightforward to use. Using Firewall is just one of Computer Security tip that i want to mention

2) Use antivirus :-

There are obvious reasons to use Anti virus Programs, but there are People that don’t have any antivirus or those who have, they have not upgraded thier antivirus since their permit has lapsed.. However there are quite powerful free antivirus Available. One must Install Antivirus to Protect and Keep thier Computer Secure

3) Updating software system :-

New vulnerabilities are found in software system or operative systems like Windows each day. So one must always updates thier software system. Keeping your installed Softwares upto date is Important, as it will Keep hackers away from breaking into your System and its Said that any upto date program Works smooth without any glitch.
4) Use complicated passwords :-

Users like you and me use too weak  passwords that are very simple to detect for hackers, there are so many software which will try all Possible Combinations to Crack your Password, this is known as Bruteforce technique .  If your secret word(password) Consists of just 4 or 5 characters, it will easily discover it.

Your Password becomes harder to crack if it consists of 8 or 9 characters which also includes numbers, letters and special characters.To check the strength of your Password, there are plenty tools over internet. This is an important Computer Security tip that everyone must Consider.
5) Use totally different passwords :-

Most common mistake people make is that they use same password everywhere over internet. Yes, its very hard to remember passwords for all accounts but its highly advisible to have different passwords for different accounts.

This Practice Comes handy if one of your account gets Compromised/Hacked, then your other accounts are still safe.
6) Always Beware: :-

    Finally, Abstain from getting hacked,  Always beware while Browsing Internet, don’t transfer and install everything and anything on your PC or Laptop.

    Always check the sources of software system and websites that you just use to download programs.

    Don’t be silly and amateur hackers won’t be able to do  anything to you (while serious and skilled hackers will not have any interest to hack you)


Do you have any Computer Security tip that you will like to share ? Feel free to comment below.

How to Speed Up Chrome Browser Easily

Today I will be Sharing some cool tricks and tweaks by which you will be able to Speed up Chrome browser. Do you know that experts which are sitting at future mark says that Google chrome is one of the fastest internet browser. Rightly said, As you have already experience while using google chrome that it really works faster and smoother compared to other internet browser. Google chrome uses DNS prefetching and speedy (SPDY) protocols instead of simply using HTTP. These DNS prefetching and SPDY protocols load up your page in advance so that you need not to wait for more time.

 
But It happens many times that google chrome starts working very slow and believe me that  is very frustrating. But you need not to worry any more because listed below are some nice tricks to speed up chrome browser

 How to Speed Up Chrome Browser ?

1. Disable plugins-

I can bet you that you are using many plugins which are generally not in your use. To work faster and smoother on your chrome browser you must have some selected plugins installed. Too much plugins can slow up your browsing speed. Follow the steps below and start removing your extra plugins from your browser.

1. Open your chrome browser and go to the following address

chrome://plugins/

2. Uncheck the plugins which are not in your use
You can also delete these plugins unwanted plugins. Understand that you may not be able to delete or uninstall these plugins,you can only disable them

Note: Be very careful while unchecking or deleting your unwanted plugins because there are many plugins which are responsible for the performance of your browser. You may not want to disable plugins like flash because many web sites use flash to display web pages.
 

2. Disable Extensions

You might wonder if Plugins and extensions are almost similar to each other?  Plugins are usually a third party programs which are needed to enhance the speed and performance of your browser but other than this extensions are specifically needed for browsers.

These Extensions really slows up your browser and can affect your browsing speed very badly. To avoid this thing you just need to follow the below steps carefully :-

1. Open your chrome browser and type the following address in the address bar

 chrome://extensions/

OR

To check the full list of extensions installed in your browser, simply Click on Wrench icon on your toolbar, navigate to Tools and then click on Extensions.

2
. You will now going to see an extensions list which is supporting your browser.

3. Simply uncheck the extensions which are not needed or just delete those extensions which are not needed in future.

You will surely see some changes in your browsing speed as you delete those extensions from your browser.
 

3. Clear your browsing data

You already know that if you browse any website, chrome automatically collects the cached text, cookies and other kinds of website data. That is why when we click again on that website address it consumes less time for loading that web page.

Although cached and cookies are really made to speed up chrome browser but sometimes it happens that they are responsible for decreasing your browsing speed and lagging.

Following steps will be helping you in clearing your browsing data:-

1. Click on Control and customize chrome button or Wrench icon as i mentioned earlier.

2. Choose Tools > Clear browsing data.

3. Simply, choose the time range and other types of  extra features which are listed below in that dialog box, hit Clear browsing  data.

That’s all. I Hope you this article will some what help you clear your question how to speedup chrome browser?  if you face any type of problem or confusion after reading this article you can surely leave a comment below in the comment box.

How to Clear Cache in Chrome – Super Fast way

As you already know that google chrome is one of the fastest browser for using different internet services but do you know why? Chrome automatically stores many types of website data when you open any website and that’s the reason why it takes less time compared previously for loading your webpage.

But as google chrome stores website data for quick loading then it is also possible that chrome can get slower because of storing too much data and believe me guys when it happens it is the worse thing ever. the Cache helps to speedup browsing but slow downs the Broswer, So here is a Step by Step guide on How to 
Clear Cache in Chrome and make your browser faster then before.

In this guide you will learn 2 ways to clean cache in chrome. The Default way and The Fast way, So do not miss to Check Both the methods.

How to Clear Cache in Chrome Default Method

Step 1.  First of all Open your Google Chrome browser.

Step 2. Then click on Customize and control Google Chrome button on the top right corner.

Step 3. Select History option. You can also press CTRL + H for opening this menu box directly.

Step 4.  After performing the above steps choose Clear browsing data option for clearing your recent web files and other browsing data.

Step 5.  Now carefully choose the time period and check or uncheck the options in the menu.

At the last simply click on Clear Browsing Data and that’s all and this How to Clear Cache in Chrome.  Your all type of recently used websites and web data will automatically be removed after pressing this option. If you have confusion regarding the above steps then you can simply press CTRL + Shift + Del button and then clear your all browsing data.

All types of Cookies, Cached plugin data, passwords, form fills and other type of app data will be flushed from your browser.

How to Clear Cache in Chrome Fast


You can also prefer using different types of extensions which are available online for chrome browser. With the help of these extensions user will able to clear the browsing history just by one click. Here I have mentioned some of the best extensions that you can use for your chrome browser.

1. Cache killer-
There are lots of extensions which are available for cleaning your cached plugin data in your chrome browser. Cache killer is counted in one of the most simply used extensions for chrome browser. This extension is so simple that it can be easily controlled with just one click.

After you have successfully installed and enabled this plugin on your chrome browser then it will help you by automatically erasing your cache plugin data. Not only this but you can also able see the latest version of the websites with the help of this useful extension.
2. Clear Cache-

This extension contain many amazing features which can allow you in removing your browsing data which generally contains downloads,cookies, cache, history,form fills, and other type of storage.

If you compare this extension to cache killer then you will find that this extension is more useful. You just have to click the icon of Clear Cache and then it will automatically flush you browsing data.
3. OneClick Cleaner-

Like all the extensions discussed above One Click Cleaner also performs the same work. With the help of this extension user can clean up the whole google chrome browser with just one click. One Click Cleaner contains many type of options for clearing your browsing data.

Whenever you find that your browser is working slow then simply use this extension and clear your all type of cache plugin data to speed up your chrome browser again.

You just learned 2 Methods on topic How to Clear Cache in Chrome, This guide not only helps you to clear cache in chrome but also clears cookies and browsing history.

[alert style=”e.g. white, grey, red, yellow, green”] Note:You should always try to clear your google chrome cached data after every use because it is the best way by which you can speed up your chrome browser. If you are doing this process regularly then you can surely enjoy your internet services without any type of issues. [/alert]

Hope, you have enjoyed this article while reading. If you have any type of confusion or problem regarding the above content then you can leave your comment below and express your problem.

Error 651 – Methods to Fix it in Windows 7/8

If you are a windows user then it is possible that you have Face Error 651 Anytime. There are many windows user who get affected by this error code 651 while working online.

If you are one of those windows user, then keep reading this article and carefully read out the following Detailed solutions which I have gathered after researching various websites, articles, forums etc.

So, without consuming more time I’ll directly come over the main point of this article. Error code 651 usually occurs when user tries to connect it’s broadband in windows 7 operating system.

It shows a message that Your modem (or other connecting devices) has reported an error and Usually the message will be “Connection failed with error 651” .

 
In such cases user tries to restart the whole computer, router or modem and if this solution doesn’t work then he/she tries to find the solution online but its rare that they find out the solution as they cannot get online.

You can easily make out when you are facing this problem in your windows 7 as this error code 651 shows an error message when user is working online.

How to Fix Error 651 in Windows

There are  ofcourse lots of suggestions and solution available online to solve this Error but let me tell you that there is no official solution available online or guarantee for fixing this problem in windows 7. So, for helping out those users I have tried to gathered all types of solution which can help you out in solving this problem on your windows 7 operating system.

You can relax and follow below fixes to this particular error you are facing.
 

1. Uninstall Modem-

By uninstalling the modem user can solve this problem. This solution is Most Common to get rid of this particular error code. Its applicable for all type of dial up modems. There are many people who had solved out this problem by this method.
 

2. Replace raspppse.sys from windows 7 drivers directory

I have seen that many users has successfully solved this problem by replacing the raspppse.sys file from the windows 7 directory.

3. Disable IPv6 for your internet connection

User can also solve this problem by turning off the IPv6 for their dialer modem. This is one of the most easiest way for solving out this problem successfully. Right click on the Connections, Select Properties, Then Uncheck the box which says Internet Protocol Version 6 (TCP/IPv6).
 

4. Disable Windows 7 auto tuning feature


There are many people who suggested that by turning off the auto tuning feature we can solve out this problem. This method is useful for only those users who are using router. To Disable Auto tuning follow the below steps.

    Start command prompt as administrator.

    Type in the below command and Press Enter

“Netsh interface tcp set global autotuning=disabled”

5. Reinstall LAN card drivers

We have seen that by reinstalling the LAN card drivers, Connection Error 651 problem can be solved. Sometimes it is possible that drivers may get corrupted and this is the reason why I will suggest you to install your drivers again.
 

7. Performing Clean Boot

Performing clean boot can help the user in finding the root cause of this problem. If there is no problem in your windows services then this method will not be working for you.
 

8. Recreate Dialer and Restart ADSL modem router

It is possible that your internet modem could get hanged during the connection. By removing the dialer and then creating the new dialer can help the user a lot. Restarting ADSL modem/router can also work during such type of cases.
Overall Verdict on Fixing Error 651

So, these are the solutions which I have found while researching to Solve the Error code 651 in windows . If you are facing this problem in your windows 7 Pc then I will strongly recommend you to try these methods once.

Hope, you have liked the above article. If you face any type of problem after reading the above article carefully then you can surely leave your comments below in the comment box. Also if you have liked anything about the above article then kindly share this article with your friends to help them too…  :)

Google Play Store Error 498 – 5 Ways to Fix it

Recently While Downloading Asphalt game on my Smartphone I got an Error 498 in Google Play Store. To be Exact, the Error Reads “Error 498 has occurred while communicating with the server“.

I Tried again but the Same Error Again. After Few Tweaks i was finally able to download and Install  Asphalt on my Phone.

Because i Faced this error in Google Play store, i though there will be many other people facing the same error and so this Guide on how to Fix Error 498 in Gooogle Play store.

Here on this Page i will be sharing few Methods that will help you to get rid of it. Though any one listed Method will not work for Everyone to Get rid of Google Play Error 498 because there are different reasons that are responsible to cause this error.

Causes of Error 498 in Play store


There are Few things that causes this Error on your Smartphone while you try to download any app from Google Play store.

    The Most common issue is the Size of Device’s Cache Partition. You will get Error 498 in play store if you try to download apps that are larger in size then your Device’s Cache partition.
For Eg: Your Cache partition is of 30M and you try to download an app with Size 35M then you might get this error. Usually Play store have issues when downloading apps that are large in size.


    Another Reason is Google Servers from where you are trying to download the apps might be under maintenance. So if you are downloading an App and you get Play store erro 498 message then Server may be the issue. Just wait and try to download it again.

So these were just Couple of Possible Reasons for a User to get this Error in Google Play store, Now let us see Some Possible Ways to Fix it.
 

5 Ways to Fix Google Play store Error 498

Method 1: Clearing Cache-

Most Common Reason you might be facing this Error  is because of Cache, so i will start the Methods list by Recommending you to Clearing the Cache.

To do So, Just navigate to Settings > Applications > Manage Applications > Select Google Play store > Clear Data & Clear Cache.

Now Try and download the App if Cache was the problem and clearing it solved the Issue for you.  One more reason of listing this method on top is this worked for me and i was able to download the game easily after clearing the Cache. Though the Solution for all might not be the same so try below methods too.

Method 2: Use Wifi to Download.-

Many a times your Internet Service Provider(ISP) Creates this Problem of Error 498 and many other Errors. so Try and get access to Wifi somehow and try to download the app thats giving you the Error.

Method 3: Adding New Play Store account.-

You will need to Add a new Play store account inorder to fix this Error. Go to Settings > Accounts > Add New Account > Click on Google > Next > Enter email > Done.

After setting up new Play store account try to download the same app and see if this have Solved your Problem.

Method 4: Connecting with Computer:-

One of my Friend reported that he fixed Error 498 by installing apps from Computer to Smartphone. You just need to connect your Smartphone to Computer Using USB Cable. then goto Google Play Store using your Favourite Browser on your Computer. Then Search for the App which was getting error on your Smartphone.

Click on the Preferred Result that you get, next On the App page you will see Install button. Click it to Download that app On your Smartphone. No it will not Install on your Computer. it will Install on your Smartphone. Just make sure your Smartphone is Connected or else you will not See Install Button.
 

Method 5: Uninstall & reinstall Google Play store:-


If your Phone is Rooted then You might just want to Uninstall and Then Reinstall Google Play store so that to make sure that you actually get rid of Error 498 in Google Play Store. If any of the above Listed methods don’t work for you then go for this one and you will fix it for sure.

So these were 5 Methods to Fix Error 498 In Play Store. I hope this helps you to get rid of this error and you can again download your favourite app from play store just like before.

If these Helps then please don’t forget to spend few seconds and Comment below which Method solved the Issue for you. Or If you have any other way to get rid of this error message in play store then feel free to share it in Comments below.

How To Create Facebook Page without Name

If you are a Daily facebook user or a facebook addict, you might have come across some Facebook Page without Name . Well at that very moment you must have thought about how did these guys can create it. You might have even googled it , but never succeeded.

Creating Facebook Page without Name is as simple as 1,2,3 . Just be with me and by the end of this tutorial you will be able to Create one by yourself. We will be Using some Arabic characters to Create a Facebook page with no name.

How to Create Facebook Page without Name?


if you have already Created a Page on facebook before than this is going to be the Easiest tutorial for you, For those who don’t have any experience in creating a page , Believe me i will keep it Simple just Follow the Below simple steps.

Step 1: Login to facebook and click on Create page or just click Here .

 
Step 2: Now Click on Company, Organization or Institution (Not mandatory You can click on any.) and Choose a Category, again you can choose any it doesn’t really matters.

 
Step 3: Now copy the below characters and paste in the place of name just like shown in below picture and Check the box which says i agree to facebook pages terms.

Step 4: Now, Click on Get Started, Give a short description and click on “Save info” now you can click on skip, skip and skip .

 
Step 5:  With this said, We have successfully created a page , But we can see the Characters which we entered earlier, we are making a page without any name or Character. Now in admin panel, click on Edit Page > Edit Settings.

Step 6:  Click on “Page info”  , the first thing you will see will be the Name, Click on Edit and use your Backspace key to Delete everything from the box.

Step 7: Click on Save Changes. If you have done all the steps as explained then you must not get any error.

Step 8: Click on View page to check your Facebook Page without Name.

 
 Step 9: Upload a profile picture and Cover photo if you want. Now its Time to Show your Page with No name to your Friends. Try it by Yourself While its Still working.
"Note: The Code and the Trick to Create Facebook page without name is not working any more, This trick was working fine at the time of Creating the tutorial. There is still one or two pages on whole of fb which has no name."

How to Change Facebook Themes with Chrome Extension

Hey guys, few Days ago i was just Surfing Google Chrome webstore and i somehow stumbled upon a Chrome Extension.  Yes,a Chrome extension that will give my Facebook a Whole new look. I was anxious to try it, so i just installed it and checked my facebook. i was surprised to see my facebook homepage have all new look. I found it cool and so i decided to write steps on How to Change Facebook Themes using Chrome Extension.

Earlier i have seen many extensions but Recently this one is on Top of my list.So today i decided to share with you all about this particular Extension that will give your facebook a whole new look.

Other Posts That May Interest You..


  1. Facebook app for Windows 8.1 Download
  2. How To Create Facebook Page without Name
  3. Google Play Store Error 498 – 5 Ways to Fix it
  4. Error 651 – Methods to Fix it in Windows 7/8
With this Facebook Themes Chrome extension, you get to choose your favourite Color and theme.Which is that extension ? How to Install ? How to Use it ? Stay calm, I will show you Complete Procedure step by step, Just stay with me.

How to Change Facebook Themes?


Step 1: First of all, Goto the Chrome Web Store, Download and Install Facebook Themes Extension.

Step 2:  Install the Facebook Theme Extension by clicking on Free or Add to Chrome Button on Top Right hand Side of the Web page. (Feel free to Check the Reviews about this extension before installing.)

Step 3: It will take just a second to download the Extension, Now Click on Customize and Control Google Chrome Button > Tools > Extensions OR Alternatively you can just Type : chrome://extensions/ in your address bar to show up all installed extensions

Step 4
: Now if you have Many Extensions Installed, Look for Facebook Themes Extension and Click on “Option” . Refer to The below picture to get more clear idea about what i am trying to explain here.

Step 5: After Click on “Options”  Click on “Explore” Tab to Show up all the available facebook Themes to Choose from.

Step 6: Choose any theme of you choice by Clicking on “Install” , The facebook theme is now installed, Click on Installed tab to verify.

Step 7: By now, every thing is Done. Open Facebook and Check the New theme, You may change it later on by Choosing another theme from the list of Facebook themes provided there.

How do i Revert Back to Default theme ?


If you ever feel like switching to the default theme Just Goto Installed tab and Disable the theme.

OR You Can even Disable the Extension by Unchecking the Extension box, Pretty Simple hah ? If you get bored using the same color or facebook themes then you can switch to different themes anytime.

So try it, and Let me know what you think about new Changed Facebook themes in the comment box below, Show it to your friends, let them know about it too.
"The Extension does not seem to be harmful and is clean.Feel Free to Share your Experience with this article, also if you have any sort of trouble , do not hesitate to ask."

How to Schedule SMS and Social Messages With Schemes

Good evening friends..
Social media has become an integral part of everyone’s life and so has changed the way of expressing our thoughts. The generation believes in everything that is readily available and in our case, it is the technology that you need right on your fingertips. It is not just the friend circle conversely the business world too revolves around the social media.


One needs to be productive all the time and on the web; productivity is all about right scheduling and time management. This is where Schemes aims to address.

What is Schemes ?

Schemes is a simple android application that allows you to schedule your messages via Facebook, Twitter, Email (for Gmail only) and SMS. Whether you need to send that birthday text to your Facebook friend exactly at twelve midnight, Tweet about something exciting that you came across, make Facebook status updates, or send that important business mail during the odd hours, Schemes is right there for you.

Other Posts That May Interest You..


  1. How to Change Facebook Themes with Chrome
  2. Facebook app for Windows 8.1 Download
  3. How To Create Facebook Page without Name
  4. Google Play Store Error 498 – 5 Ways to Fix it

The Size of this Usefull app is 4.7mb and you require to have android 2.3 and up to Run this app on your Device Smoothly. Talking about the User Interface then nothing Complicated there, User interface is very user Friendly.

How to Schedule SMS and Social Messages

  •     Scheme is Created by Flozzo, an XDA senior member, Schemes features clear Holo card-based UI. The UI is sleek to support numerous forms of communication and offers settings that other similar apps never bothered to include. The app is Specially created to Schedule SMS and Social Messages.
  •     One can easily schedule SMS, emails, tweets and FB status from any device.What that means is You can Write your message any time and schedule it for the time to send to any person you want. For eg: you need to send a Happy birthday message to your friend at 12, but you know you wont have access to internet at that time or you are busy because of  xyz reason, you Can Schedule your message , the rest will be done.
  •      All you do is Create a message by tapping on Message icon, This takes you to the Compose Screen where you can type your Message to be Sent, Select Recipient and date & time.
  •     Setting date and time is quite easy and the messages can be scheduled on up to four networks simultaneously. You receive a notification when the message is sent where you can easily edit or cancel the messages and there is lot more to it.To Schedule posts on Social media, you need to Connect your account with Scheme.

The application offers you unlimited possibilities for the social media freaks. Your future messages stay secure in a thread like manner and Schemes will never post. So go Schedule SMS and Social Messages with this automated communication system and let the world know of what you are up to.


How to Post Custom Via Status on Facebook

Hello friends.
Today i will Share a short  but a Fun Facebook trick with all you Readers, Most of us Use Facebook and update statuses. Normally when you update your status from mobile, then it shows “via Mobile ” or the Name of the brand of mobile you used to update that status. But what if i tell you we can Post Custom Via Status on Facebook which show like ” Updated via Macbook Pro ” or “iPhone 5″ or any other gadget or thing that you don’t even own.

There may be more funny things coming in your mind already, How about “via Potato ” or “via GTA 5″ or ” via Calculator” why not, it can be anything that you can best think of. So lets move on and see how to Post Custom Via Status on Facebook. Continue reading the below Simple steps, and you will learn it easily.

Steps to Post Custom Via Status on Facebook

Step 1: First of all In order to Post Custom Via Status on Facebook, you will need to Create an app on Facebook, Nope thats not hard at all, you dont need to do any Coding, Follow me while i show you how to do it.

Step 2: Click here to goto Facebook Developer page, there if you are asked to register as developer,read this step and if you are not asked and you are already registered then skip to Step 3.

Click on Register as developer and Check the box ” I accept the Facebook Platform Policy and the Facebook Privacy Policy” and Click on Continue > Continue > Done.

Step 3:
Now you are Registered as Developer, Now click on Create new app, Next Step is to name your App so Name it any thing that you want to show as “updated via xyz” . Here in my case it will show ” updated via way2trick.blogspot.com ” as i have named it way2trick.blogspot.com as you can see in the below Picture. Now click on Continue, Leave everything else as it is.


Step 4:  On the next page you will be filling some more details like App domain and Site url, As you can see i have entered my site url in both the Cases. Everything is done now Click on Save Changes. Note the APP ID we will need it in Next Step

Step 5: You app is Ready, Now its time to use it. Simply Copy the Below URL, Open new tab in your Browser, Paste it in address bar, You will have to Replace my APP ID with yours in following URL which is Highlighted in Green Color,
"https://www.facebook.com/dialog/feed?app_id= 649329338451749&redirect_uri=http://www.way2trick.blogspot.com"

Also Understand that if you want to Redirect your Friends to your own blog when they try and click on your Custom Via Status, then Replace www.way2trick.blogspot.com with yours in the above URL.

Step 6 : Once you have Replaced the app id and Pasted the URL in your address bar, hit enter and boom, you will see something like below Pic,obviously with your app name.

Step 7: Now its time to let your Friends know about this, Write your status and click on Share. You will Be redirected to way2trick.blogspot.com but its time to check your timeline to see your Custom via Facebook Status.

Conclusion :-

So Now in this Article you learned how to Create your own App and how to Post Custom Via Status on Facebook. If In Case you find it Tedious, then i will share one more method, you simply go Here and Click on any name you want as updated via of your choice and you will be taken to the status update page directly.

You might be thinking why so long process when you can do it with this site way to easy? Well, My main aim was to explain the whole process of how it works. and on the above mentioned site, you are limitation to choose the name from the option provided. its always better to make your own choice of custom name .

Other Posts That May Interest You..

  1. How to Schedule SMS and Social Messages
  2. How to Change Facebook Themes with Chrome
  3. Facebook app for Windows 8.1 Download
  4. How To Create Facebook Page without Name

Related Posts Plugin for WordPress, Blogger...

Labels

404 AdBlock Add-on Airtel GPRS Trick Airtel SMS Trick Alexa Amazon Amazon Kindle Amazon Prime Android Android 8 Android Oreo antivirus Apple Apple Mac ASCII Audacity Audio Authotkey Backup Balance Transfer in Vodafone Battery Bing Blogger Blogging Bookmarklet Browser Camera Chromebook clock Cloud colors command lines Computer Computer Tricks configuration Contact Creative Commons Credit Card CSS devolop DIY Doodle DOS Download Dropbox E-Mail eBook Email Email Attachment Embed Encryption English Error Evernote Eyes Facebook Facebook Tricks Feedburner Flipkart Font Foursquare Free Internet Free sms trick in Vodafone G Mail Gadget Game Getty Images GIF Gists Github Google Google AdSense Google Analytics Google Apps Google Chrome Google Contacts Google Currents Google DNS Google Docs Google Drive Google Earth Google Font Google Forms Google Images Google Map Google Photos Google Play Store Google Plus Google Print Google Reader Google Script Google Sheets Google Spreadsheet Google Translate GPRS Setting GPS Hacking Health App HelloFax Hindi Hoodie HTML Icons idea Image Editing Images IMEI Indian Railways Infographics Instagram Internet Internet Explorer Internet Tricks iOS iPad iPhone IRCTC iTunes iTV JavaScript JioCinema JioTV Junglee Kindle Language Translation Laptop Laptop. TV Life Time FREE GPRS Life-Style Link Linkedln Linux logo Make Money Online Microdoft Powerpoint Microdoft Word Microsoft Office Microsoft Outlook Mobile Mosaic Music Name Networking nexus Notepad OCR Online Shopping Open DNS OS Outlook Password PDF Petya Phillips Hue Lights Photogtraphy Pixel Play Station Podcasts Pokemon Pokemon Go Polls Print Productivity Proxy Server Pushbullet QR Code Ransomware Reddit Reliance Hack GPRS Reliance Jio RGB Ringtone Router RSS Safe Mode Samsung Galaxy S Scrabble Screen Capture Screen Sharing Screencast Secrets Security Send free sms from PC SEO Sierra Skype Slideshare SMBv1 SMS Snapchat Snapdeal Social Media Solution Sound Device Speech Recognition Sql Steam Sync Synology NAS Tata Docomo GPRS trick Teleprompter Torrent Trick Tricks TV Twitter UltraISO Unicode Unknown Extension Unlimited 2GB Unlimited 3GB Unlimited GPRS USB USB Security Key Video Editing virtual desktop Virus attack VLC Vodafone 110% working trick for GPRS Vodafone 3g Vodafone GPRS VPN wallpapers WannaCry Web Design Web Domain Website Wget Whatsapp WiFi Wikipedia Windows Windows 10 Windows 10 S Windows KN Windows Tricks windows updates Winows N Wolfarm Alpha WordPress XBox YouTube Zip
Twitter Delicious Facebook Digg Stumbleupon Favorites More