Saturday, 11 March 2017

How to Make Someone Else’s YouTube Playlist Your Own

Learn how to copy the YouTube playlists of another YouTube users to your own account. You can also merge one or more YouTube playlists into one for easy viewing. 

Millions of YouTube users are working diligently to organize this ever-growing database of videos into playlists that make the YouTube experience even more enjoyable.


Looking for inspiring Steve Jobs speeches on YouTube? Classic nursery rhymes for kids? Popular music videos of Adele? Well, chances are that some YouTube user may have already curated the best videos for a topic into playlists that you can watch on any device with a click. You can even download YouTube playlists on your Android or iPhone for offline viewing.

Save Playlists vs Copy Playlists-

When you open any video playlist on YouTube, you have the option to save that playlist. This is like creating a bookmark that you can revisit later to watch that playlist again. However, it is a read-only playlist and you have absolutely no control over the content of that playlist.

Also, like everything else on the web, your saved YouTube playlists may disappear without warning. This can happen if the playlist creator deletes the playlist or if their YouTube account is suspended for, say, copyright infringement. When the YouTube account is gone, the user’s playlists are removed too.

The solution is simple. If you would like to save a YouTube playlist permanently, you should  clone that playlist into your own YouTube account. You’ll become the owner of the copied playlist and thus, if the original disappears, you aren’t affected.

How to Copy YouTube Playlists of Another User-

Introducing YouTube Copier, a web app that lets you easily copy any public video playlist to your own YouTube account.

To get started, sign-in with your YouTube account and allow the app to access your Youtube account. Now enter the YouTube playlist URL (like this one) and choose the privacy of your new  playlist – it can be either public (visible to all), private (only visible to you) or unlisted (visible to people who know the link). That’s it.

Click the “Copy Playlist” button and a copy should be ready in your YouTube channel within a minute. Also, you can copy playlists of any size – they can have 20 video or 800 – the tool will copy them all.

How to Merge Multiple YouTube Playlists-

The YouTube Copier offers another handy feature – you can input any video playlist (it could be yours or someone else’s) and merge it with an existing playlist in your YouTube account. So if you have discovered 3 different playlists of your favorite music, you can save them all in a single playlist rather than having to create multiple playlists.

The tool uses the official YouTube API and the source code is available on ctrlq.org. Download the YouTube video to get started.

Make a Bookmark to Quickly Restart Google Chrome

How to make a bookmark for Google Chrome that will help you quickly restart your Chrome browser and free up system RAM
 
Google Chrome, most would agree, is a memory hog. Open a few website tabs in Chrome and your system slows down to a crawl. The most recommended solution is that you uninstall the non-essential Chrome add-ons and restart your browser to release some RAM.
 
How do you restart Chrome? Close the browser and double-click the application icon on the desktop to launch it again. That’s the usual way but Chrome also offers a special URL that makes it easy to restart Chrome from the address bar.

Go to the browser address bar, type chrome://restart and hit the Enter key. Voila! The browser restarts itself.


Make a Chrome Restart Bookmark-

If you restart Chrome frequently, it may be a good idea to create a bookmark that will help you restart with a click. Here’s how.

Press Ctrl+D (Windows) or Cmd+D (Mac) to bookmark this page in your browser. Now click the Edit button on the bookmark screen, put chrome://restart in the URL input field and click save to create the restart bookmark.

That’s it. Type chrome://chrome-urls in your browser address bar to see other internal pages of Chrome that can be accessed via special URLs.

How to Receive Notifications for Google Forms on your Mobile Phone

How to get instant push notifications for Google Forms on your Android and iPhone. Get notified when a respondent submits your form and also receive the answers in the notification. 

The Email Notifications add-on for Google Forms will send you the form data in an email message each time a respondent submits your form. You can use the same add-on to also send automated emails to the form respondents immediately after they complete your Google Form.

The popular Google Forms add-on has been updated and it can now send push notifications to your mobile devices as well. That means when respondents complete and submit your online form, you’ll get an instant real-time notification (sample) on your iPhone or Android phone. The notification text can also include answers from the Google Form.

A fast response time is a key to success, especially in areas like customer service and closing sales leads, and mobile notifications will ensure that your important form entries are never lost in the daily deluge of emails.

Setup Mobile Notifications for Google Forms-

 It takes a few easy steps to get up and running.
  1.     Install Email Notifications for Google Forms from the Google Add-on store.
  2.     Install the IFTTT mobile app on your Android or iOS device.

Next, we need to create a connection between our Google Form and the IFTTT app so that mobile notifications are triggered on the mobile phone immediately after the form is submitted.

1. Configure IFTTT

Open ifttt.com on your desktop and create a new applet. Choose the Maker service for if-this condition and set the Event name as the name of your Google Form. For if-this-then-that action, choose Notifications as the service and set the text as {{Value 1}}. Click Finish to make your IFTTT applet live.
 

2. Configure Google Forms

Open any Google Form, go to the Addons menu, choose Email Notifications and then select Mobile Notifications. Enter the Event name, the IFTTT key and the notification text. You can put any {{form field name}} in the text and these will be replaced with actual values filled by the user.

That’s it. Click the Test button to test the connection between the form and your mobile phone. If it works, click Save to enable mobile notifications.


If you have multiple Google Forms, you need to create separate IFTTT applets for each form and the event name should be unique for each applet.

Internally, when someone submits your form, the Google Addon triggers and sends a web request to the IFTTT service which in turn pushes the notification to your mobile device.

 Troubleshooting Mobile Notifications-

  • Ensure that your mobile is connected to the Internet.
  • The event name in the applet should match the event name in the form configuration.
  • You are logged into the IFTTT app on your mobile phone.
  • Check the activity log to ensure that notifications are getting sent.
  • If you are still facing any issue, contact support.

An Undocumented Gmail Trick – Search Emails by Date and Time

Gmail supports several search operators to help you easily find emails in your account. Learn about an undocumented trick in Gmail that will help you search emails by date and time. 

Gmail supports a plethora of search operators to help you instantly find that elusive email message buried in your mailbox. You have size search – like larger_than:5mb – to find the big messages in your account. File search – like has:attachment filename:doc – will locate email messages that contain file attachments of specific types. This graphic illustrates all the known search operators that work both on Gmail and Google Inbox.

Date Search in Gmail-

Date search in Gmail helps you locate emails sent or received in a specific period. Here are some examples:
  •     newer_than:7d from:me – Emails sent in the last 7 days
  •     after:2016/12/01 to:me – Emails received in the month of December 2016 

 Specify Time Modifiers in Gmail Search

Gmail also supports time-based searches allowing you to find emails in the specific hour, minute or second. For instance, you can limit your Gmail search to emails that were received between Dec 10 8:15 PM and Dec 10, 2016 8:45 PM.

To get started, convert the date and time to Epoch time and then use the timestamp with the standard after or before search operator of Gmail.

For instance, the Epoch time for Dec 10, 2016 8:15 PM is 1481381100 and the Epoch time for Dec 10, 2016 8:45 PM is 1481382900. Use the search query after:1481381100 before:1481382900 and you’ll get a list of all emails received during that 30-minute period.

Epoch time is the number of seconds that have elapsed since January 1, 1970 (UTC). Use the Epoch converter to represent a human readable date and time in Epoch and use that timestamp with the before or after search operator of Gmail to find that elusive email.

How to Generate a Report of Bounced Email Addresses in Gmail

When you send emails through Gmail, some messages fail to deliver and bounce back to the sender from mailer daemon. Learn how to prepare a bounce report of all failed email addresses and keep your mailing list clean. 

Some of the email messages you have sent through Gmail might not get delivered at all. There could be a problem with the recipient’s email address, their mailbox could be full or maybe the mail server could be specifically blocking your emails due to the content of the message.

When an email message is returned, you get a bounce-back notice from MAILER-DAEMON@gmail.com and it will always contain the exact reason for the delivery failure along with the SMTP error code. For instance, an error code 550 indicates that the email address doesn’t exist while a 554 indicates that your email was classified as spam by the recipient’s mail server.


How to Get a List of Email Addresses that Bounced-

It is important to keep track of your bounced messages and remove all undelivered email addresses from your future mailings as they may adversly affect your sending reputation.

Mail Merge keeps track of all your bounced messages in Gmail but if you are using mail merge yet, here’s an open-source Google Script that will prepare a list of all email addresses that have bounced inside a Google Spreadsheet.

Gmail Bounce Report – Getting Started-

Here’s how you can get started:

  1.     Go to website/bounce to make a copy of the Google Spreadsheet.
  2.     Click the Gmail menu (adjacent to Help) and choose Bounce Report.
  3.     Allow the Google Script to access* your Gmail account.
  4.     Watch as the Google Sheet is populated with bounced addresses.
[*] The sheet uses an open-source Google Script that runs inside your own account and doesn’t share even a byte of data with anyone.
The email bounce report includes the email address that bounced, the reason why that email failed to deliver and the date when the bounce occurred. The spreadsheet will also have a direct link to the bounced message received from MAILER-DAEMON@google.com.

How to Add a Picture Password to your Google Forms

Learn how to add picture passwords or image CAPTCHAs to your Google Forms. You don’t want spam bots from completing your Google Form and make fake submissions. 

Google Forms have this “all-or-none” problem. The forms are either public (anyone can fill your form) or, if you are on Google Apps, you can create forms that are visible to everyone in your organization. It is however not possible to restrict access to forms to specific people.

Another shortcoming is that Google Forms do not allow passwords or CAPTCHAs to prevent spam bots from filling your forms with random data. Google itself maintains the reCAPTCHA project but it is not known if integration with Google Forms is in the works. There is a workaround, though.

Google Forms with Picture Passwords-

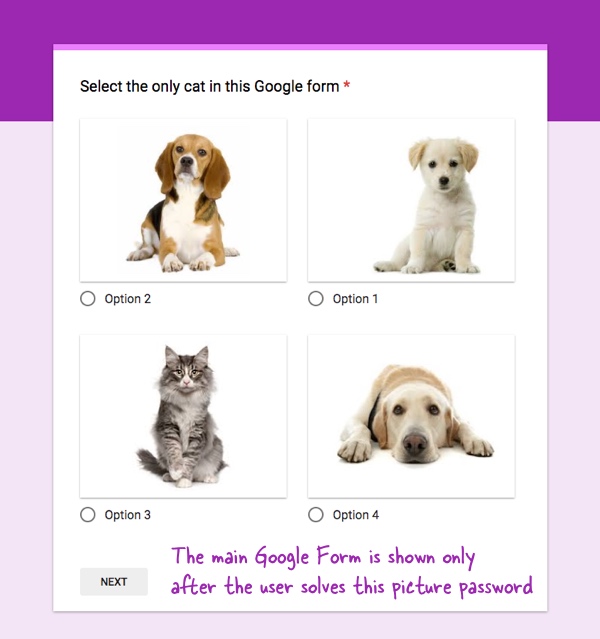
Google Forms do not support CAPTCHA but they do offer an option to attach images with questions. These can be used as picture passwords.


The idea is simple.
We add a multiple-choice question where the user is asked to pick an image from a selection of multiple images. If they select the correct image, the main form is displayed else an error message is shown. Also, these images are shuffled so the answer’s position is random for each respondent.

How to Make Google Forms with Picture Passwords-

Take this sample Google Form for a spin and you’ll get the idea.

Open a new Google Form and create 3 sections. The first section will have the picture password, the second section will contain the error message and the last one will have the actual questions that you want to ask users who have passed the anti-spam test.

In the first section, create a multiple choice question and attach a different image with every choice. Make this a required question and turn on the shuffle order for the question. Also turn on the option “Go to section based on answer” for the section so that only valid answers are taken to the main form.


For each choice that is not valid, choose “Go to section 2” (see screenshot) and choose “Go to section 3” for the right choice. In section 2, do not add any questions but for the error message in the section description. Also set “Go to section 1” after section 2 so that the user cannot go to the main section 3 without passing the picture test.

Make the Google Form live and respondents will only see the main questionnaire if they have solved the problem in section 1. You should also check out another technique for restricting access to Google Forms with passwords.

Know What Facebook Can See Inside Your Photographs

Facebook uses image recognition technology to accurately determine the content of your photographs. You can view these machine generated captions to know how Facebook sees your own photographs. 
 
When you upload any photograph to your Facebook account, they look at the actual content of the photograph and try to determine what objects and scenes are inside the image. You may not have added any description, yet Facebook can determine what that picture is all about.
 
Whether you are having a pizza, enjoying the sun on a beach, playing with your dog or spending an evening with friends, Facebook can accurately figure it out from the photo itself. They internally use these machine generated captions to make your pictures more accessible to blind users.


Facebook Computer Vision Tags-

If you are curious to know what information Facebook visual recognition algorithms have found in your own pictures, here’s an easy way to view that data.

  1. Open any photograph on the Facebook website and click the thumbnail to view the enlarged version of the image.
  2. Right-click the image and choose Inspect to open the Chrome Dev Tools. This trick would work across all modern browsers since they have developer tools built-in.
  3. Look at the alt attribute of the image tag* and you’ll find the description of the image as seen by Facebook (video tutorial).

[*] If the <img> tag is not visible in developer tool, you may need to expand the parent <div> tag.

Friday, 10 March 2017

How to Make Phone Numbers Callable in Google Sheets

Learn how to insert phone numbers inside Google Spreadsheets and make the numbers clickable and callable on mobile phones. 

If you click an email link on a webpage, it opens your default mail program. Similarly, you can make phone numbers on your website “callable” meaning when someone clicks the phone number, it will launch the dialer on their mobile phone and initiate dialing of the specified phone number. It is recommended that you make phone numbers clickable as more and more people would be accessing your site on their mobile devices.

How to Insert Clickable Phone Numbers in Web Pages-

We use the simple tel protocol to convert a plain text phone number on a web page into a clickable telephone link.


For instance, if you click this link on a mobile phone, it will open the phone dialer prefilled with the specified number. There’s no need to copy-paste numbers.

How to Type Phone Numbers in a Google Sheet-

 It is a bit tricky to type phone numbers inside Google Spreadsheets. Here’s why:

Phone numbers are mostly made of digits preceded by the plus (+) symbol. The problem is as soon as add the plus sign in the spreadsheet cell, it assumes that you entering a math formula and tries to calculate the value.
There are two simple workarounds to this problem. You can enclose the phone number inside double quotes (“) and precede it with an equal to (=) sign.

An even easier alternative is to use the single quote (‘) before the phone number. Google Sheets will then interpret the cell’s value as text and the phone number formatting will be preserved.


How to Make Phone Numbers Clickable in Google Sheets-

Coming to the main problem, how do you make phone numbers inside a Google Sheet clickable. The obvious answer would be to use the =HYPERLINK() method with the tel protocol but, unfortunately, Google Sheets do not support it.

So a formula like =HYPERLINK(“tel:12345”, “Call Me”) would not work since sheets will only allow regular http and mailto hyperlinks. There’s a simple workaround though. 


You can create a regular hyperlink in the cell pointing to a website which in turn redirects to the actual telephone link. To see this in action, add https://ctrlq.org/call/ before any phone number in the Google Sheet and it will turn into a clickable telephone link.

Say you have the phone number in cell A1. Add this simple formula in any other cell and it will create a telephone link just like on a regular webpage.

=HYPERLINK(“https://ctrlq.org/call/”&A1; “Call our support team”)

To get a better idea, open this Phone Number Google Sheet inside the Sheets app of your Android or iPhone and try clicking any of the phone links.

See the Email Sender’s Company and Logo in your Gmail Inbox

Gmail will only show the names of the sender in the default inbox view. Use the Chrome extension to see the company’s domain and logo image of the senders in your Gmail mailbox. 

The default layout of your Gmail inbox has the sender’s name listed in the left most column followed by the subject and the date of the message. The emails are sorted in reverse chronological order with the newest messages listed at the top.

The problem with this layout is that you cannot figure out who the actual sender of a message is without actually opening the email. For instance, if you get an email from Angus who works at Google and a second email from another Angus who is employed with Microsoft, Gmail will simply show Angus as the sender for both emails.

How to Email Unique File Attachments using Mail Merge for Gmail

Mail Merge, available for Gmail and Google Inbox, is a perfect tool for sending personalized emails to one or more email addresses using a simple Google Sheet. If you never performed merge before, please watch the Mail Merge tutorial and documentation to get started.

One of the most popular features of Mail Merge is its unique ability to send different file attachments to different email address. For instance, if you are applying for a job at different companies, you can attach the same PDF resume in all email messages but the cover letter could be different with each application.

This step-by-step tutorial explains how you can you can use Mail Merge for Gmail to send unique email attachments to your contacts. Mail Merge pulls files from Google Drive and includes them as attachments in the outgoing email messages.

Steps :-

Step 1: Install the Mail Merge add-on.

Step 2: Open a new Google Sheet, go to Addons > Mail Merge with Attachments > Create Merge template to initialize the sheet.

Step 3: Add one or more rows in the Mail Merge sheet. To keep things simple, you can add the First Name, last Name, and the Email address as shown in the screenshot.


Attach Google Drive files to Mail Merge-

Step 4:  Go to Addons > Mail Merge > Add File Attachments > Insert Files from Google Drive and select one or more files that you wish to send with your email message. You can also select the option Select Files from Computer if the files are on the computer.

Mail Merge will get the direct link of the selected file(s) and inserts them into the File Attachments column. If you wish to send more files with the same email message, you can add the drive links in the same cell, separated by the comma.

Easily Add File Attachments with Mail Merge-

In the previous step, we used the Google File Picker to select the files from Google Drive. This is slightly tedious more so as you have to repeat the steps for every row in your Mail merge sheet.

There’s an easier way though for adding attachments to merge. Instead of using the File Picker, you can simply put the name of the file in the File Attachments column. The addon, at the time of sending the email, will search your Drive for that file and attach it to the email message.

If you have multiple files in Google Drive with the same name, you can specify the folder path where the file is located. The syntax is \\Folder A\\Folder B\\filename.ext

I want to show you one more technique for quickly attaching files to your Mail mere sheet. Go to Addons > Mail Merge > Add File Attachments > List Files in Google Drive Folder. Now select the parent folder in your Google Drive and the addon will generate a list of every file it found inside that folder, including sub-folders.

Now switch back to the Mail Merge sheet and you’ll notice that a drop-down has been added to every cell in the File Attachments column. This makes it even easier for you to select files from Drive.

So we are all set. Go to the mail merge menu, choose Configure and run merge (video) to send your emails that all have unique attachments. You’ll find a copy of the emails in your Gmail Sent items.

Enjoy.!! 

Related Posts Plugin for WordPress, Blogger...

Labels

404 AdBlock Add-on Airtel GPRS Trick Airtel SMS Trick Alexa Amazon Amazon Kindle Amazon Prime Android Android 8 Android Oreo antivirus Apple Apple Mac ASCII Audacity Audio Authotkey Backup Balance Transfer in Vodafone Battery Bing Blogger Blogging Bookmarklet Browser Camera Chromebook clock Cloud colors command lines Computer Computer Tricks configuration Contact Creative Commons Credit Card CSS devolop DIY Doodle DOS Download Dropbox E-Mail eBook Email Email Attachment Embed Encryption English Error Evernote Eyes Facebook Facebook Tricks Feedburner Flipkart Font Foursquare Free Internet Free sms trick in Vodafone G Mail Gadget Game Getty Images GIF Gists Github Google Google AdSense Google Analytics Google Apps Google Chrome Google Contacts Google Currents Google DNS Google Docs Google Drive Google Earth Google Font Google Forms Google Images Google Map Google Photos Google Play Store Google Plus Google Print Google Reader Google Script Google Sheets Google Spreadsheet Google Translate GPRS Setting GPS Hacking Health App HelloFax Hindi Hoodie HTML Icons idea Image Editing Images IMEI Indian Railways Infographics Instagram Internet Internet Explorer Internet Tricks iOS iPad iPhone IRCTC iTunes iTV JavaScript JioCinema JioTV Junglee Kindle Language Translation Laptop Laptop. TV Life Time FREE GPRS Life-Style Link Linkedln Linux logo Make Money Online Microdoft Powerpoint Microdoft Word Microsoft Office Microsoft Outlook Mobile Mosaic Music Name Networking nexus Notepad OCR Online Shopping Open DNS OS Outlook Password PDF Petya Phillips Hue Lights Photogtraphy Pixel Play Station Podcasts Pokemon Pokemon Go Polls Print Productivity Proxy Server Pushbullet QR Code Ransomware Reddit Reliance Hack GPRS Reliance Jio RGB Ringtone Router RSS Safe Mode Samsung Galaxy S Scrabble Screen Capture Screen Sharing Screencast Secrets Security Send free sms from PC SEO Sierra Skype Slideshare SMBv1 SMS Snapchat Snapdeal Social Media Solution Sound Device Speech Recognition Sql Steam Sync Synology NAS Tata Docomo GPRS trick Teleprompter Torrent Trick Tricks TV Twitter UltraISO Unicode Unknown Extension Unlimited 2GB Unlimited 3GB Unlimited GPRS USB USB Security Key Video Editing virtual desktop Virus attack VLC Vodafone 110% working trick for GPRS Vodafone 3g Vodafone GPRS VPN wallpapers WannaCry Web Design Web Domain Website Wget Whatsapp WiFi Wikipedia Windows Windows 10 Windows 10 S Windows KN Windows Tricks windows updates Winows N Wolfarm Alpha WordPress XBox YouTube Zip
Twitter Delicious Facebook Digg Stumbleupon Favorites More