Friday, 5 May 2017

How to Find and Replace Text in Gmail and other Web Pages

Search and Replace for any Webpage

While you are on the web page, press Ctrl+Shift+J on Windows or Cmd+Opt+J on Mac to open the Console window inside Chrome Developer tools. Now enter the following command to replace all occurrences of the word ABC with XYZ.

document.body.innerHTML = document.body.innerHTML.replace(/ABC/g, "XYZ")
You can use Regular Expressions for more complex substitutions. For instance, if you wish to replace all common misspellings of occurrence, you could use either of these:

 document.body.innerHTML.replace(/(ocurrance|occurrance|occurance)/g, "occurrence")
 document.body.innerHTML.replace(/oc[\w]+nce/g, "occurrence")
The same technique can be used to format words inside a page as well. For instance, the next command will bold all instances of the word Hello on a page.

document.body.innerHTML.replace(/Hello/g, "<b>Hello</b>")

Search and Replace Text in Gmail

On Gmail ,You may have written a lengthy email but just when you were about to hit Send, you come across some spelling errors.

To fix the errors in Gmail, you can either copy the email message into notepad, perform search and replace and then paste the edited text back into Gmail. Or you can directly use Chrome Dev Tools.

The first step is to find the element on page where the search & replace should be done. This is easy as shown in the video above. Select the Gmail text, right-click and choose Inspect Element and make a note of the DIV ID that contains the editable textarea. It is “:h7” for Gmail.
Now all we need to is run the substitution command inside the Console window to replace word ABC with XYZ everywhere.
document.getElementById(':h7').innerHTML = 
  document.getElementById(':h7').innerHTML.replace(/ABC/g, "XYZ");
And your changes won’t be lost as Gmail will auto-save your Draft.

How to Add Speech Recognition to your Website

Add Voice Recognition to your Website

The HTML5 Web Speech API has been around for few years now but it takes slightly more work now to include it in your website.
Earlier, you could add the attribute x-webkit-speech to any form input field and it would become voice capable. The x-webkit-speech attribute has however been deprecated and you are now required to use the JavaScript API to include speech recognition. Here’s the updated code:
<!-- CSS Styles -->
<style>
  .speech {border: 1px solid #DDD; width: 300px; padding: 0; margin: 0}
  .speech input {border: 0; width: 240px; display: inline-block; height: 30px;}
  .speech img {float: right; width: 40px }
</style>

<!-- Search Form -->
<form id="labnol" method="get" action="https://www.google.com/search">
  <div class="speech">
    <input type="text" name="q" id="transcript" placeholder="Speak" />
    <img onclick="startDictation()" src="//i.imgur.com/cHidSVu.gif" />
  </div>
</form>

<!-- HTML5 Speech Recognition API -->
<script>
  function startDictation() {

    if (window.hasOwnProperty('webkitSpeechRecognition')) {

      var recognition = new webkitSpeechRecognition();

      recognition.continuous = false;
      recognition.interimResults = false;

      recognition.lang = "en-US";
      recognition.start();

      recognition.onresult = function(e) {
        document.getElementById('transcript').value
                                 = e.results[0][0].transcript;
        recognition.stop();
        document.getElementById('labnol').submit();
      };

      recognition.onerror = function(e) {
        recognition.stop();
      }

    }
  }
</script>

We have the CSS to place the microphone image inside the input box, the form code containing the input button and the JavaScript that does all the heavy work.
When the user click the mic image inside the search box, the JavaScript checks if the user’s browser supports speech recognition. If so, it waits for the transcribed text to arrive from Google servers and then submits the form.

Make your WordPress Website More Secure with Single Sign On

❖ Secure WordPress with Single Sign On

WordPress Single Sign On offers an even more secure option for protecting your website from brute force attacks as you ‘outsource’ the authentication part to WordPress.com. Once enabled, the login screen on your WordPress website is disabled and you are required to sign in to your WordPress.com account in order to access the admin dashboard of your own self-hosted WordPress blog.

❖ How to Implement WordPress Single Sign On with Jetpack

Here is a step-by-step guide that explains how you can enable Single Sign On for your WordPress website:

Step 1: Create an account on WordPress.com Skip this step if you already have an account. You may be required to create a dummy blog on wordpress.com as part of the registration process.

Step 2:  Once your account is created, click here to enable two-factor authentication. Specify your phone number, WordPress will send a verification code via SMS and you need to type the same code to verify your number.

Step 3: Go to your WordPress blog, install the JetPack Plugin, activate the plugin and then click the green button that says “Connect to WordPress.com” to link your blog to your WordPress account.

Step 4:  Once the connection is established, go to Jetpack settings and activate the “Single Sign On” module.

Step 5: Go to your WordPress installation folder via FTP or SSH, switch to the current theme folder (wp-content/themes/theme-name ) and edit the functions.php file. Here copy-paste the following line of code after the first line:

 add_filter('jetpack_sso_bypass_login_forward_wpcom', '__return_true' );

Step 6:  Go to Users – Your Profile and, at the bottom of the page, click the button that says “Log in with WordPress.com” – this will essentially link your WordPress.com account to the username that you’ve used to log into the site.

This will completely disable the login form of your WordPress site and instead forwards the user to the login screen on WordPress.com. Once you login through WordPress, you are immediately redirected to the admin dashboard of your self-hosted WordPress blog.

How to Speed Up Chrome and Fix Errors Without Reinstalling It

Your once snappy Chrome browser is dragging, and you don’t know why. Do you blame Google, and switch to another browser to feel that new-browser smell once again? Not so fast! A browser reset is much less of a hassle, and will fix all kinds of issues— without deleting all your bookmarks and other data.


When you reset Chrome, the following things happen:

* Your in-browser search engine is reset to the default, Google.com.

*Your homepage and default startup tabs are reset.

*You new tab page settings are reset.

*Pinned tabs are erased.

*Content settings (like which sites you’ve given access to your webcam or allowed popups from) are erased.

* All cookies and site data are erased.

* All extensions and themes, save for the default ones, are disabled (but not deleted).

How to Reset Chrome

If that sounds like a detox session you’d like to sign up for, resetting Chrome is easy. Just click on the menu button in the upper right corner and select “Settings”


At the bottom of the Settings page, click on “Show advanced settings”.


Scroll way down through the now greatly expanded settings options until you reach the bottom. There, click on “Reset settings”.


Finally, you’ll be prompted to confirm the reset.


After the reset, Chrome will be out-of-the-box fast again thanks to all that purged dead weight. 

How to Temporarily Share Your Location with Someone Using Google Maps

You’re meeting a friend downtown in a new city, and he asks you where you are. Be honest: you have no clue. Luckily, Google Maps can help you both out.

This relatively new feature shows your location right on your friend’s map—and his on yours—even if you’re both moving around. And if you’ve got Google Maps open, it’s easy to start sharing your location, assuming the person you want to share locations with is also a Google Maps user.

You know that blue dot that shows you where you are?


  • Tap that blue dot and you’ll see a bunch of options, including sharing your location.


  • You can choose how long to share your location—the default is one hour.


Once you decide how long to share your location, you can then choose specific contacts to share your location with using the “Select People” button. You can scroll through your contacts and choose someone to share with. The list will be populated with Google users in your contacts list. If the person you want to share your location with is not on the list, you can also send a link via SMS or any messaging app.

  • The person you share your location with will get a notification.


  • When they click through, they will see your location on their map.


The other user will also have the option to share their location with you, making it much easier for you to find each other.

How to Automatically Turn Your Wi-Fi Back On in Windows 10

You may want to turn your Wi-Fi off to save battery power on an airplane or somewhere else where there’s no Wi-Fi available. With Windows 10’s Creators Update , you can now have your PC automatically re-enable your Wi-Fi so you don’t have to remember to do so later.

From the Taskbar

This option is only available in Windows 10’s Settings application and the taskbar’s network menu. You won’t see this option when disabling your Wi-Fi interface via the old Network Connections interface in the Control Panel.

To disable your Wi-Fi from the Taskbar, click the Wi-Fi icon in the notification area near your clock and click the “Wi-Fi” button to disable it.


When your Wi-Fi is set to “Off”, you can choose to turn it back on in 1 hour, 4 hours, or 1 day—just like in the Settings app. The default option is Manually, which means you’ll need to click the “Wi-Fi” tile in this menu to re-enable Wi-Fi.


Sadly, no similar option is available when enabling Airplane Mode . If you want to turn your Wi-Fi back on automatically, you’ll need to disable Wi-Fi instead of enabling Airplane Mode.

What’s New in Windows 10’s Creators Update

If you want to do this from the Settings menu, navigate to Settings > Network & Internet > Wi-Fi. Set your Wi-Fi connection to “Off” here, and you can tell Windows to automatically turn your Wi-Fi back on in 1 hour, 4 hours, or 1 day. The default option is Manually, which means Windows won’t automatically turn on your Wi-Fi for you. You’ll have to flip the switch back on yourself.


How to Turn Wi-Fi On or Off With a Keyboard or Desktop Shortcut in Windows

You may also be interested in disabling and enabling your Wi-Fi connection with a keyboard shortcut

, although Windows can’t automatically turn it back on if you do this. You’ll need to turn it back on by pressing the appropriate keyboard shortcut.

Thursday, 4 May 2017

How to Make Phone Numbers Callable in Google Sheets

❖ How to Type Phone Numbers in a Google Sheet

It is a bit tricky to type phone numbers inside Google Spreadsheets. Here’s why:

Phone numbers are mostly made of digits preceded by the plus (+) symbol. The problem is as soon as add the plus sign in the spreadsheet cell, it assumes that you entering a math formula and tries to calculate the value.

There are two simple workarounds to this problem. You can enclose the phone number inside double quotes (“) and precede it with an equal to (=) sign.
An even easier alternative is to use the single quote (‘) before the phone number. Google Sheets will then interpret the cell’s value as text and the phone number formatting will be preserved

❖ How to Make Phone Numbers Clickable in Google Sheets


You can create a regular hyperlink in the cell pointing to a website which in turn redirects to the actual telephone link. To see this in action, add https://ctrlq.org/call/ before any phone number in the Google Sheet and it will turn into a clickable telephone link.
Say you have the phone number in cell A1. Add this simple formula in any other cell and it will create a telephone link just like on a regular webpage.
=HYPERLINK(“https://ctrlq.org/call/”&A1; “Call our support team”)

How to Easily Switch between Multiple Google Accounts

Sign-in is Easy, Switching Accounts is Difficult

One you are logged in, click your profile image in the upper right and select any Google account from the drop down to switch to that account.

The default account, the one that appears on top of that list, is the one that you signed in with first. Thus, if you type mail.google.com in your browser’s address bar, you’ll always be taken your Gmail account. If you need to set another Google account as the default one, you’d have to sign-out of all existing accounts and sign-in first with that account.

That’s obviously too many steps for users who have to constantly juggle between multiple accounts. So here’s a simple URL trick that will help you switch between Google accounts quickly.

❖ Create Keyboard Shortcuts for Google Accounts

Go to the Gmail website and press Ctrl+D (or Cmd+D on Mac) to bookmark the Gmail website.


Click the Edit button to modify the bookmark. Here add
?authuser=email@gmail.com after the last slash(/) symbol and append the shortcut to the bookmark name as shown below.
We use the short “gw” meaning Google Apps for Work Gmail.


Repeat the steps for all your other Gmail accounts.
You can now type gw in the address bar to quickly launch your work Gmail account even if that account may not be your default Google account.

The trick works with all Google Apps services including Google Drive, Contacts and Calendar.

https://calendar.google.com/?authuser=email@domain.com

https://drive.google.com/?authuser=email@gmail.com

https://contacts.google.com/?authuser=email@domain.org

Google Can Remember Things for You

❖ Let Google Remember Things for you


To get started, say “OK Google” to launch Google Assistant on your phone and then say “Remember ..” followed by information you would like Google to remember. For instance, you could say:

* Remember my favorite color is blue
* Remember that my registration number is Z1234
* Remember that I parked the car in the 2nd level
* Remember that my hotel room safe code is 6666

You can launch the Google Assistant anytime later and ask Google for information that was previously stored.

❖ How to ask what Google remembers?

You could say something like “What did I say about my favorite color?” or “What’s my registration number?” If Google is unable to understand your question, you could say “What did I ask you to remember” and it will show a list of 5 most recent things you’ve asked Google to remember.


❖ How to Clear Google’s Memory?

If the list has grown big, you can also use your voice to instruct Google to forget things it remembers. You could say “Forget what I said about my favorite color” or say “What did I ask you to remember” and tap the “Forget #” option to erase any of the listed items from Google’s memory.

Use WhatsApp as a Private Store for your Documents and Notes

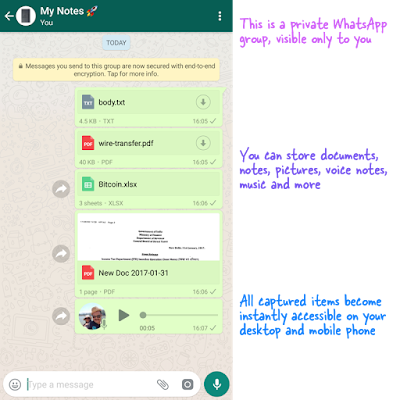
The idea is simple. You create a new virtual contact inside WhatsApp and, everything that you wish to capture privately, you can just share it with this virtual contact.
It is not possible to send WhatsApp messages to your own number but there’s a simple hack to get around this problem. Create a new WhatsApp group with just a single participant – you.

Here’s how:

  1. * Open WhatsApp on your phone and create a new group.
  2. * Add any contact from your address book to this group. Give your group a name and save.
  3. * Now go to the group in WhatsApp, tap the subject to view the list of participants.
  4. * Tap and hold the lone participant in this list and remove them from the group. 

That’s it. What you now have a private store in WhatsApp that is visible only to you and accessible from the web (desktop) and your mobile phone.
If you wish to transfer a document from computer to phone, open web.whatsapp.com on the computer, send the file to this group and it will instantly become available on your phone. There’s search built-in so you can easily find messages by keyword later.

8 Great On-Page SEO Techniques- Way2trick

There are many people who are just starting to blog and many more that have run their own site for a while, that don’t know what SEO is and how to implement it!

SEO simply stands for Search Engine Optimisation. This is where you construct your web pages and implement certain techniques to help you rank as high as possible on search engine result pages (SERPs). The higher your pages can rank on Google/Bing/Yahoo/etc. results pages, the more traffic your site is likely to get.

Now, SEO can be split up into two separate categories; On-Page SEO & Off-Page SEO.

On-Page SEO refers to all the things that you can do ON your website to help you rank higher, such as page titles, internal linking, meta tags & descriptions, etc.

Off-Page SEO refers to all the things that you can do directly OFF your website to help you rank higher, such as social networking, article submission, forum & blog marketing, etc.

In today’s post we will be looking specifically at On-Page SEO and some of the most effective ways to increase your page rankings on search engines.


On-Page Search Engine Optimisation

1. Page Titles

Your page titles are one of the most important SEO factors on your site. Each of your pages & posts should have its own unique title, which includes the main keywords for that page.

For example, you could write a blog post about a new chocolate cake recipe that you have tried. It is therefore vitally important that you include ‘Chocolate Cake Recipe’ within your post title, perhaps “Easy Chocolate Cake Recipe” or “ Chocolate Cake Recipe for kids”, etc.

This way, whenever someone searches for Chocolate Cake Recipes in a search engine, your post has a better chance of showing up because you have included those keywords.
 

2. Meta Descriptions

Many people forget to include meta descriptions for their pages. These descriptions are an important place to include relevant keywords for your content, as these are used within the search results when your page is listed.

For instance, if we continue to use the ‘Chocolate Cake Recipe’ example, then a good meta description for that page would include those keywords and related ones. So, “This easy chocolate cake recipe is possibly the most delicious, mouth watering, chocolatey cake ever made.” would be a great meta description to use, as it is relatively short, whilst containing a number of specific keywords.
 

3. Meta Tags

For each of your pages, you can include a set of keywords in the form of meta tags. These should be all the relevant keywords of your content, which you will have researched previously.

I use a WordPress plug-in on my sites called ‘All In One SEO Pack’. This allows me to enter all of my meta tag keywords, meta description and page title at the bottom of each of my posts before publishing. This simply inserts all of the information into your page HTML format for you, making your life a little easier.

4. URL Structure

Including search engine friendly URLs for each of your pages is highly recommended, as these bring better crawling. Shorter URLs seem to perform better in search engine results, however that is not the only factor.

URLs that include targeted keywords, also perform better. The location of these keywords can also be a major influence. For example site.com/keyword would perform better than site.com/365/738/subfolder/keyword etc.

As you can see for this page, the URL is http://onlineincometeacher.com/traffic/on-page-seo-techniques/ I have included the keywords that are relevant for this post.
 

5. Body Tags (H1, H2, H3, H4, etc.)

When writing your articles, you should break up your content into smaller sections & paragraphs to make it easier for people to read. These sections can be given heading, which is where H1, H2, H3, H4, etc. tags are used.

Generally H1 tags are reserved for your main page title, with subsequent headings (just like the ones I have used throughout this post) being issued H2, H3, etc. Search engines use these to determine what is important within your content. This is why keyword rich headines are more useful than generic ones. Make sure you write keyword rich headings in the order of priority in H1, H2 and H3 title tags. They are used by many crawlers to differentiate important content.
 

6. Keyword Density

Including relevant keywords throughout your content is very important, as it helps search engines work out what your content is about. However, try not to excessively repeat and overuse keywords just for search engine robots. This can lead to your site being banned from search engines.

To avoid this, try to keep your keyword density to roughly 2-5%. If you find this hard, get out a thesaurus and broaden your writing vocabulary. This way, you are still writing about the same thing, without risk of being banned.

7. Image SEO

Using images within your content is a great way to make your site more visually appealing and break up boring chunks of text. You can utilise these images to help improve your site SEO.

All your uploaded images have titles, so treat them just the same as your page titles. Including relevant keywords can help people find your site when searching on Google Images.

You can also include Alt Text and Descriptions for your images, making them even more useful with SEO.
 

8. Internal Linking

People often think that the only links that count are those from other websites. While these links are important, these are not the only important links!

Placing links to your other website pages, is a great way of improving your site and used properly, internal links can be a useful weapon in your SEO arsenal. Not only does it make it much easier for your visitors to navigate around your site and find all of your content, but it also ensures that your site gets properly crawled allowing the search engines to find all of your pages. It also helps to build the relevancy of a page to relevant keywords and phrases, whilst also helping to increase the Google PageRank of your pages.

There are a number of different methods that you can use to improve your internal linking structure. The main being; content links and permanent navigation links.

For bloggers, content links are very useful when used properly. These are links that are placed within your article posts, which redirect people to other relevant pages on your site. For example, this post is focused on increasing traffic to your site, so readers may also find a post on ‘How To Drive Traffic To Your Blog‘ useful. Perhaps other people are just starting out blogging and want to learn more.

Summary

These 8 techniques are just some of the ways that you can improve your on-page SEO. Any one used independently of the others won’t make much difference to your site ranking, however when used together, they can help to improve your site traffic.

They will help to get your pages working better, they will help to get your entire site crawled by search engine spiders, they will help increase the value of internal pages and they will build the relevancy of internal pages to specific keyword phrases.

So, it pays to spend some time implementing these to improve your site! Please leave your comments below & feel free to ask any questions.

How to Optimize your WordPress site for Search Engines

Search Engine Optimization (SEO) is a web development practice that not a lot of people understand, but if you are lucky enough to have a blog based on the WordPress Content Management System (CMS), you have numerous options when it comes to optimizing your blog for the search engines. If you are new to web development or running a WordPress blog, have a look at some of your options when it comes to implementing SEO practices to better your flow of organic traffic. In this article, we will show you how to optimize your WordPress site for Search Engines.

1. WordPress Plugins

The great thing about using WordPress for your blogging needs is that you will have access to thousands of free and paid plugins that could lead to better SEO with little effort from yourself. There are hundreds of SEO plugins available, and many of them offer to perform automated SEO so you’ll not have to do much from your end. Many of the plugins will create a sitemap for the search engines spiders to take advantage of, and some plugins will even let you know if your on-page SEO is good enough to get you ranked well for certain keywords.

Currently on our WordPress hosted websites we're using SEO by Yoast Plugin.


2. Start with On-page SEO to Better Your Knowledge

If you are truly interested in practicing SEO yourself without spending a lot of money on a professional or by using WordPress plugins, then it would be wise to start practicing SEO with on-page SEO techniques. The techniques can differ greatly, but if you start by implementing lengthy keywords and add good content to your website, you will be able to see improvements by going into the search engines to see where your keywords are placing you.

If you have a blog related to cars, instead of targeting the keyword “car blog” you could target the keywords “best car blog in the universe” and then play along with that for a while until you start ranking well. You could then target “best car blog” which may be a little more competitive, but as long as you keep varying your choice of keywords, you will greatly see a difference in organic traffic.

3. Hire an SEO Expert

If you are one of those people that still has to ask the question, what is SEO? Then you will find that the best option to get your website or blog ranked well in the search engines is to hire a professional that knows what they are doing. SEO can be expensive business depending on the keywords you want to be ranked well for, and it can also take a long time before you see any benefits from hiring a professional, but it’s certainly the way forward if you have the capital to invest and are serious about making your blog succeed.

When starting out in the world of SEO it’s very hard to know where to start which is why using WordPress plugins to begin with could be your best option until you start understanding how the whole process works. As long as you produce good quality content for your readers naturally, the search engines will reward you with good page rankings for your hard work.

Emporio Blogger Theme - Blogger Grid Layout Template

Emporio Blogger Theme is an ideal blogger template for those who like a list of posts titles instead of long descriptions. If you want a grid layout then this template is a perfect choice. It displays a clean list of posts along with its thumbnail and small post description. It is clean and nicely design to support grid layout. Today in this article, we will tell you about Emporio Blogger Theme – Grid Layout Template.


Responsive Design: Just like Soho Blogger Theme, this theme is also made responsive by Blogger engineers. It works very well on desktops, laptops and mobile devices.

Sticky Header: Just like Soho Blogger Theme and Contempo Blogger Theme this one also has a sticky header that sticks to the top of your screen when you scroll down. For users, It makes it lot easier to navigate between different labels or categories.

5 Layout Skins: Emporio comes with 5 different skins, you can choose from your favorite color scheme and can further customize it as per your likings using customizer.

New Commenting Form: A new stylish and much clean commenting form is been introduced by Google and Blogger.com in this new theme, you can check the demo for more.

Grid Layout: This Blogger theme also offers grid layout, it is the first time that an official blogger template supports grid layout.

A lot more: There are a lot of more features that this theme offers. You can customize this theme using the built-in customize option provided by blogger, and much more.
 

Does Blogger Forum will Provide Support for Emporio Theme?

Since, Emporio is provided developed by engineers at Blogger.com so you’re free to ask questions related to bugs and error reporting about Soho Blogger Theme at Blogger help forum.

Where to Download Emporio Blogger Theme? 

There is no need to download this theme because it is already present in your Blogger dashboard. To install Soho in your blogger blog, go to Theme >> Emporio >> Apply to Blog.
 
 
We hope this quick review about the new Emporio Blogger Theme would help you in deciding whether to use this template or not. Let us know what do you think about this template in the comments down below.

How to Add New Users or Authors in Blogger

The new technique of hiring multiple bloggers has becoming common by each passing day. In the beginning this feature was only present in WordPress but now blogger has also made it possible to avail this facility. Blogger User Management System allows you to add various authors to your blog by just simply sending them requests. Now blogger users can have up to 100 authors for their blog.

Why to Add New Bloggers?

As soon as one hears about having multiple authors in blogger, he wonders what it will bring to his blog. So, here are some productive benefits of adding more authors:
  1.     This will help your newly hired author to have his own profile.
  2.     Authors can manage everything from a single dashboard.
  3.     Authors would get the same benefit as the admin but they won’t have access to the major admin settings. He has rights to write posts.

Although, the owner of the blog will remain default admin and has the authority to run the whole blog however, co-authors can edit their posts but they cannot delete or edit others posts.

How to add a new Author in Blogger


Here is the simple way to add new authors to your blog. All you have to do is to follow these simple steps:

The very first thing you need to do is to sign in to your blogger account and go to Settings >> Basics >> Add Authors.

Now type the email addresses of the people whom you are interests to invite to your blog, each separated by a comma. When you’re done then click Invite authors..


As soon as you send them an invitation they will receive an email. That email will consist of a link that a person must follow to start contributing as a author, a screenshot of the email is attached below:

Changing Permission-

logger provides you with these default user roles:
  1.     Administrator: They have full access to the blog including posting or deleting content, adding or removing members and they also have the authority to transfer ownership.
  2.     Author:They can only create and edit their own post. They  have the authority to remove themselves from blog membership.

Once the author accepts your invitation, he will be able to write for your blog. He can edit his own posts but is unable to edit or delete others’ post.  If you want a certain author to overlook posts written by others you can simply grant him the duties of an admin.

In order to set an admin, go to settings, and then permission sub-tab. below will be the list of authors working for you. Besides the name of the author, there will be a button named ‘Admin’. Click that button and you are done.


If you want to refrain someone to post more content you can simply remove them but it will not affect their previous posts.

So this is how you can add multiple writers to your blog and providing your readers with content diversity matching their taste.

Related Posts Plugin for WordPress, Blogger...

Labels

404 AdBlock Add-on Airtel GPRS Trick Airtel SMS Trick Alexa Amazon Amazon Kindle Amazon Prime Android Android 8 Android Oreo antivirus Apple Apple Mac ASCII Audacity Audio Authotkey Backup Balance Transfer in Vodafone Battery Bing Blogger Blogging Bookmarklet Browser Camera Chromebook clock Cloud colors command lines Computer Computer Tricks configuration Contact Creative Commons Credit Card CSS devolop DIY Doodle DOS Download Dropbox E-Mail eBook Email Email Attachment Embed Encryption English Error Evernote Eyes Facebook Facebook Tricks Feedburner Flipkart Font Foursquare Free Internet Free sms trick in Vodafone G Mail Gadget Game Getty Images GIF Gists Github Google Google AdSense Google Analytics Google Apps Google Chrome Google Contacts Google Currents Google DNS Google Docs Google Drive Google Earth Google Font Google Forms Google Images Google Map Google Photos Google Play Store Google Plus Google Print Google Reader Google Script Google Sheets Google Spreadsheet Google Translate GPRS Setting GPS Hacking Health App HelloFax Hindi Hoodie HTML Icons idea Image Editing Images IMEI Indian Railways Infographics Instagram Internet Internet Explorer Internet Tricks iOS iPad iPhone IRCTC iTunes iTV JavaScript JioCinema JioTV Junglee Kindle Language Translation Laptop Laptop. TV Life Time FREE GPRS Life-Style Link Linkedln Linux logo Make Money Online Microdoft Powerpoint Microdoft Word Microsoft Office Microsoft Outlook Mobile Mosaic Music Name Networking nexus Notepad OCR Online Shopping Open DNS OS Outlook Password PDF Petya Phillips Hue Lights Photogtraphy Pixel Play Station Podcasts Pokemon Pokemon Go Polls Print Productivity Proxy Server Pushbullet QR Code Ransomware Reddit Reliance Hack GPRS Reliance Jio RGB Ringtone Router RSS Safe Mode Samsung Galaxy S Scrabble Screen Capture Screen Sharing Screencast Secrets Security Send free sms from PC SEO Sierra Skype Slideshare SMBv1 SMS Snapchat Snapdeal Social Media Solution Sound Device Speech Recognition Sql Steam Sync Synology NAS Tata Docomo GPRS trick Teleprompter Torrent Trick Tricks TV Twitter UltraISO Unicode Unknown Extension Unlimited 2GB Unlimited 3GB Unlimited GPRS USB USB Security Key Video Editing virtual desktop Virus attack VLC Vodafone 110% working trick for GPRS Vodafone 3g Vodafone GPRS VPN wallpapers WannaCry Web Design Web Domain Website Wget Whatsapp WiFi Wikipedia Windows Windows 10 Windows 10 S Windows KN Windows Tricks windows updates Winows N Wolfarm Alpha WordPress XBox YouTube Zip
Twitter Delicious Facebook Digg Stumbleupon Favorites More