Windows 10 finally added virtual desktops as a built-in feature. If you keep a lot of apps open at once—or use your PC for very different types of tasks—virtual desktops offer a convenient way to stay organized.
With virtual desktops, Windows 10 lets you create multiple, separate desktops that each can display different open windows and apps. A simple use for this might be keeping work separate from personal stuff. You could also put all the items that relate to a specific task on one desktop, so that you can better focus on that task. While macOS and Linux have featured virtual desktops for a while—and there have been third-party apps that provided them for Windows—virtual desktops are now built into Windows 10.
Add a New Virtual Desktop
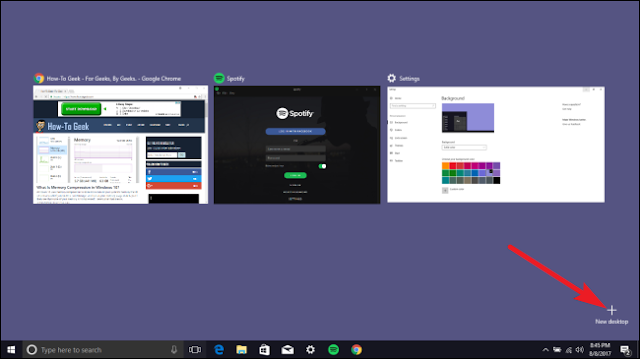
Adding a new virtual desktop is easy. On the taskbar, click the “Task View” button. If you don’t see that button, you might have switched it off. Right-click any open space on the taskbar and choose the “Show task view button” option to turn it back on. You can also open the Task View by hitting Windows+Tab on your keyboard.
The Task View is a full screen app switcher that shows all the apps running on your PC. You can switch to any app by just clicking on it. If you’ve never set up an additional virtual desktop before, that’s all that Task View shows. To add a new desktop, click the “New Desktop” button at the bottom right of the screen.
Windows 10 allows you to create as many desktops as you need. We created 200 desktops on our test system just to see if we could, and Windows had no problem with it. That said, we highly recommend you keep virtual desktops to a minimum. After all, you’re creating them to help organize your activities. Having tons of them kind of defeats that purpose.
Switch Between Virtual Desktops
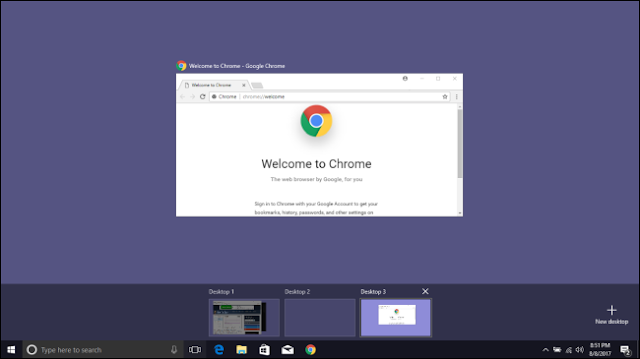
When you have more than one desktop, the Task View shows all your desktops at the bottom of the screen. Hovering over a desktop with your mouse shows you the windows currently open on that desktop.
You can click a desktop to jump there, or click a specific window to jump to that desktop and bring that window into focus. It’s much like switching between apps on a single desktop—you just have them organized into separate virtual workspaces.
You can also switch between virtual desktops just using your keyboard. Press Windows+Tab to bring up Task View and then release the keys. Now, hit Tab again to move the selection to the desktop row. You can then use your arrow keys to move between desktops, and then hit the Enter key to jump to the selected desktop.
Even better, you can switch between virtual desktops without using the Task View at all by just hitting Windows+Ctrl+Left or Right arrow keys. And if you’re using a touch screen device or a precision touchpad, you can move between desktops with a four-fingered swipe.
Work with Windows and Apps on Virtual Desktops
So, now you’ve created a new desktop, and you know how to switch between them. It’s time to populate those desktops with the stuff you need.
First things first: if you switch to a desktop and then open an app or other window there, the window opens—and stays—on that desktop. So, for example, if you switch to “Desktop 3” and open a Chrome window there, that Chrome window remains on Desktop 3 until you close it or move it to another desktop.
This is where things get a little tricky. With apps that let you open multiple windows—like, say, Chrome or Microsoft Word—you can open different windows for those apps on different desktops. Say, for example, you had a desktop devoted to a specific project. You could have Chrome windows, Word docs, and so on open on that desktop, and still have other Chrome windows and Word docs open on other desktops.
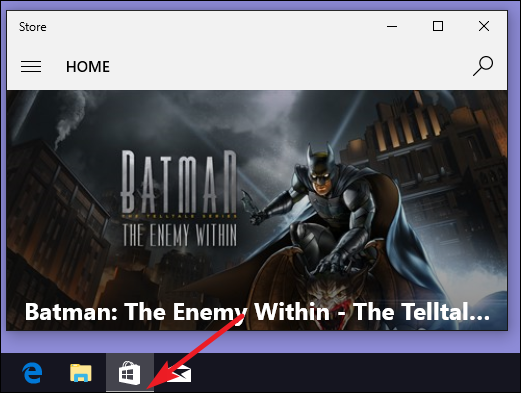
But, some apps only allow you to have a single window open at a time. The Windows Store app is a good example of this. Say you opened the Store app on Desktop 3. If you then try to open the Store app on a different desktop, instead of opening there, you’ll jump to the desktop where that app is open.
And unfortunately, Windows doesn’t give you a good way—other than opening up Task View and poking around—to see if an app is open on another desktop. Back to that example where the Store is open on Desktop 3: if I look at the taskbar on Desktop 3, I can see that the Store app is open (it has a line under the icon).
But look at the taskbar on any other desktop, and it looks like the app isn’t running.
You can also move apps and windows between virtual desktops. Hit Windows+Tab to open Task View. Hover your mouse over the virtual desktop containing the window you want to move. You can now drag that window to another virtual desktop.
If you prefer, you can also right-click a window, point to the “Move To” menu, and then select a specific desktop to which you want to move the window—or even create a new desktop and move the window there in one action. This method is handy if know exactly where you want to move the window.
Delete a Virtual Desktop
To delete a virtual desktop, first hit Windows+Tab to open Task View. Click the “Close” button above the desktop you want to remove.
If there are any open apps or windows on the desktop when you close it, they are moved to the desktop immediately to the left of the one you’re closing. Close Desktop 3, for example, and open apps and windows are moved to Desktop 2.
Treat Virtual Desktop as Temporary Workspaces for the Best Experience
Unfortunately, the built-in virtual desktop feature in Windows 10 is still pretty limited compared to that found in other operating systems. You can’t set different wallpapers for different desktops. You can’t set different color schemes, or apply any other types of personalization. Different desktops cannot have different taskbars, or even different icons on the desktop.
There’s also no way to quickly jump to a specific desktop, either—you have to cycle through them with the keyboard commands or use Task View to navigate.
Virtual desktops are maintained after restarting your PC, but that doesn’t really do you too much good. Even if you have apps and windows set to automatically load with Windows, they’ll just open on your main desktop: Desktop 1. You’ll then have to move them to their respective desktops again after each restart. And that’s the part that takes time. Creating the virtual desktops in the first place is quick and easy.
With that in mind, we’ve found that virtual desktops—at least, as they exist in Windows 10—are best treated as temporary workspaces to help you organize your activities while you’re working on them.


 00:46
00:46
 Unknown


0 comments:
Post a Comment