Tuesday, 30 May 2017

How to Resume Failed Download | Continue failed download in browser

Good evening Friends., Google Chrome is one of the most popular web browser for Windows PC only behind Mozilla Firefox web browser. It is fast, it is easier to use, yet it lacks some basic functionalities like the ability to pause download and resume it. Here is a tutorial on how to resume failed download in Google Chrome browser.

Inability to pause and resume download in Google Chrome must be the most asked feature, but seems like Google development team is yet to give any value to users demand. On the other hand, Mozilla Firefox browser has one of the best downloading manager with pause and resume capability for downloads.

Coming back to Google Chrome, the download manager of Google chrome is not as good as the its competitors, but it also lacks basic functionalities like the ability to pause and resume downloads. Suppose if you accidently close Google Chrome while downloading in progress, by default you will not able to resume that failed download. All you can do is, restart the download from the scratch.


How to Resume Failed Download | Continue failed download in browser


Fortunately, here is a simple work around which allows you to resume failed download in Google Chrome.  To do this you need  Firefox, as we will be using Firefox download manager to resume the failed download in Google Chrome. Follow these steps to know how to do it.

Step of Resume Failed Download in Chrome :-


Step 1: Locate your failed download file in your Google Chrome folder.


Step 2: Press Ctrl + J, click on Open downloads folders.

Step 3: Find your download failed file. It should be with CRDOWNLOAD extension.

Example : faileddownload.CRDOWNLOAD
Step 4: Keep that folder open we will come back there.

Step 5: Now copy the failed download link from download page in Chrome.

How to Resume Failed Download | Continue failed download in browser


Step 6: Now open Firefox and paste the copied download link in the address bar.

Step 7: When the download begins, right click on it and pause the download.

Step 8:  Right click on Paused download and select open containing folder.

Step 9: Find your paused download file, copy name of your file including the extension (.part).

Example : If your file name is pauseddownload.part then copy full pasueddownlaod.part (name only).

Step 10: Now go to the chrome download folder (see step 3).

Step 11: Change or Rename filename failddownlaod.CRDOWNLOAD to
 pauseddownlaod.part.

Step 12: If you see any corrupt message go ahead with it as it is normal whenever you change file name.

Step 13: Once you have renamed the file, copy the renamed file from Google Chrome download folder.

Step 14: Go to your Firefox download folder, delete pausedownload.part and paste your copied file there.

Step 15: Now in Firefox find your paused download, right click on it and select resume.

If you have done everything correctly then your failed download in Google chrome will resume in Firefox now. Wait until the download completes and there you have your file.

This method may not be the easiest way, but currently this is the only method through which you could resume failed download. From next time onwards don’t let Google Chrome to handle your downloads untill it gets download resume feature. 


How to Become a Domain Registrar

Some experts who are following modern technology have called the world of domains a gold rush scenario, but profiting from domain name administration isn't always easy. Some entrepreneurs might get a healthy yield from investing in domain names, but others can find this type of work to be a difficult process. 

One of the key roles in handling domains is the role of a domain registrar. A domain registrar is an entity that is accredited to register domain names and administer providing domain services to the public. Starting up a domain registrar involves some critical steps, and for those who want to understand how to become a domain registrar, it's important to understand the general process and what needs to be involved.

Steps:-

1.) Learn about ICANN accreditation.

The Internet Corporation for Assigned Names and Numbers (ICANN) is an agency that domain registrars must go through. Find out more about this regulating group online to know more about what it takes to become a domain registrar.
  • Read up on ICANN fees. According to industry resources, domain registrars must pay at least $4,000 to ICANN for starting up.
How to Become a Domain Registrar

2.) Find out about other accreditations.
Other accrediting rules often apply to domain registrars.
  • Learn about generic top level domain (gTLD) and country code level domain (ccTLD) registry needs. Domain registrars may also have to go through companies like VeriSign or others in order to get full accreditation.

How to Become a Domain Registrar

3.) Study the domain business.
To get an idea of whether domain registration or some other role is right for you, learn more about domain name handling. You may choose to go in the direction of domain name buying and selling or, Internet real estate, rather than trying to get set up as a domain registrar.
How to Become a Domain Registrar
4.) Learn about other rules for domain registrar contractors.
Other provisions apply to the task of starting up as a domain registrar. Some of these will involve more high costs; others are procedural necessities for this kind of administration.
  • Find out about applicable liability insurance. A domain registrar may need to have business liability insurance for up to a certain amount in order to secure a domain registration business.
  • Find out about stable IP address requirements. A domain registrar will need a set IP address in order to provide domain name services.

How to Become a Domain Registrar

5.) Work toward independent or career domain registrar goals.
  • If your goal is to become a domain registrar business, most of your attention will be toward the above challenges and all of the other regulations that apply to domain name handling.
  • If you choose to become a domain registrar as an employee of a bigger domain name handling company, get familiar with the telecommunications companies that often handle domain name registration. Find contacts through job fairs and other events and get a foot in the door at a domain name handling company.

How to Link Your Website to Your Twitter

People all over the world use Twitter and many other social media websites as a way to advertise their businesses and products. If this is something you do, one of the important things you must do is to connect your website to your Twitter so people who are interested in your product or service can get quick and easy access to your website. You will need a desktop or laptop computer in order to connect your website.

Steps

How to Link Your Website to Your Twitter

1.) Log in to your Twitter account.
  • Keep a note of your username and password so that you will never have to worry about being locked out of your account.
How to Link Your Website to Your Twitter

2.) Click on the small gear symbol on the top-right portion of your screen.
This will be between the “Direct messages” and “Compose a new tweet” options. After you click on the gear, the site will take you to the Settings page.
  • Check on the left side, you will see a clickable list of options.

How to Link Your Website to Your Twitter


3.) Choose the option that says Profile.
After you click Profile, you will see a list of modifiable objects.

How to Link Your Website to Your Twitter
4.) Look for the Website box.
This should be between the “Bio” and Location” boxes on the right side.

How to Link Your Website to Your Twitter
5.) Enter in the Website box the direct link to your website you wish for people to see.

How to Link Your Website to Your Twitter
6.) Scroll toward the bottom and click “Save changes.
” It is CRUCIAL that you click on this box because this confirms that your website will show up on your profile.

How to Link Your Website to Your Twitter
7.) Go back to your profile page and see if your website is listed.  If it is, for sure others can see it as well.

Tips

  • You do not even need to post a business page; you can post your blogs and private information if you want to post it for entertainment purposes.
  • You can only post one website at a time. So if you have more than one page you want people to see, make a website and list all of your websites on that page so your followers can get to all of your pages.


Android Touch Screen Not Working Problem [Fix]

Touchscreen devices are becoming necessity nowadays and they are continuously replacing physical keypads/keyboards on Laptops, Cell-phones, Car-stereo and on many other things.  Android OS ranks #1 and it comprises of  80% of touchscreen devices sold in global market.  

Android Touch Screen Not Working Problem Solution


Android is designed to be user-friendly and versatile operating system for mobile devices, however sometime it tends to be unstable. Many users are reporting issues of touchscreen not working, being unresponsive and so on. Don’t worry, there’s a fix for that!

Android Touch Screen Not Working Problem Fix

Follow the steps mentioned below until your problem is sorted.

1. Restart Your Android Device..

It works 80% of the time. Screen locking/managing applications often make touchscreen unresponsive. In that case you need to restart your Android device.  How can I reboot my tablet, the touchscreen is not working.. Good question!
  • Grab your Android tablet/phone
  • Press and hold the Power Button for 10 seconds or until  the screen goes blank.
  • Wait a minute or two and then power on your device normally using the same button.

2. Eject Memory Card and Sim..

Shutdown your Android device and remove the Memory card and Sim(s) attached to it. Also, remove the battery for few seconds if possible.

3. Remove Any  Cases..

Smart cases are good in protecting your device from scratches and damage. But their automatic screen wake/sleep feature sometime cause the device to malfunction. Remove the case, perform a restart.

4. Hard Reset your Android..

For advanced users. If everything else doesn’t work, try doing a hard reset on your phone. This will wipe your phone/tablet and return it to its original condition.  This usually involves holding down Volume-Up and Volume-Down button together and then pressing Power Button (every phone has different method). It starts your device in Recovery mode, you can do a Wipe-Factory-Reset from there. Use volume up/down buttons to navigate and press Power button to select. Be careful and don’t mess with other options or  you may brick your phone.

5. Knocking the Touchscreen (Not recommended)..

Remove the Screen Protector on your Android device if present.  Now, gently knock every corner of your touchscreen to realign it. Sometimes continuous phone drops cause screen digitizer cable to loses its connection to device motherboard however, its a rare case.

If you are still unable to make touchscreen work maybe its time to claim warranty, Its a lengthy process but works. Also, post comments below to share other tips not mentioned in this article.

Google Play “No Connection – Retry” Problem

There often comes a time when you are tinkering with the latest Android apps and suddenly Google Play market pops up annoying “No Connection, Retry” error message even though your WiFi/3G/LTE connection is working smoothly and all the other internet apps are running fine.

Google Play “No Connection – Retry” Problem


When I first experienced this problem, I had no clue what made all Google Play services including Gmail, Play Movies, Music, Magazines stop working. I tried to use different WiFi connection, VPN’s, changed DNS servers, restarted my Android phone but still no avail. Then finally, after hours of struggle I came up with solution which one would have never thought of..!!

1. Fix Date and Time Settings..


It works 80 percent of the time. Google Play Services sync with their master servers to send and receive data, to do this your device time and date should be correctly set. I used to change time settings to cheat extra lives on Candy Crash Saga and later that turned out to be the main culprit behind connection error issue.

Google Play “No Connection – Retry” Problem

  • Go to Settings > Date & Time
  • Check Automatic date & time
  • Or alternatively, you can set time by yourself, just make sure it is correct.

2. Clear Google Play Store App Cache

Android OS keeps cache of Google Play Store items in order to quickly serve content to users and to save bandwidth at same time. Sometimes it causes issues and could be one of the reasons behind connection error. It is wise to clear cache and restart the Play Store. By doing this, not only it will resolve the issue but it will also serve you recent/fresh apps for download and purchase.

Google Play “No Connection – Retry” Problem

  • Go to Settings > Apps
  • Swipe right to ALL
  • Scroll down and tap Google Play Store
  • Press Clear Data button and tap OK

3. Change DNS Settings of your Phone or Network Router


Sometimes ISP’s DNS servers cannot resolve domains of Google Play services. To fix that, you need switch to Google DNS servers from WiFi settings of your phone. It can also be done through your Internet Router. From your phone change the settings below given below.

Go to Settings > Select WiFi Network (Hold Tap) > Select Modify > Show Advanced Settings.
Then from IP settings drop box, change DHCP to Static and enter the details mentioned in picture below.

    DNS1 should be 8.8.8.8
    DNS2 should be 8.8.4.4

 
Google Play “No Connection – Retry” Problem

4. Change or Re-login your Google Account..

If you previously changed the security settings or password of your Google account. You need to update the account settings on your Android device. Also, you can switch to other account.

Google Play “No Connection – Retry” Problem

  • Go to Settings > Accounts > Google
  • Tap your primary Google account
  • Open options from right top corner, click remove account.
  • Now open Play Store, it will ask you to login your Google account again.


5. Uninstall Updates..

Sometimes Google Play Store updates automatically and makes changes without user permission. If the above mentioned steps don’t help you, use the “uninstall updates” option of Play Store app, it will revert to previous version and may also fix the problem.
  • Go to Google Play App settings (refer to Step #2)
  • Press Uninstall Updates


6. Remove any proxy or VPN software..


  • Go to Wireless & Network, modify your WiFi settings, go to advanced options and remove any proxy servers.
  • Disconnect any VPN connection or apps you have running in background.

 
Google Play “No Connection – Retry” Problem

7. Delete hosts file..

For advanced users only. If you rooted your Android device, do the following.
  • Open File Manager App.
  • Browse to root/system/etc.
  • Delete hosts.txt file


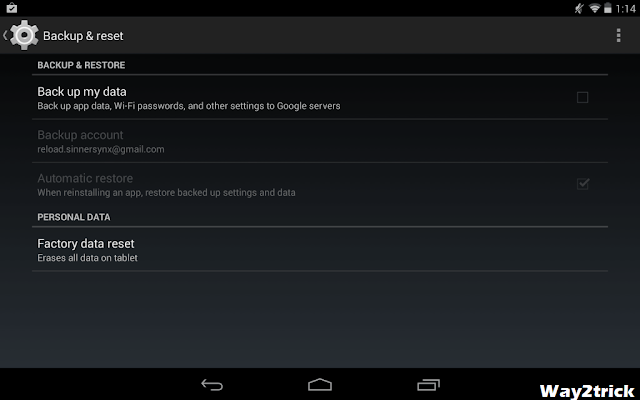
8. Factory Reset your Phone/Tablet..

This comes as a last resort. If anything mentioned above does not work. It’s time to do a full factory reset to your phone. It will clear everything and put your device in its original condition. Make sure you back-up your contacts and files before you perform a reset, else you will lose everything.
Remove any existing proxy or VPN services and connect directly to the internet before accessing Play Store.

Google Play “No Connection – Retry” Problem

  • Go to Settings > Backup & reset
  • Click Factory Data Reset
If the all the solutions don’t help, please contact your ISP if they are blocking Google IP addresses. You may also want to visit the service center of your Android phone/tablet manufacturer. If you have any tips related to this issue, post a comment.

Google Starts Filtering Chrome Extensions

In an attempt to make internet browsing experience faster, Google Chrome team has announced the removal of extensions that are multi-purpose and hinder the functionality of Google Chrome. In simple words, Google has banned all the external toolbars and search externsions that take a portion of UI of the web browser.

Google Starts Filtering Chrome Extensions


Also, there is an incoming update which will prevent the installation of  3rd party extensions, it has caused outrage in users who use privacy protection and script blocking addons.

This step is quiet absurd because on the other hand Google promotes their Toolbar for other web-browsers bundled with Adobe Flash player. It is kind of like Government censorship where they ban whole website because of a single URL. While, its true that not allowing 3rd party addons will speed up Chrome/browsing experience but Google should not dictate users what do they want with their web browser.

Mozilla Firefox, the 3rd most used web browser offers versatility and many options for customization. If things keep going like this, users may find Firefox a better alternative for  Chrome.

Jungle Heat, Clash of Clans Cheats/Hack Tool Warning!

About 5 years ago, when Android was first launched, there were limited number of games available on Google Play (formerly Android Market).  Apple’s iPhone, on the other hand had a great amount of quality games and Android was badly losing the competition. But luckily, things have been changed. Now, Android has the biggest mobile application market so is the number of games. Giant game publishers are porting their existing PC games on mobile and the database is growing daily.

Jungle Heat, Clash of Clans Cheats/Hack Tool Warning!
Android currently has a huge variety of both free and paid games. You can find tons of action, strategy, puzzle and casual games. I recently got myself addicted to a game called Jungle Heat. It is a military themed strategy simulation game in which you build your base, gather resources, build your army and fight your enemies in multiplayer.
It is quite fun and best for killing your idle time. However, this game involves micro-transactions , you need to spend a little money if you want to grow fast or wait days for the upgrade. In my case, I chose to wait because diamonds that allow instant upgrades are very expensive. There are many games like Jungle Heat that offer almost same gameplay with but under different theme.

Games Similar to Jungle Heat:-

  1. Clash of Clans
  2. Battle of Zombies
  3. Samurai Siege
  4. Castle Clash
  5. Viking Wars

One day, when I was playing Jungle Heat, I ran out of resources, I couldn’t upgrade my defense towers or create an army so I did a search on Google for Jungle Heat Cheats or any hack for diamonds to skip/speed up upgrade process. I was surprised to find many websites and videos that were providing Jungle Heat hack/tools for unlimited diamonds etc. and they were all fake.

All the Jungle Heat, Clash of Clans Diamonds/Gems Hacks are fake

When you play Jungle Heat or any other similar game on your device. It requires an internet connection all the time.
Why? Because you can’t fight in multiplayer without internet and secondly, your progress, number of resources and diamond values are constantly synchronized with the Jungle Heat servers. So, if you even manage to modify the values on client side, it wouldn’t work because the value will mismatch with server and you will disconnect from the game server. It may also lead to ID ban.
In other words, just don’t download any hack or cheat tool for Jungle Heat or any similar game, they are most probably viruses and infect both PC and phone.
 I am no way affiliated with game developers, this is just a tip I wanted to share with everyone.

GTA San Andreas Android Version Released

The all-time favorite PC game Grand Theft Auto: 


San Andreas has now arrived on mobile platform. Rockstar Games has partnered with WarDrum Studios to make the game available on Android, iOS, Windows Phone and KindleFire.

GTA San Andreas mobile version has received graphics enhancements to match with 2013 standards.

GTA San Andreas Android Version Released


However, it is not yet confirmed whether its optimized for tablets or not. The GTA SA apk on Google Play will cost you $7 bucks. Before purchasing the app. make sure your device has at least 1 GB of RAM and 2 GB ROM available.


There has been an ongoing trend of porting all the popular PC games on smartphones. Game publishers such as EA, Activision and Sega have released their games on Googe Play and Apple AppStore. But there is big problem, all these ported games are often poorly optimized for  mobile processors and they end up giving poor FPS, constant lagging and draining battery of your device. Not to mention the bad placement of touch d-pad on the screen. Waiting for the day when these problems are addressed.


Anyway, since we have already got GTA SA on mobile, which PC game you would like to see next?

How to Root Motorola Moto G

This device is taken apart for everyone to easily buy in suitable price. Moto g is the phone that gives you your requirement as well as it do not exceed you budget like any other expensive Smartphone.


How to Root Motorola Moto G

"The price range between 200$ makes it perfect gift for this time"


Smart Qualities of Motorola Moto G

With smart screen of 4.05 inch and 1280 X 720 pixel LCD screen display, 16 GB internal storage, to make it very fast it has 1 GB RAM and processor that is 1.2Ghz quad core. 5 MP video capable camera 720p along with a front camera 1.3 MP. It has android 4.3 that is out of the box. And you also can update it with 4.4 kikat, you also can read about kitkate version in my previous article.


Root guide

It is very easy to root Motorola Moto G and that credit goes to the all Motorola software developers that make it easy for us on a single click root method. You just have to install root apps and also need to customize ROM you have installed for a custom recovery. And now we are going to show you that how you will be able to root your Moto G phone.


Precautions

• Before you start rooting your phone you have to void your phones warranty, while on un-rooting will give you your warranty back.
• Your battery storage should be more than 70% or your phone will be affected so make sure it first.


Required File

• Now you have to download root package for Moto G that is easily available on websites but try to download with any authentic or from Motorola website.


Start rooting Moto G phone-

  • First you should download your root package and for easy approach place it on your desktop.
  • Now carefully just extract you root package file and remember do not open it right now.
  • Now you have to start USB debugging on you Moto G by accessing
  • Menu > Setting > Application > development > USB debugging.
  • Now connect you phone with you computer with the help of phone USB cable.
  • Now the thing that you should care about is, the device that you attached with your PC has a name and that name should never be use already with your any other device or drive.
  • Now click on this bat file (PrevailToExistance.bat) that you have placed on your desktop.
  • You will see something on your screen, follow instructions any of them.
  • Your Moto G is rooted now.

Now you are successfully rooted your phone device, and you can enjoy many others things on your phone.

Playing IPTV UDP Streams on Android [Problem]

A while ago I was tinkering with my Galaxy Tab (Android Tablet) trying to transform it into a live television using the apps and IPTV box’s UDP multicast streams provided by my ISP. I did my preparation, configured my IPTV Set top box and my ADSL router to broadcast UDP streams on WiFi. 


Then I downloaded the IPTV m3u8 extension playlist which contains IP addresses/port of UDP streams so I can play it on my devices. The streams worked flawlessly on PC via VLC Media Player, everything was fine, I was able to change channels via playlist.
But when I tried to do same thing on Android, it didn’t go as planned. I was unable to find a good application that can load IPTV m3u/m3u8 playlist and play UDP streams simultaneously like VLC media player did on PC. I searched intensively on Google play market thinking I’d find a good application but no use. I downloaded VLC Media player for Android and tried to run UDP multicast stream by entering its IP (udp://@xxx.xxx.xxx.xxx:1234) and surprisingly it worked but only for once then it never did.
Then I came across this IPTV application. It was able to load IPTV playlist without any problem and provided options to play streams with any media player but same problem occured, the streams don’t run at all, “an error has occured or can’t play video file”. I tried using tons of media players for e.g. VLC, VPlayer, MXPlayer, RealPlayer for Android but no resolution. When I opened the settings of IPTV app, it asked for UDP proxy setup on a computer on Lan or WiFi to perform streaming operations and then I lost hope. So, that’s how I spend 4 hours trying to run IPTV on an Android tablet.

How to extend your Smartphone Battery Life

Realizing the multi-functionalities of the Smartphone which let users to play games, snap photographs, access internet, stream videos and many more; it is no wonder that battery life has been a major concern and one of the most ordinary complaints for the mobile user at all times.

How to extend your Smartphone Battery Life
An unsatisfactory situation mostly faced is the low battery notification whilst one needs to send an important email or a phone call resulting in a trip to walk with an adapter or searching for an outlet to recharge. But, battery life can effectively be managed and extended by combating the prevalent causes of phone’s battery life consumption.

1) Disable Notifications and Fetch Emails..

Smartphones have provided user with great comfort of delivering the whole lot without delay as they occur. Being constantly connected to the internet, we are continually updated by the notification of email, news alerts, the weather, tweets, add-ons for applications etc. This is a great power sucker as every incoming notification will lit the screen or chime or vibrate. Similarly, fetch emails will look for new emails on server in every few minutes, which also gulp the battery juice.

To keep the phone lasting very long in the hands, adjustment of the email fetching intervals and notifications is required. Changing the email notifications to manual can save the battery power. Turning off the superfluous and non-essential notification such as instant game alerts can make a huge difference in the battery drain.


2) Control Shaking Of The Phone By Turning Vibration Mode Off..

Vibration mode is good enough for notifying about incoming calls or messages during meetings, class, hospitals or other places where it’s essential to keep the phone on silent respectively. However, vibration uses additional power the ringtones. This is because the sound produced by ringtones only pulse the speaker membrane whereas shaking the whole phone on vibration mode sucks the battery to its maximum.

Lessen the vibration mode extend battery timings. However, in such places where it doesn’t matter whether to keep phone on vibration or general mode, it is good choice to turn the phone out of vibration mode or trim down the magnitude of the vibrations if the users wants to keep their Smartphone on for long.


3) Easy On Screen Brightness..

The phone battery cannot be used for so long until the brightness have not set to dim.  This factor affects the battery life significantly. Dimming the screens will dramatically diminish the Smartphone’s power consumption since screen is frequently activated whenever the phone is used. The lower the healthier for the phone’s battery. Auto-brightness setting is a favorable choice in order to adjust the brightness to its optimal level for reading while saving the battery life.


4) Cut Down Screen Timeout..

Another significant setting to glance at is the screen timeout. Screen timeout actually decides that after how long the phone’s screen will go to sleep as soon as one ended interacting with it.  Lesser timeframe is better for the battery life.  User should also make a habit to lock the phone after using so that it cannot glow for long.


5) Stop Draining Phone, Turn Off GPS, Bluetooth, Wi-Fi, 3G/4G When Not In Use..

GPS, Bluetooth, WI-FI, are some of the biggest battery murderers on cell phones, because they are continuously hunting for possible connections, networks, or data and power is consumed in such searches for signals.
There is no point to let Wi-Fi, Bluetooth and GPS on when there is no need to be connected. To make a one tap process, many Smartphone users are provides with the service of widgets, which they can add to their home screen for Wi-Fi connectivity. Another practical attempt is to switch the phone on airplane mode, where there is no possibility to connect with any signal.


6) Rest Phone In High Connectivity Zone And Mostly On Wi-Fi Networks..

The power is drained constantly whenever the Smartphone makes an attempt to search signals. If placed in the poor reception area, the phone will continue to scan for signals to attain good connections. This effort makes the battery level drop a notch. Keeping the phone in good reception area will cut down the effort of constantly seeking for a connection and frequent switching from one signal to the other, resulting in maximizing the battery life.
Having Wi-Fi on kills the battery when not in use. But cellular data connection, 3G or 4G is less power- efficient than Wi-Fi networks comparatively.
Therefore, it is a good idea to switch to Wi-Fi instead of data connections when Wi-Fi connections are available. Besides, the Wi-Fi should also be turned off when neither Wi-Fi network is accessible.


7) Kill The Apps..

The concurrent operations of the Smartphone are one of the main causes of rapid battery drainage. Various applications are left open after using, when it is no more needed. As often as possible, the applications should be closed when it is not being used because not doing so will burn a lot of energy and will leave the battery at half-bar very soon. Some applications can be kicked in the phone to manage the applications while conserving the battery.

8) Turning On The Power Saver Mode Can Save The Juice..

Smartphones are equipped with power saver modes which can automatically avoid apps from updating in the background, disables vibrancy, faint the screen and reduces the screen timeout settings. It manages the phone’s power consuming features. Hence, the longer Smartphone’s battery will last if the power saver mode in turned on as soon as possible.

Monday, 29 May 2017

Effects Of Wifi Signals On Health

WiFi basically is the device used to say a high speed network connection over short distance. These devices are sometimes termed as wireless local area network. It is also used for communication between consumer devices such as television, DVD, and cameras also.

Effects Of Wifi Signals On Health

The signals send to the computer through WiFi are electromagnetic radiation and these signals travel through wall and if you have a routers and wireless devices around you like blue-tooth, Air-Port express, net gear or any other wireless device than you are living under a great EMF exposure and working under a great soup of radiation.

> WiFi Hotspot

The access point of WiFi is termed s “hotspot”. You can commonly find these hotspots area in hotel, office, colleges and universities. It is the low power consumption devise use only to sent data transmission. The number of WiFi hotspot increasing day by day in many countries particularly in inner cities so you are unlikely to be far from a WIFI signals.

> Health Risk from WiFi Signals

Many of the hazardous reactions would be occur to the health due to these signals now days as these WiFi signals are more common so they cause more damages to the health. Some of the health risks related to these signals are as follows.


> Intensity of Radiation

The radiation emits from the routers are low gigahertz frequency. The scientist and the doctors or health experts consider this level of radiation potentially dangerous to the health of a person. The radio signals transmit by these WiFi routers are in the same general frequency range as the frequency that microwave used to cook the food.

> Impact On Children Health

These radiations cause a great impact on the health of the children especially under the age of 10. Those children using cell phones are facing health problems more than those who are far from it and sometimes these mutations take decades to show their impact on the health of the children.


> Wifi Signals Cause Insomnia

Sometimes when you put your laptops near you in working condition and went to sleep it cause insomniac this is because your brain is sensitive to electromagnetic radiations that causes interference between brain and signals.


> Safety Precautions

To reduce the effects of these radiations some precautions should be taken to avoid risky conditions of health like limit the use of WiFi avoid unnecessary use of laptops cellular phones etc. try to follow the instructions given with the routes. You can try to use wired router rather than wireless. By taking these small measures you can save yourself from risky conditions of health.

Error loading operating system: Fix for Windows XP, Vista, 7

Get the fix to the “Error loading operating system” boot error in Windows XP, Vista and 7.

“Error loading operating system” error screen on startup.


This error shows when your computer’s BIOS doesn’t support the capacity of the hard disk where you are installing Windows XP or it’s not properly installed.

Issues with your hard disk drive’s partition can also be a major cause.

Alternative error messages.  There are no other known alternative messages for this boot error, except the “Error loading operating system” text that appears on your computer’s black screen at startup.


> Fix: Use Easy Recovery Essentials

Easy Recovery Essentials can fix many errors such as this automatically using its built-in Automated Repair option. EasyRE is currently available for Windows XP, Vista, 7 and 8 and can be downloaded and created on any PC.
  1. Download Easy Recovery Essentials. Make sure to note your Windows version (XP, Vista, 7 or 8) before you download EasyRE. This guide can help you identify what version of Windows you have installed.
  2. Burn the image. Follow these instructions on how to burn the bootable ISO image very carefully, as making a bootable CD can be tricky! Alternatively.
  3. Boot up your PC from the Easy Recovery Essentials CD or USB you created.
  4. Once EasyRE is running, choose the “Automated Repair” option and click Continue.


5. After EasyRE scans your computer’s drives,  identify and select the drive letter for your Windows installation from the list, and then click on the Automated Repair button to begin.


6. Easy Recovery Essentials will start analyzing the selected drive for problems. EasyRE will test for and attempt to automatically correct errors with the disk, partition, bootsector, filesystem, bootloader, and registry. No intervention is required, as EasyRE’s repair is fully automated:


7. Once the process is complete, EasyRE will report its findings. Click on the Restart button to reboot your PC and test the changes.
8. The “Error loading operating system” error should now be fixed as your PC begins to load:


You can download Easy Recovery Essentials from here.

> Fix Error loading operating system in Windows XP

You can fix this error without a Windows XP installation disc as you don’t need to boot into its Recovery Console.


Fix #1: Check your hard drive status in BIOS menu

Your computer may not see the hard drive correctly and can’t boot into XP. You can check its status in BIOS (or CMOS Setup), but the step to access it depends on your computer’s manufacturer.

Press one of these keys to enter BIOS/CMOS:  "DEL" or "F1" or "F2" or "ESC".

Fix #2: Recreate the partitions

If your hard disk is setup correctly, you can recreate the partitions by installing Windows XP again.

The “Error loading operating system” error is more likely to appear if your partitions were also changed by another system before installing XP, e.g. a Linux distribution.
When you reinstall Windows XP,  make sure you delete all partitions and create the partitions you need to install XP.

Fix #3: Update the BIOS

If none of the above fixes works for you, you can try and update your computer’s BIOS. When starting up your computer check the messages at boot to determine your motherboard’s manufacturer.

Press "Pause" key at boot to pause the loading messages.
You can also check the BIOS version when accessing BIOS Menu/CMOS Setup. Go to Fix #1 above for the available keys to access it.


> Fix Error loading operating system in Windows Vista

=> Windows Setup CD/DVD Required!

"Some of the solutions below require the use of the Microsoft Windows setup CD or DVD. If your PC did not come with a Windows installation disc or if you no longer have your Windows setup media, you can use Easy Recovery Essentials for Windows instead. EasyRE will automatically find and fix many problems, and can also be used to solve this problem with the directions below."

You can also try the solutions from Windows 7.

Fix #1: Run System Restore from the disc

This solution works if you have System Restore enabled on your Windows Vista.
The steps for restoring your PC with System Restore:
  1. Insert the Windows Vista install disc
  2. Restart your computer and boot from the install disc
  3. Press a key when “Press any key to boot from CD or DVD” message appears on your screen
  4. Click on Repair your computer after selecting a language, time and keyboard method
  5. Select the drive where you installed Windows (usually C:\)
  6. ClickNext
  7. Select System Restore from the System Recovery Options window
  8. Follow the System Restore instructions to select a restore point
  9. Restore your PC by clicking Finish


Fix #2: Use Startup Repair

  1. Insert your Windows Vista install disc
  2. Restart your computer and boot from the CD
  3. Press any key when you see “Press any key to boot from CD or DVD”
  4. Click Repair your computer after selecting your language, time and keyboard method
  5. Select the drive of your Windows installation and click Next. The standard drive is usually C:\.
  6. Select Startup Repair and wait for the process to finish.

> Fix Error loading operating system in Windows 7

=> Windows Setup CD/DVD Required!

"Some of the solutions below require the use of the Microsoft Windows setup CD or DVD. If your PC did not come with a Windows installation disc or if you no longer have your Windows setup media, you can use Easy Recovery Essentials for Windows instead. EasyRE will automatically find and fix many problems, and can also be used to solve this problem with the directions below."

Fix #1: Use bootrec.exe and rebuild the BCD

bootrec.exe is a tool built in the Windows Recovery Environment (Windows RE) that you can use to troubleshoot and repair the error. The steps for accessing bootrec.exe to rebuild the master boot sector:
  1. Insert your Windows 7 install disc
  2. Restart your computer and boot from the CD
  3. Press any key at the “Press any key to boot from CD or DVD” message
  4. Choose Repair your computer after you select the language, time and keyboard method
  5. Select your Windows installation drive (usually C:\)
  6. Click Next
  7. Select Command Prompt from System Recovery Options
  8. Type the following command and press Enter:
    bootrec /FixMbr
    
    bootrec /FixBoot
    
    bootrec /ScanOs
    
    bootrec /rebuildBcd

Related Posts Plugin for WordPress, Blogger...

Labels

404 AdBlock Add-on Airtel GPRS Trick Airtel SMS Trick Alexa Amazon Amazon Kindle Amazon Prime Android Android 8 Android Oreo antivirus Apple Apple Mac ASCII Audacity Audio Authotkey Backup Balance Transfer in Vodafone Battery Bing Blogger Blogging Bookmarklet Browser Camera Chromebook clock Cloud colors command lines Computer Computer Tricks configuration Contact Creative Commons Credit Card CSS devolop DIY Doodle DOS Download Dropbox E-Mail eBook Email Email Attachment Embed Encryption English Error Evernote Eyes Facebook Facebook Tricks Feedburner Flipkart Font Foursquare Free Internet Free sms trick in Vodafone G Mail Gadget Game Getty Images GIF Gists Github Google Google AdSense Google Analytics Google Apps Google Chrome Google Contacts Google Currents Google DNS Google Docs Google Drive Google Earth Google Font Google Forms Google Images Google Map Google Photos Google Play Store Google Plus Google Print Google Reader Google Script Google Sheets Google Spreadsheet Google Translate GPRS Setting GPS Hacking Health App HelloFax Hindi Hoodie HTML Icons idea Image Editing Images IMEI Indian Railways Infographics Instagram Internet Internet Explorer Internet Tricks iOS iPad iPhone IRCTC iTunes iTV JavaScript JioCinema JioTV Junglee Kindle Language Translation Laptop Laptop. TV Life Time FREE GPRS Life-Style Link Linkedln Linux logo Make Money Online Microdoft Powerpoint Microdoft Word Microsoft Office Microsoft Outlook Mobile Mosaic Music Name Networking nexus Notepad OCR Online Shopping Open DNS OS Outlook Password PDF Petya Phillips Hue Lights Photogtraphy Pixel Play Station Podcasts Pokemon Pokemon Go Polls Print Productivity Proxy Server Pushbullet QR Code Ransomware Reddit Reliance Hack GPRS Reliance Jio RGB Ringtone Router RSS Safe Mode Samsung Galaxy S Scrabble Screen Capture Screen Sharing Screencast Secrets Security Send free sms from PC SEO Sierra Skype Slideshare SMBv1 SMS Snapchat Snapdeal Social Media Solution Sound Device Speech Recognition Sql Steam Sync Synology NAS Tata Docomo GPRS trick Teleprompter Torrent Trick Tricks TV Twitter UltraISO Unicode Unknown Extension Unlimited 2GB Unlimited 3GB Unlimited GPRS USB USB Security Key Video Editing virtual desktop Virus attack VLC Vodafone 110% working trick for GPRS Vodafone 3g Vodafone GPRS VPN wallpapers WannaCry Web Design Web Domain Website Wget Whatsapp WiFi Wikipedia Windows Windows 10 Windows 10 S Windows KN Windows Tricks windows updates Winows N Wolfarm Alpha WordPress XBox YouTube Zip
Twitter Delicious Facebook Digg Stumbleupon Favorites More