As a fairly versatile operating system, Windows has always had ways of browsing and viewing photos. But with Windows 10, Microsoft decided to try and mash browsing, organizing, and viewing all together in one application, with some basic editing to boot. The result, the innocuously-titles “Photos” app, can be less than intuitive.
Here are all the different things you can do with the Photos app… assuming you want to.
Starting Photos and Setting Defaults
Starting up the Photos app is pretty simple: for most new machines and fresh installations of Windows 10, it’s already in the Start menu as a big tile. Even if it’s not, just press “Start” and then begin typing “photos” to bring it up quickly via search.
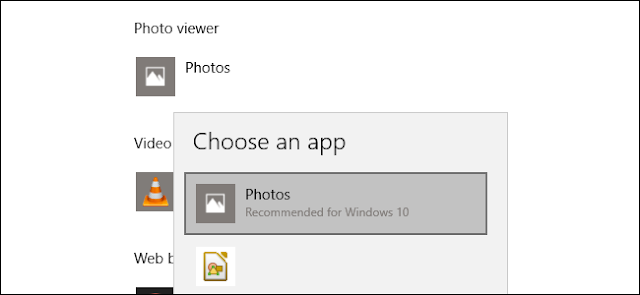
The Photos app is already set up as the default image viewer in Windows 10. If something else has taken over those duties, it’s easy to reset the status quo: press the “Start” button, type “default,” then click the first search result, “Default app settings.” Under “Photo viewer,” click the “Photos” icon.
Browsing Photos
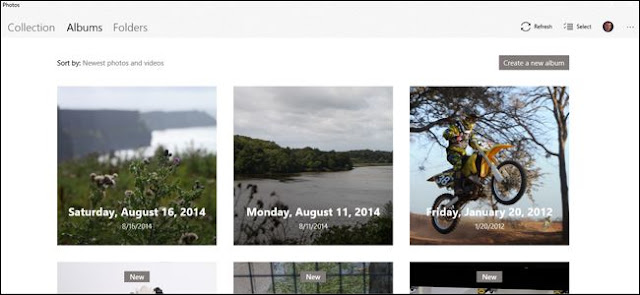
The Photos app offers three different interfaces when looking for photos: Collection, Album, and Folders. You can choose any of the three at any time by clicking the relevant tab, above the main interface and below the “Photos” application label.
“Collection” is a view of your most recent photos and screenshots, displayed in reverse order by date. “Albums” is a series of automatically-created photo albums, organized according to the Photo app’s internal logic, though you can add your own and remove or add photos to existing albums.
And “Folders” is merely a tab for all of the photos on your machine in specific folders—your OneDrive photo folder and your assigned “Pictures” folder in Windows, by default. To add folders to this view, click “Choose where to look” to go to the Photos Settings page, then click “Add a folder” to manually select one in Windows Explorer.
Within the main viewer of “Collection,” and in the nested album or photo viewers of the other tabs, a series of controls appear on the upper-right portion of the interface. These allow you to select multiple items for a specific action like copying, printing, or adding to a specific album, or to start a slideshow, refresh the current file view, or import from a camera or mobile device. Contextual items in the Album view allow you to edit the name of the album or change the cover photo.
To navigate backwards through the Photos interface, click the left-pointing arrow in very top upper-left of the window, or press the Esc or Backspace keys at any time.
Using the Photo Viewer Interface
When you finally get down to an individual photo, the interface goes completely black and dedicates the maximum length or width of the window. If you’re using mouse navigation, scrolling up or down will advance or retreat in the current collection, album, or folder. Hold down the “Ctrl” button on your keyboard to turn the mouse wheel into zoom or retract controls.
On the bottom of the interface, manual arrow controls to go forward or back in the album are on either side of an “add to album” button and a Delete button. You can use the keyboard for both actions: Ctrl+D to add it to a specific album via a pop-up menu, or simply press the Delete button. If you press “Delete” again, the image will be removed both from the album/collection/folder in the Photos app, and the file itself will be deleted in Windows Explorer and sent to the Recycling Bin. Tread carefully.
The top controls are labelled, and fairly self-explanatory. The “Share” button will open Windows 10’s share menu, allowing the user to send the file via email, copy it via Windows’ standard copy and paste function, or open and share it directly in any compatible Windows Store app. Zoom opens a manual slider to zoom in and out—remember that you can do this much faster by holding the Ctrl button and using the mouse wheel. “Slideshow” will begin a full-screen slideshow of the current album, collection, or folder.
The “Draw” command allows you to write on the image, with a selection of pen and eraser tools that appear contextually. It’s mainly intended for pen-enabled devices like the Microsoft Surface. You can double-click on any of the tools in the upper bar to select color and width. Note that the drawings can be erased with the Eraser tool, but after you click “save” (the floppy disk icon) and see the “Letting your Ink Dry,” the original file for this photo is saved over. Don’t click “save” on a photo unless you have it backed up somewhere, or you’re willing to lose the original.
“Edit” opens the photo editor, which we’ll cover in the next section. “Rotate” will rotate the image clockwise; if you hit it by accident, just click it again three more times to return the photo to its original orientation. At any time you can right-click on the image itself to open up most of these items in a menu.
Using the Built-In Photo Editor
The editor in Photos isn’t exactly incredible, but it can handle some light cropping and adjusting if nothing else is available. On the main interface, using the + and – buttons will zoom in and out, which can also be done with the mouse wheel (no Ctrl button necessary). Click and drag any part of the image to move it around, or click the “Actual size” button (the box with corners in the lower-right) to see the whole photo maximized horizontally or vertically.
The Crop and Rotate Tool
The “Crop and rotate” button is the most prominent tool, as it’s visible at all times. Click it to open a dedicated cropping UI. You can click and drag the circles on the corner to manually select a cropping box, or click the “Aspect ratio” button to choose a standard size. This is quite useful if you want your image to be viewed on semi-standardized devices, like a smartphone or TV (16:9), iPad (4:3), or a corporate projector (usually 4:3 as well). The “Flip” button will flip the image horizontally, but not vertically, and the “Rotate” button will spin it clockwise by 90 degrees. To get a non-square rotation, click the circle beside the right-hand menu and slide it up or down. When you’re finished, click “Done” to return to the full Edit interface.
The Enhance Tab
Right below the Crop button are two tabs, “Enhance” and “Adjust.” Let’s look at Enhance first. The “Enhance your photo” tool is an all-in-one slider: click and drag the slider from left to right to apply automatically-selected filters to “enhance” the image, according to the Photo app. You can stop it at any point along the axis. Generally this tool brightens up an image, smooths out shadows and highlights, makes a more ideal contrast, and just generally makes things look clearer.
The rest of the “filters” on the Enhance tab work the same way: click one of the filters, then click the slider beneath “Enhance your photo” to apply the effect, with a left-to-right strength of 0 to 100. You can apply multiple effects by clicking on a new one and then adjusting the slider—rinse and repeat. When you’re done, click the “Adjust” tab.
The Adjust Tab
The controls for this page are fairly similar, but you can adjust multiple factor at once. The “Light” sliders adjust the contrast, exposure, highlights, and shadows of the image, with the master “Light” slider being a combination of all four. The “Color” slider handles saturation, with 0 reducing the image to greyscale and 100 making it overly vibrant. More fine controls can be applied with the Tint and Warmth sliders.
The separate “Clarity” slider will outline specific edges with darkened shadows or blend them into the background, and the “Vignette” slider will add a white (left) or black (right) vignette effect to the photo.
Finally, the Red Eye tool will let you click on a subject’s eyes to remove the red glare from a camera flash, and the “Spot Fix” tool will let you click and drag around a specific area to obscure fine details. It’s good removing acne and other blemishes.
Saving Your Edits
When you’ve edited your image to your liking, you have two options: “Save” will overwrite the original image file (not recommended), or “Save a copy” will let you save the edited version to a folder in Windows Explorer. The second is obviously better, unless you’re absolutely sure you don’t want the original. At any time during editing, you can click “Undo all” to return to the original image and start over.
It’s no Photoshop, but it’ll get a simple crop or adjustment done in a pinch.


 10:01
10:01
 Unknown


0 comments:
Post a Comment